Stand Mixer or Electric Mixer: Essential for creaming butter and sugar, beating eggs, and making smooth frosting.
Large Mixing Bowls: Perfect for combining dry and wet ingredients, one medium and one large size.
Cake Pans: Three 9-inch round cake pans are crucial for creating layers.
Whisk: Helps blend dry ingredients smoothly and evenly.
Spatula: Great for gently folding pineapple and coconut into batter.
Wire Cooling Rack: Allows cakes to cool evenly without getting soggy.
Toothpicks: Helps check cake doneness by testing center.
Serving Plate: Needed for assembling and presenting the final cake.
Steps To Bake Pineapple Coconut Dream Cake
Fire Up the Oven
Crank the oven to a toasty 350F. Give your cake pans a quick massage of grease and flour to prevent any sticky situations.
Whip Together the Base
Grab a mixing bowl and dance your whisk through the flour, baking powder, and salt. Set this powder party aside for later.
Cream Your Fat and Sweet
Unleash your mixer and beat butter and sugar until they transform into a cloud-like wonder. Drop in eggs one by one, letting each get cozy before the next arrives. Splash in vanilla for that extra magic.
Marry Your Mixtures
Slowly waltz the flour mixture and coconut milk into your buttery base. Alternate between the two, making sure everything blends smoothly without overmixing.
Add Tropical Treasures
Gently fold in crushed pineapple and shredded coconut. Imagine you’re tucking these delicious bits into a fluffy blanket.
Bake to Perfection
Pour batter into prepared pans and slide into the oven. Bake for 25-30 minutes until a toothpick comes out clean. Let cakes cool down for 10 minutes, then free them onto a wire rack.
Craft the Frosting
Whip cream cheese and butter until silky. Gradually blend in powdered sugar and vanilla. If needed, splash a bit of coconut milk to reach spreadable nirvana.
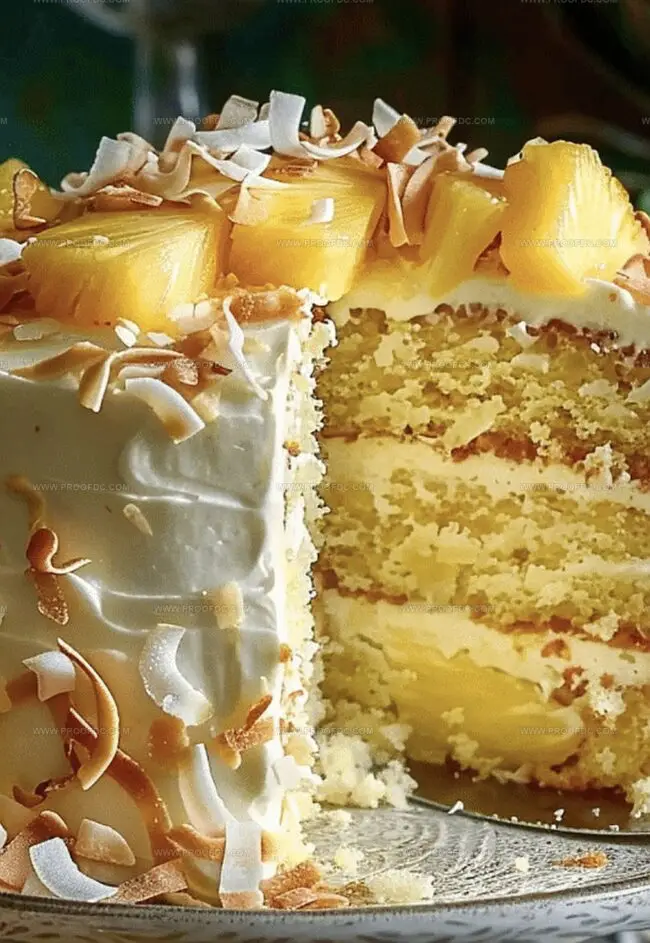
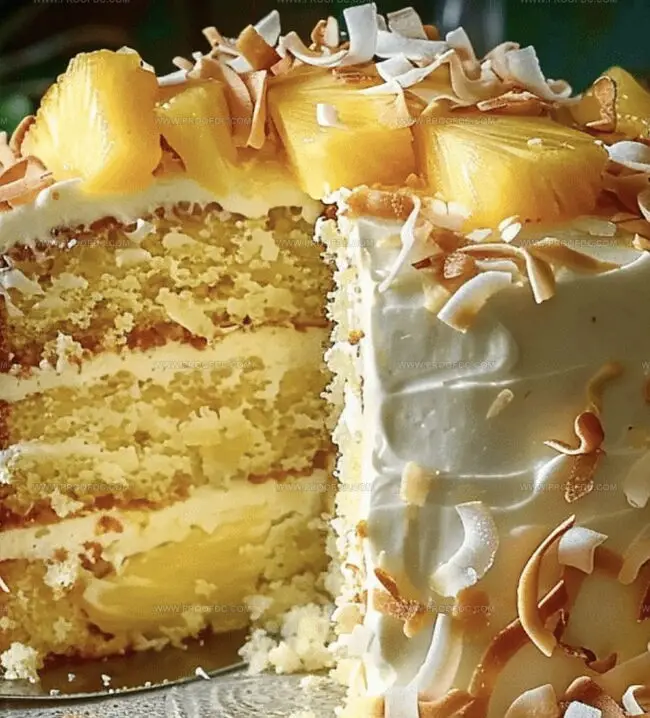
Build Your Masterpiece
Stack cake layers with frosting between each. Cover the entire cake in a dreamy cream cheese blanket.
Final Flourish
Sprinkle toasted coconut and arrange pineapple chunks for a show-stopping finale.
Cake Tips For Pineapple Coconut Dream Cake
Baker’s Pro Tricks: Learn how to nail this tropical cake masterpiece!
Moisture Magic: Drain crushed pineapple completely to prevent soggy cake layers, using a fine-mesh strainer or cheesecloth to remove excess liquid.
Room Temperature Harmony: Let eggs, butter, and cream cheese sit at room temperature for 30-45 minutes before mixing, ensuring smoother, more consistent batter and frosting.
Make-Ahead Marvel: Prepare cake layers a day ahead and store wrapped in plastic at room temperature, which actually enhances flavor and moisture.
Gluten-Free Transformation: Swap all-purpose flour with a gluten-free blend, adding 1/2 teaspoon xanthan gum for better texture and structure.
Ways To Serve Pineapple Coconut Dream Cake
Tropical Picnic Paradise: Pack slices in a beautiful container with wax paper between layers for a perfect outdoor dessert adventure.
Beach Party Centerpiece: Decorate cake with fresh pineapple wedges, edible flowers, and additional toasted coconut to create a stunning tropical display.
Coffee Companion Delight: Serve chilled cake slices alongside a rich espresso or coconut-infused coffee for a complementary flavor experience.
Brunch Showstopper: Pair cake with fresh fruit salad and a mimosa for an elegant weekend morning celebration that will impress your guests.
Plan And Store Pineapple Coconut Dream Cake Properly
Fridge Freshness: Store the cake in an airtight container in the refrigerator for up to 5 days. Cover loosely with plastic wrap to maintain moisture and prevent flavor absorption from other foods.
Slice and Freeze Strategy: Cut individual cake slices, wrap each tightly in plastic wrap, then place in a freezer-safe container. Frozen slices stay delicious for 2-3 months. Thaw overnight in the refrigerator before enjoying.
Room Temperature Magic: If serving within 1-2 days, keep the cake covered at room temperature. Use a cake dome or large container to protect from dust and maintain softness.
Make-Ahead Masterplan: Bake cake layers up to 2 days in advance. Cool completely, wrap in plastic wrap, and refrigerate. Frost just before serving to ensure peak taste and texture.
Recipe Testing and Troubleshooting; Time-Saving Kitchen Hacks; Global Flavor Exploration; Engaging Food Writing and Honest Reviews.
Education
Institute of Culinary Education (ICE), New York, NY
Program: Diploma in Culinary Arts
Focus: Hands-on training in foundational techniques, flavor development, recipe creation, and kitchen efficiency, with an emphasis on real-world application and storytelling through food.
Marcus Foley, based in Atlanta, GA, is a friendly food expert who makes cooking fun and simple.
With hands-on training from the Institute of Culinary Education and years of tasting everything from street food to fine dining, he shares easy kitchen hacks, global flavor ideas, and step-by-step recipes that turn kitchen mishaps into delicious surprises.

Marcus Foley
Food Critic & Kitchen Coach
Expertise
Recipe Testing and Troubleshooting; Time-Saving Kitchen Hacks; Global Flavor Exploration; Engaging Food Writing and Honest Reviews.
Education
Institute of Culinary Education (ICE), New York, NY
Marcus Foley, based in Atlanta, GA, is a friendly food expert who makes cooking fun and simple.
With hands-on training from the Institute of Culinary Education and years of tasting everything from street food to fine dining, he shares easy kitchen hacks, global flavor ideas, and step-by-step recipes that turn kitchen mishaps into delicious surprises.