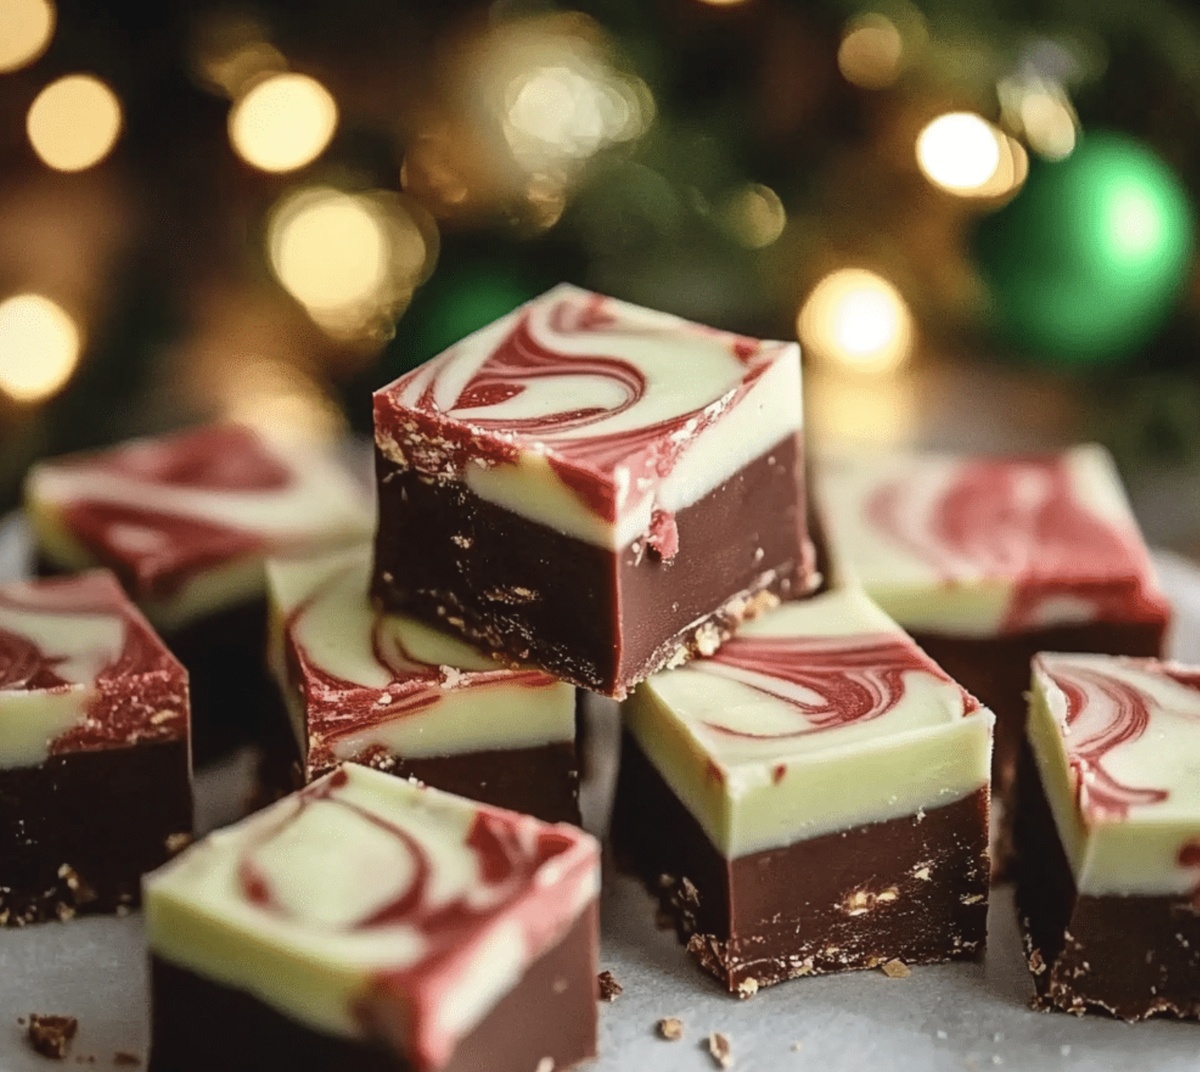
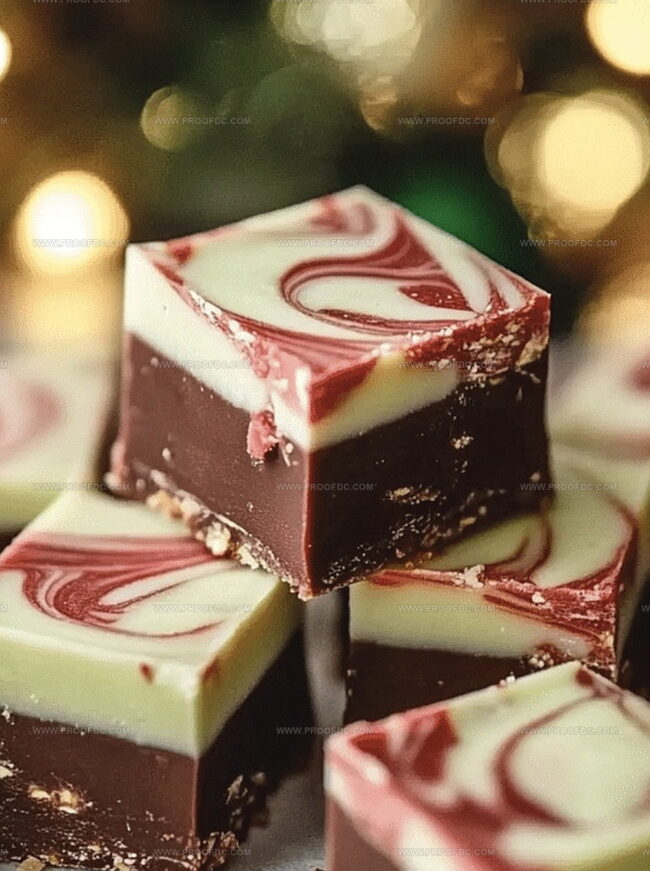
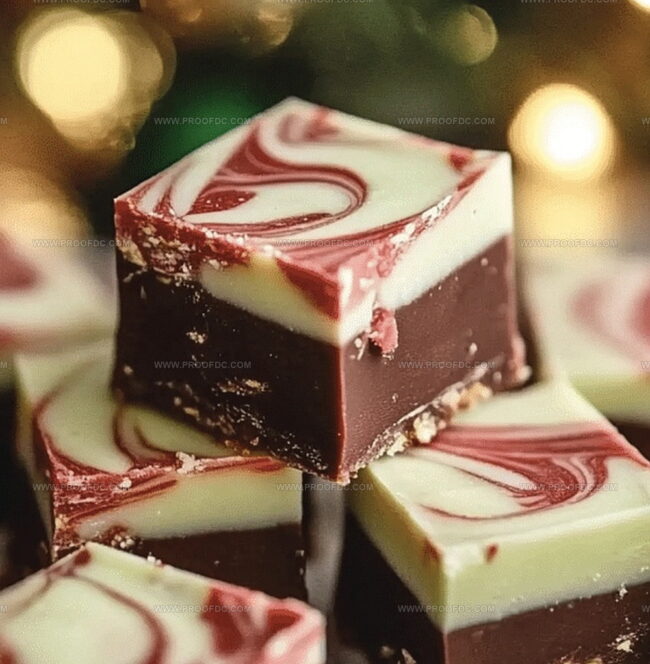
Unwrap the Magic: A Jolly Christmas Fudge Recipe
Sweet memories of childhood winters sparkle through this classic Christmas fudge recipe that melts hearts instantly.
Festive kitchens buzz with excitement when chocolate and marshmallow combine into silky perfection.
Generations have shared this delectable treat during holiday gatherings.
Creamy textures and rich flavors dance across your palate with each decadent bite.
Warm aromas will fill your home, creating magical moments of connection.
Relatives and friends gather around, anticipating the first delicious slice.
the smiles and laughter as you unveil this irresistible dessert that promises pure delight.
Why The Joy Of Christmas Fudge Feels So Festive
What Goes Into The Joy Of Christmas Fudge
Fudge Base Ingredients:Mix-In Ingredients:Topping Ingredients:Steps To Make The Joy Of Christmas Fudge At Home
Step 1: Create Delicious Fudge Base
Heat a medium saucepan over low flame. Add:Stir ingredients constantly until they transform into a silky smooth mixture. Remove from heat and splash in vanilla extract for an extra flavor punch. The mixture should look glossy and inviting.
Step 2: Personalize Your Fudge Masterpiece
Pour the fudge mixture into a lined 8×8-inch baking pan. Smooth the surface with a spatula until it looks perfectly even. For extra excitement, consider mixing in some fun additions:Gently press your chosen mix-ins into the fudge so they peek through the surface.
Step 3: Decorate With Festive Flair
Sprinkle delightful toppings across the fudge:Press toppings lightly so they stick to the fudge surface.
Step 4: Chill and Transform
Place the pan in the refrigerator. Let the fudge set for about two hours until it becomes firm and solid. The waiting is the hardest part!
Step 5: Slice and Serve
Remove the fudge from the refrigerator. Lift it out using parchment paper edges. Slice into bite-sized squares using a sharp knife. Arrange on a beautiful holiday platter or package in festive wrapping for delightful gifts.
Helpful Hints For The Joy Of Christmas Fudge
How To Store The Joy Of Christmas Fudge The Right Way
What Goes Well With The Joy Of Christmas Fudge
Fun Flavors For The Joy Of Christmas Fudge
All Your Joy Of Christmas Fudge FAQs
This fudge captures the holiday spirit with classic flavors and festive toppings like peppermint candies, creating a delightful treat that’s perfect for celebrations or gifting.
Absolutely! This recipe is beginner-friendly and requires minimal cooking skills. With just a few simple steps, you can create a delicious chocolate fudge that looks and tastes professional.
Use low heat and stir constantly when melting ingredients. Make sure to use fresh, high-quality chocolate chips and sweetened condensed milk to ensure a smooth, creamy texture.
Not at all! Toppings like crushed peppermint or sprinkles add a festive touch and extra flavor. However, you can customize or omit them based on your preference.
Print
The Joy Of Christmas Fudge Recipe
- Total Time: 2 hours 10 minutes
- Yield: 12 1x
Description
Festive Christmas Fudge melts hearts with its rich chocolate essence and classic holiday spirit. Creamy texture and sweet memories blend perfectly, inviting you to savor this delightful seasonal treat that connects family and tradition.
Ingredients
Main Ingredients:
- 3 cups (525 g) semi-sweet chocolate chips
- 1 can (14 ounces/397 g) sweetened condensed milk
- ¼ cup (60 g) unsalted butter, cut into pieces
Flavor Enhancers:
- 1 teaspoon vanilla extract
- ½ cup crushed peppermint candies or candy canes
- ½ cup chopped nuts (walnuts, pecans, or almonds)
Decorative Toppings:
- ¼ cup red and green sprinkles
- Mini marshmallows
Instructions
- Prepare the fudge foundation by lining a rectangular baking vessel with parchment paper, ensuring edges extend slightly beyond the pan for effortless extraction. Softly coat the paper with a thin layer of cooking spray.
- Combine chocolate chips, sweetened condensed milk, and butter in a medium saucepan. Gently melt the ingredients over low heat, continuously stirring until the mixture transforms into a silky, uniform texture. Remove from thermal source.
- Infuse the melted chocolate mixture with vanilla extract, stirring thoroughly to distribute the aromatic essence throughout the fudge base.
- Optional enhancement: Gently fold chopped nuts or miniature marshmallows into the molten chocolate mixture, creating delightful textural surprises.
- Transfer the luxurious fudge mixture into the prepared pan, using a flexible spatula to create an even, smooth surface that fills every corner.
- Embellish the fudge’s surface with crushed peppermint candies, festive sprinkles, or selected decorative elements. Delicately press the toppings to ensure they adhere to the chocolatey canvas.
- Refrigerate the fudge for a minimum of two hours, allowing it to solidify into a firm, decadent treat that holds its shape perfectly.
- Carefully lift the set fudge from the pan using the parchment paper overhang. Slice into precise, bite-sized squares using a sharp culinary knife.
- Present the fudge pieces on an elegant serving platter or wrap individually in decorative packaging for a charming holiday gift.
Notes
- Precision matters when melting chocolate, so use low heat and stir constantly to prevent burning or seizing.
- Select high-quality chocolate chips for a smoother, richer fudge texture that melts beautifully.
- Customize the recipe by swapping chocolate types – dark, milk, or white chocolate work wonderfully for different flavor profiles.
- Keep fudge refrigerated in an airtight container for up to two weeks, separating layers with parchment paper to prevent sticking.
- Prep Time: 10 minutes
- Cook Time: 2 hours
- Category: Desserts, Snacks
- Method: Mixing
- Cuisine: American
Nutrition
- Serving Size: 12
- Calories: 200
- Sugar: 22 g
- Sodium: 30 mg
- Fat: 10 g
- Saturated Fat: 6 g
- Unsaturated Fat: 4 g
- Trans Fat: 0 g
- Carbohydrates: 25 g
- Fiber: 1 g
- Protein: 2 g
- Cholesterol: 15 mg
Jenna Stewart
Head Chef & Recipe Innovator
Expertise
Farm-to-Table Cooking; Seasonal Menu Development; Visual Plating Techniques; Flavor Layering and Simple Prep Hacks.
Education
The Culinary Institute of America, Hyde Park, NY
Jenna Stewart is the inventive spirit behind many of our standout dishes at Pro of Delicious Creations. A proud graduate of The Culinary Institute of America, she built her skills mastering both classic recipes and fresh, modern twists.
Now, Jenna celebrates the beauty of seasonal, local ingredients, often sourced from her garden and nearby markets, to create recipes that are bursting with flavor yet easy to follow. When she’s not experimenting in the kitchen, Jenna loves exploring nature on hikes and discovering new treasures at local co-ops.