
Irresistible Red Velvet Thumbprint Cookies with Cream Cheese Recipe
A red velvet thumbprint cookie that melts effortlessly on your tongue, bringing pure delight with each bite.
Sweet and velvety textures dance together in this irresistible treat that promises pure indulgence.
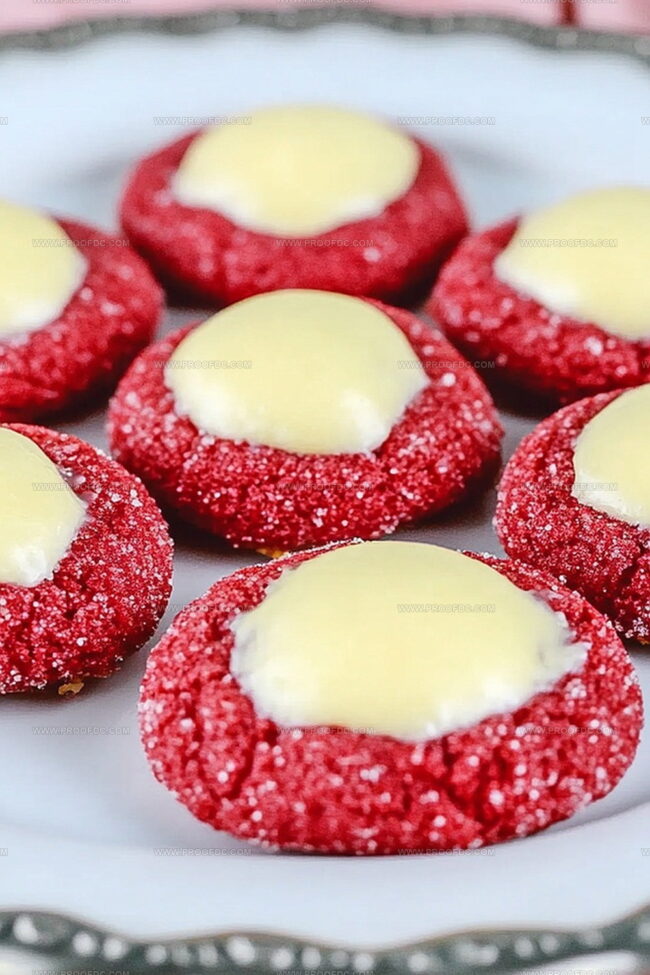
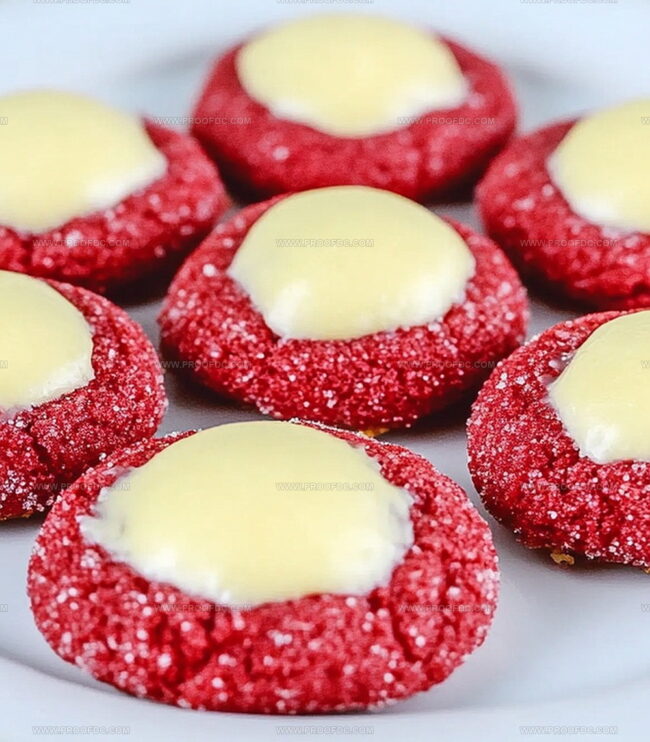
Soft crimson cookies with a luscious cream cheese center will make anyone swoon at first glance.
These little delights combine rich chocolate undertones with a tangy cream cheese filling that creates magic in every mouthful.
Serving these stunning cookies at your next gathering, watching eyes light up with excitement.
The combination of deep red hues and creamy centers makes these thumbprint cookies a showstopper for any dessert spread.
You’ll want to clear your schedule and head straight to the kitchen to whip up this decadent recipe right now.
Why You’ll Love Red Velvet Thumbprint Cookies with Cream Cheese
Red Velvet Thumbprint Cookies with Cream Cheese Ingredients
Cream Cheese Filling:Note: Full-fat cream cheese works best for a rich, smooth filling. Philadelphia brand is a reliable choice for consistent results.
The list captures all ingredients mentioned in the instructions with their purpose and helpful notes, organized into a single category focused on the cream cheese filling.
How to Make Red Velvet Thumbprint Cookies with Cream Cheese
Step 1: Prepare Cream Cheese Filling
Beat ingredients in a small bowl until smooth and creamy. Transfer the mixture to a piping bag or a resealable plastic bag with a small corner snipped off. Chill in the refrigerator while preparing the cookie dough.
Step 2: Create Cookie Dough
Whisk together flour, cocoa powder, baking powder, and salt in a medium bowl. In a separate large bowl, cream butter and sugar until light and fluffy. Add egg, red food coloring, and vanilla extract, mixing until well combined. Gradually blend in the dry ingredients until a smooth dough forms.
Step 3: Shape Cookie Bases
Scoop small portions of dough and roll into bite-sized balls. Place on a parchment-lined baking sheet, leaving space between each cookie. Use your thumb or the back of a small spoon to create a gentle indentation in the center of each cookie.
Step 4: Bake Cookies
Preheat the oven to 350°F. Bake cookies for 10-12 minutes until edges are set and tops look slightly cracked. Remove from oven and let cool on the baking sheet for a few minutes.
Step 5: Fill Thumbprint Centers
Once cookies are slightly cooled, pipe the chilled cream cheese filling into the center of each cookie. The filling should be smooth and slightly mounded.
Step 6: Chill and Serve
Refrigerate the filled cookies for 15-20 minutes to help the filling set. Serve at room temperature or chilled. Store in an airtight container in the refrigerator for up to 5 days.
Best Baking Tips for Red Velvet Thumbprint Cookies with Cream Cheese
Saving and Reheating Red Velvet Thumbprint Cookies with Cream Cheese
Tasty Pairings for Red Velvet Thumbprint Cookies with Cream Cheese
Fun Versions of Red Velvet Thumbprint Cookies with Cream Cheese
FAQs for Red Velvet Thumbprint Cookies with Cream Cheese
Red velvet cookies get their signature deep red color from a small amount of cocoa powder and red food coloring, which creates a subtle chocolate flavor with a vibrant appearance.
Absolutely! You can use a small spoon to fill the cookie centers or simply cut a corner off a resealable plastic bag to create a makeshift piping tool.
Use the back of a rounded measuring spoon or your clean thumb to gently press a small well into the center of each cookie dough ball before baking, ensuring an even and consistent shape for the cream cheese filling.
Cream cheese filling adds a tangy, rich flavor that complements the slightly chocolatey red velvet cookie base, creating a delicious contrast in taste and texture.
Print
Red Velvet Thumbprint Cookies With Cream Cheese Recipe
- Total Time: 1 hour 2 minutes
- Yield: 24 1x
Description
Sweet red velvet thumbprint cookies embrace classic Southern charm, blending rich cocoa and velvety texture into delicate bite-sized treats. Cream cheese centers create irresistible indulgence you cannot resist, making these cookies perfect for holiday gatherings or intimate dessert moments.
Ingredients
Main Ingredients:
- 1 ½ cups (190 g) all-purpose flour
- ½ cup (115 g) unsalted butter, softened
- ⅔ cup (135 g) granulated sugar
- 1 large egg
- 4 ounces (115 g) cream cheese, softened
Flavor and Color Ingredients:
- 2 tablespoons (15 g) cocoa powder
- 1 tablespoon red gel food coloring
- 1 teaspoon vanilla extract
Binding and Finishing Ingredients:
- ½ teaspoon baking powder
- ¼ teaspoon salt
- ½ cup (50 g) powdered sugar (for rolling, optional)
- ¼ cup (30 g) powdered sugar
- ½ teaspoon vanilla extract
Instructions
- Whip the cream cheese, powdered sugar, and vanilla extract into a silky, uniform filling, ensuring no lumps remain.
- Carefully transfer the creamy mixture into a piping bag or a sturdy resealable plastic bag, trimming the corner for precise dispensing.
- Place the prepared filling in the refrigerator to chill and maintain its structure while you prepare the cookie base.
- Gently cool the filling until you’re ready to assemble the thumbprint cookies, allowing it to set and develop a firmer consistency.
- Keep the filling chilled to preserve its smooth texture and make piping easier when creating the cookie centers.
Notes
- Softening cream cheese at room temperature ensures a smooth, lump-free filling that pipes easily and blends perfectly with powdered sugar.
- Use a star-tipped piping bag for an elegant, professional-looking swirl of cream cheese filling in the cookie centers.
- For a gluten-free version, substitute all-purpose flour with a high-quality gluten-free flour blend, maintaining the same rich red velvet texture and taste.
- Chill the filled cookies briefly before serving to help the cream cheese filling set and create a more stable, picture-perfect presentation.
- Prep Time: 20 minutes
- Cook Time: 30 minutes
- Category: Desserts, Snacks
- Method: Mixing
- Cuisine: American
Nutrition
- Serving Size: 24
- Calories: 160
- Sugar: 10 g
- Sodium: 130 mg
- Fat: 8 g
- Saturated Fat: 5 g
- Unsaturated Fat: 2 g
- Trans Fat: 0 g
- Carbohydrates: 21 g
- Fiber: 0.5 g
- Protein: 2 g
- Cholesterol: 30 mg
Jenna Stewart
Head Chef & Recipe Innovator
Expertise
Farm-to-Table Cooking; Seasonal Menu Development; Visual Plating Techniques; Flavor Layering and Simple Prep Hacks.
Education
The Culinary Institute of America, Hyde Park, NY
Jenna Stewart is the inventive spirit behind many of our standout dishes at Pro of Delicious Creations. A proud graduate of The Culinary Institute of America, she built her skills mastering both classic recipes and fresh, modern twists.
Now, Jenna celebrates the beauty of seasonal, local ingredients, often sourced from her garden and nearby markets, to create recipes that are bursting with flavor yet easy to follow. When she’s not experimenting in the kitchen, Jenna loves exploring nature on hikes and discovering new treasures at local co-ops.