Adorable Polar Bear Cookies Recipe: Frosty Winter Fun
Sweet memories of arctic adventures spark joy with these polar bear cookies that capture winter’s whimsy in every delightful bite.
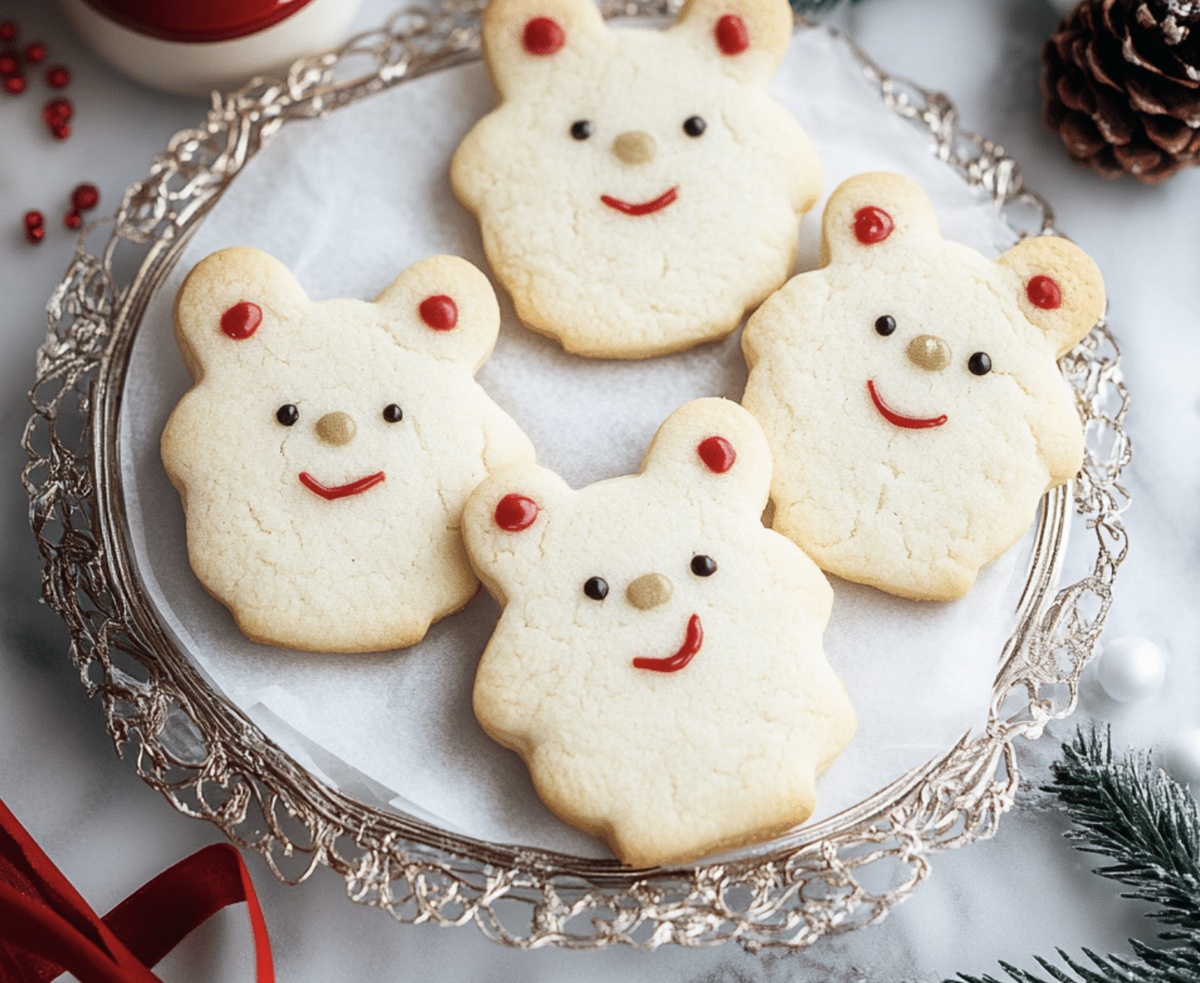
Soft, cloud-like treats decorated to resemble adorable arctic friends nestled on your plate.
Baking becomes a playful journey through snowy landscapes with these charming confections.
Gentle frosting techniques and clever design elements transform simple sugar cookies into delectable polar bear characters.
Kids absolutely love helping create these cute edible creatures with their unique personalities.
Decorating becomes an imaginative experience where creativity meets deliciousness.
You’ll find these cookies bring smiles and spark conversation at any gathering.
Grab your apron and let the magical cookie crafting begin!
Why Polar Bear Cookies Are A Winter Favorite
Everything You’ll Need For Polar Bear Cookies
Base Ingredients:Dry Ingredients:Decoration Ingredients:Steps To Create Cute Polar Bear Cookies
Step 1: Whip Up the Delightful Dough
Crank up the oven to a toasty 350F (175C) and line a baking sheet with parchment paper. In a spacious mixing bowl, blend these ingredients until dreamy and smooth:Crack in a fresh egg and splash of vanilla extract. In another bowl, mix these dry buddies:Gently fold the dry ingredients into the wet mixture until they become best friends.
Step 2: Roll and Bake the Adorable Treats
Scoop out dollops of dough and roll them into perfect little balls. Place these cuties on the baking sheet, giving them some personal space. Gently pat down each ball with your palm. Pop them in the oven for 10-12 minutes until the edges turn a lovely golden hue. Let the cookies chill completely on a wire rack.
Step 3: Create Magical White Chocolate Magic
Melt white chocolate chips in a microwave-safe bowl. Zap in short bursts, stirring between each interval, until silky smooth.
Step 4: Transform Cookies into Cuddly Polar Bears
Dive each cookie into the melted white chocolate, coating every inch. Rest them on parchment paper. While still wet, add these charming details:Feel free to jazz up your polar bears with sprinkles, icing scarves, or snowflake designs.
Step 5: Let the Decorations Set
Allow the cookies to rest at room temperature until the white chocolate turns rock solid. Want to speed things up? Slide them into the refrigerator for a quick 10-15 minute chill.
Tips To Make Polar Bear Cookies Stand Out
How To Keep Polar Bear Cookies Crisp
Best Treats To Pair With Polar Bear Cookies
Fun Designs For Polar Bear Cookies
Polar Bear Cookies FAQ
These adorable cookies are designed to look like cute polar bear faces, using white chocolate coating, marshmallow ears, candy eyes, and a chocolate chip nose to create a whimsical winter-themed treat.
Not at all! These cookies are beginner-friendly. The decorating process is simple and fun, making them perfect for baking with kids or creating a playful dessert for winter parties.
Yes! You can prepare the cookie dough in advance and refrigerate it for up to 3 days. The decorated cookies will stay fresh in an airtight container for about 3-4 days at room temperature.
No worries! You can use white royal icing, small white candies, or even carefully placed white chocolate dots to create the eyes. The key is to be creative and have fun with the decorating process.
Print
Polar Bear Cookies Recipe
- Total Time: 40 minutes
- Yield: 24 1x
Description
Polar bear cookies bring winter’s whimsy to holiday dessert tables with adorable snowflake-shaped treats. Crisp white frosting and cute decorative details make these charming cookies perfect for festive gatherings when you want something sweet and playful.
Ingredients
Primary Ingredients (Cookies):
- 1 large egg
- 1 stick (113 grams) unsalted butter, softened
- ¾ cup (150 grams) granulated sugar
- 1 ½ cups (180 grams) all-purpose flour
Dry Ingredients (Baking):
- ½ teaspoon baking powder
- ¼ teaspoon salt
Decoration Ingredients:
- 2 cups white chocolate chips or candy melts
- Mini marshmallows
- Candy eyes
- Mini chocolate chips or black edible pearls
- Optional: Red or blue sprinkles
- 1 teaspoon vanilla extract
Instructions
- Prepare the kitchen workspace by preheating the oven to 350F (175C) and lining a baking sheet with parchment paper. Ensure all ingredients are at room temperature for optimal mixing.
- In a spacious mixing bowl, thoroughly cream butter and sugar until the mixture becomes airy and pale. Incorporate the egg and vanilla extract, blending until the texture is smooth and homogeneous.
- Separately, combine flour, baking powder, and salt in a clean bowl. Gently fold the dry ingredients into the wet mixture, stirring carefully to create a consistent dough. Avoid overmixing to maintain the cookie’s delicate texture.
- Using a spoon or cookie scoop, form uniform dough balls approximately the size of a tablespoon. Roll each ball between your palms to create perfect spheres. Arrange the cookies on the prepared baking sheet, spacing them evenly to allow proper spreading.
- Gently press down on each dough ball with your palm, creating a slight flattening effect. Transfer the baking sheet to the preheated oven and bake for 10-12 minutes, watching for subtle golden edges as an indication of doneness.
- Remove the cookies from the oven and allow them to cool completely on a wire rack. This resting period ensures the cookies firm up and become easier to decorate.
- Melt white chocolate using a microwave-safe bowl, employing short 20-second intervals and stirring between each heating cycle until the chocolate achieves a smooth, glossy consistency.
- Carefully immerse each cooled cookie into the melted white chocolate, ensuring complete and even coverage. Place the coated cookies on parchment paper for decorating.
- While the chocolate coating remains wet, strategically place two mini marshmallows at the cookie’s top edge to create adorable bear ears. Add candy eyes and a mini chocolate chip or pearl to represent the nose.
- Optional embellishments like sprinkles or delicate icing can enhance the polar bear’s character. Allow the decorated cookies to set at room temperature until the white chocolate hardens completely.
- For accelerated setting, briefly place the cookies in the refrigerator for 10-15 minutes. Once fully set, serve and enjoy these charming polar bear-inspired treats.
Notes
- Precision matters when creaming butter and sugar, ensuring light, fluffy texture requires room temperature butter and consistent beating for 3-4 minutes.
- White chocolate coating works best when melted slowly at 50% power in microwave to prevent burning and maintain smooth consistency.
- Chilling cookie dough for 30 minutes before baking helps prevent spreading and maintains adorable polar bear shape.
- For gluten-free version, substitute all-purpose flour with almond or gluten-free blend, adding 1/4 teaspoon xanthan gum for better texture.
- Prep Time: 20 minutes
- Cook Time: 20 minutes
- Category: Desserts, Snacks
- Method: Baking
- Cuisine: American
Nutrition
- Serving Size: 24
- Calories: 180
- Sugar: 6 g
- Sodium: 70 mg
- Fat: 8 g
- Saturated Fat: 5 g
- Unsaturated Fat: 2 g
- Trans Fat: 0 g
- Carbohydrates: 25 g
- Fiber: 0 g
- Protein: 2 g
- Cholesterol: 20 mg
Jenna Stewart
Head Chef & Recipe Innovator
Expertise
Farm-to-Table Cooking; Seasonal Menu Development; Visual Plating Techniques; Flavor Layering and Simple Prep Hacks.
Education
The Culinary Institute of America, Hyde Park, NY
Jenna Stewart is the inventive spirit behind many of our standout dishes at Pro of Delicious Creations. A proud graduate of The Culinary Institute of America, she built her skills mastering both classic recipes and fresh, modern twists.
Now, Jenna celebrates the beauty of seasonal, local ingredients, often sourced from her garden and nearby markets, to create recipes that are bursting with flavor yet easy to follow. When she’s not experimenting in the kitchen, Jenna loves exploring nature on hikes and discovering new treasures at local co-ops.