
Festive Homemade Peppermint Bark Recipe for Holiday Magic
Cold winter nights call for a delightful chocolate and peppermint bark that melts in your mouth.
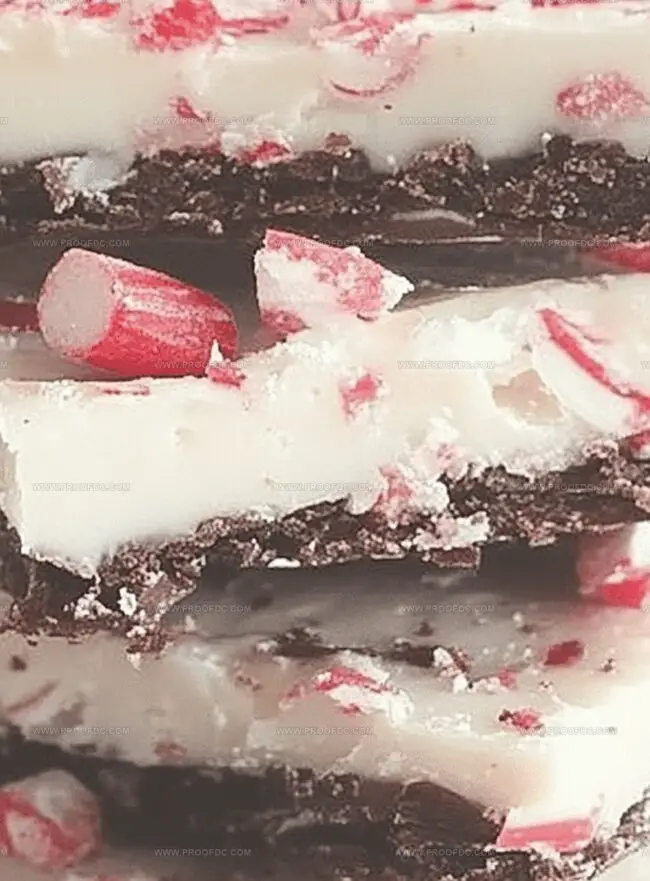
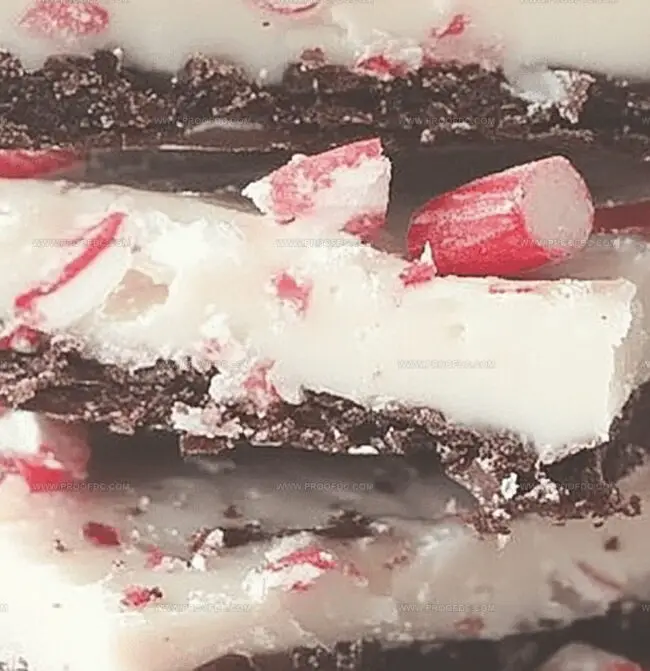
Breaking through a crisp, shimmering layer of sweet indulgence right from your kitchen counter.
Sweet peppermint carries memories of holiday cheer and cozy moments shared with loved ones.
Chocolate and crushed candy canes create a magical combination that sparkles with festive joy.
Crafting this treat requires minimal ingredients and simple techniques anyone can master.
The rich dark chocolate blends perfectly with cool, refreshing mint flavors.
You’ll absolutely adore how quickly this elegant dessert comes together, promising smiles and delighted taste buds.
Grab your ingredients and let’s make something wonderfully delicious!
Why Peppermint Bark Is A Treat Everyone Loves
Simple Ingredients For Peppermint Bark
Chocolate Base:Flavoring:Decorative Topping:Preparation Surface:How To Make Peppermint Bark In Minutes
Step 1: Prep the Workspace
Line a 9×13‑inch baking sheet with parchment paper or a silicone mat, making sure the surface is completely covered and smooth.
Step 2: Melt and Chill the Dark Chocolate
Melt the dark chocolate in 20‑second microwave bursts or over a double boiler, stirring between intervals to prevent overheating. Stir in peppermint extract, then spread the chocolate in an even layer on your prepared sheet. Chill in the refrigerator until firm, about 20 minutes.
Step 3: Melt the White Chocolate
Using the same method, melt the white chocolate and blend in more peppermint extract. Keep it warm and smooth for layering.
Step 4: Layer and Decorate
Pour the white chocolate over the chilled dark layer and gently spread until smooth. Immediately sprinkle crushed peppermint candies on top and press lightly so they stick.
Step 5: Final Chill
Return the tray to the fridge and let the bark harden completely, 30 to 45 minutes, until solid and crisp.
Step 6: Break into Pieces
Remove the bark from the fridge and crack it into irregular, rustic chunks using your hands or a knife.
Step 7: Store and Enjoy
Place the pieces in an airtight container and keep at room temperature or in the fridge. The bark stays fresh for up to two weeks, perfect for gifting or snacking.
Tips To Get Peppermint Bark Just Right
How To Store Peppermint Bark Without Losing Flavor
What Goes Well With Peppermint Bark
Ways To Make Peppermint Bark A Little Different
FAQs For Peppermint Bark Fans
Peppermint bark is a festive treat that combines the rich, deep flavor of dark chocolate with the cool, refreshing taste of peppermint. It’s a beloved holiday classic that brings instant joy and nostalgia to people of all ages.
Absolutely! While the recipe calls for dark and white chocolate, you can experiment with milk chocolate or semi-sweet chocolate. Just ensure you use high-quality chocolate that melts smoothly for the best results.
Peppermint extract is optional but highly recommended. It intensifies the mint flavor and gives the bark a more pronounced peppermint taste. If you don’t have extract, you can skip it, but the flavor will be more subtle.
Place unwrapped peppermint candies in a sealed plastic bag and use a rolling pin or meat mallet to gently crush them. This method contains the fragments and gives you control over the size of the pieces.
Print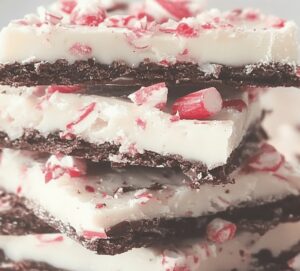
Peppermint Bark Recipe
- Total Time: 1 hour 5 minutes
- Yield: 16 1x
Description
Festive holiday “Peppermint Bark” brings delightful chocolate and candy cane magic to seasonal celebrations. Crisp mint layers and smooth chocolate create a simple yet irresistible treat you can easily craft at home.
Ingredients
Main Chocolate Ingredients:
- 200 grams (7 ounces) dark or semi-sweet chocolate, chopped
- 200 grams (7 ounces) white chocolate, chopped
Flavoring and Extract:
- 1 teaspoon peppermint extract (optional)
Topping:
- ½ cup (75 grams) crushed peppermint candies or candy canes
Instructions
- Prepare the workspace by lining a baking sheet with parchment paper, ensuring a smooth, flat surface for chocolate layering.
- Craft the dark chocolate foundation by gently melting chocolate in a double boiler or microwave, stirring carefully to prevent scorching. Infuse with a hint of peppermint extract for enhanced flavor.
- Carefully spread the melted dark chocolate across the prepared surface, creating an even, glossy layer that will serve as the bark’s base.
- Allow the dark chocolate layer to solidify in the refrigerator, giving it time to set and create a sturdy foundation for the white chocolate topping.
- Repeat the melting process with white chocolate, maintaining a smooth, velvety consistency and incorporating the remaining peppermint extract.
- Delicately pour the white chocolate over the chilled dark chocolate layer, using a spatula to distribute it evenly and create a seamless surface.
- While the white chocolate remains soft, generously scatter crushed peppermint candies across the top, gently pressing them to ensure they adhere to the chocolate.
- Return the bark to the refrigerator, allowing it to completely harden and the layers to unite into a cohesive confection.
- Once fully set, lift the parchment paper and break the bark into rustic, irregular pieces, creating an artisanal appearance.
- Transfer the peppermint bark to an airtight container, preserving its crisp texture and festive flavor for up to two weeks at room temperature or in the refrigerator.
Notes
- Avoid overheating chocolate by using gentle, low-heat melting techniques to prevent seizing or burning, which can ruin the smooth texture.
- Work quickly when spreading chocolate layers to ensure even coverage and prevent premature setting.
- Crush peppermint candies finely for a more uniform topping that distributes flavor evenly across the bark.
- For a dietary twist, use dairy-free chocolate alternatives and sugar-free peppermint candies to create vegan or low-sugar versions of this festive treat.
- Prep Time: 15 minutes
- Cook Time: 50 minutes
- Category: Desserts, Snacks
- Method: Mixing
- Cuisine: American
Nutrition
- Serving Size: 16
- Calories: 150
- Sugar: 16 g
- Sodium: 10 mg
- Fat: 8 g
- Saturated Fat: 5 g
- Unsaturated Fat: 3 g
- Trans Fat: 0 g
- Carbohydrates: 20 g
- Fiber: 1 g
- Protein: 2 g
- Cholesterol: 0 mg
Jenna Stewart
Head Chef & Recipe Innovator
Expertise
Farm-to-Table Cooking; Seasonal Menu Development; Visual Plating Techniques; Flavor Layering and Simple Prep Hacks.
Education
The Culinary Institute of America, Hyde Park, NY
Jenna Stewart is the inventive spirit behind many of our standout dishes at Pro of Delicious Creations. A proud graduate of The Culinary Institute of America, she built her skills mastering both classic recipes and fresh, modern twists.
Now, Jenna celebrates the beauty of seasonal, local ingredients, often sourced from her garden and nearby markets, to create recipes that are bursting with flavor yet easy to follow. When she’s not experimenting in the kitchen, Jenna loves exploring nature on hikes and discovering new treasures at local co-ops.