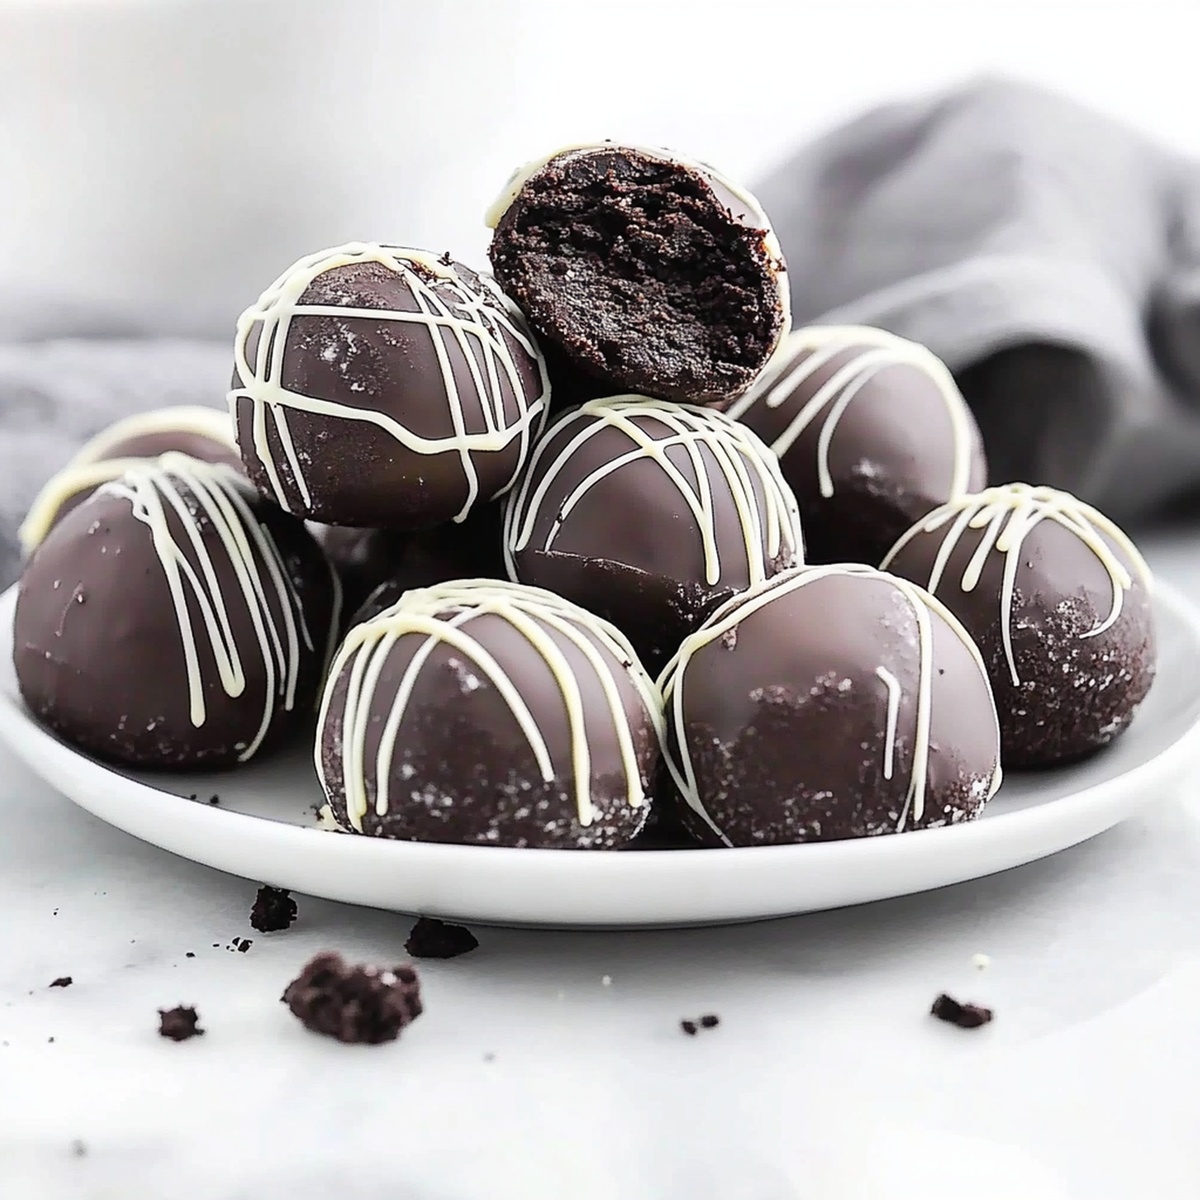
Dreamy Oreo Truffles Recipe: Sweet Bites of Cookie Magic
Rolling decadent Oreo truffles that melt in your mouth with creamy chocolate and crunchy cookie magic.
These little bites pack serious dessert power without complicated techniques.
Crushing cookies becomes a delightful sensory experience that connects you to the recipe.
Sweet chocolate coating transforms simple ingredients into elegant treats that look professionally crafted.
Professional bakers and kitchen novices alike adore how quickly these truffles come together.
Rich cream cheese binds the mixture, creating smooth interiors that contrast beautifully with crisp chocolate shells.
Small gathering or large party, these truffles will definitely steal the spotlight and impress everyone around the table.
You cannot resist making these irresistible bite-sized delights right now.
Why Oreo Truffles Are A Chocolate Lover’s Dream

What You’ll Need For Oreo Truffles
Base Ingredients:Coating and Decoration Ingredients:Optional Garnish Ingredients:Steps To Make Oreo Truffles With Ease
Step 1: Crush Oreo Cookies
Grab your food processor and transform those Oreo cookies into fine, delightful crumbs. Set aside a small handful of crumbs for a sprinkle of magic later. In a spacious mixing bowl, blend the cookie crumbs with velvety cream cheese until they become a smooth, irresistible mixture.
Step 2: Create Truffle Balls
Roll the creamy mixture into bite-sized spheres, each about the size of a classic marble. Gently place these little flavor bombs on a parchment-lined baking sheet. Pop the tray into the refrigerator and let them chill for a cool 20-30 minutes until they’re firm and ready for their chocolate bath.
Step 3: Chocolate Dipping Extravaganza
Melt your chocolate in a microwave-safe bowl, stirring every 30 seconds until silky smooth. Use a fork or toothpick to gracefully dunk each truffle into the molten chocolate. Let the excess chocolate drip away, then return each coated treasure to the parchment-lined sheet.
Step 4: Add Glamorous Finishing Touches
While the chocolate is still wet, sprinkle those reserved cookie crumbs or add a fancy drizzle of extra chocolate. For an extra pop of excitement, scatter some colorful sprinkles across the truffles.
Step 5: Chill and Savor
Slide the truffles back into the refrigerator for about an hour, allowing the chocolate to set into a perfect, glossy shell. Once firm, these delectable treats are ready to devour or store in an airtight container for up to a week.
Tips For Smooth And Rich Oreo Truffles
How To Store Oreo Truffles The Easy Way
Perfect Treats To Pair With Oreo Truffles
Fun Twists On Classic Oreo Truffles
Oreo Truffles FAQs
Absolutely! While classic Oreos work best, you can experiment with flavors like mint, peanut butter, or birthday cake Oreos to create unique truffles with different taste profiles.
Not really. A food processor helps create fine crumbs, but you can also crush Oreos in a sealed plastic bag using a rolling pin. A baking sheet, parchment paper, and a microwave-safe bowl are the main tools you’ll need.
Ensure the Oreo mixture is well-chilled before dipping. Cold truffles hold their shape better and are less likely to crumble. If the mixture feels too soft, refrigerate for an additional 10-15 minutes before coating.
Yes! These truffles freeze wonderfully. Place them in an airtight container with parchment paper between layers, and they’ll keep for up to 2 months. Thaw in the refrigerator before serving.
Print
Oreo Truffles Recipe
- Total Time: 1 hour 20 minutes
- Yield: 36 1x
Description
Chocolate-drenched Oreo truffles deliver a sinful blend of creamy cheesecake and rich cookie crumbs. Sweet indulgence melts smoothly on your palate, promising a delightful escape into pure dessert bliss.
Ingredients
Main Ingredients:
- 36 Oreo cookies (about 1 standard package)
- 8 ounces (225 grams) cream cheese, softened
Coating Ingredients:
- 12 ounces (340 grams) semi-sweet or white chocolate, melted
Decorative Ingredients:
- Sprinkles
- Crushed Oreos
- Melted chocolate
Instructions
- Crush Oreo cookies into ultra-fine powder using a food processor, ensuring a consistent, smooth texture. Set aside a small portion of crumbs for garnishing later.
- Blend the processed Oreo crumbs thoroughly with softened cream cheese, creating a cohesive mixture that holds together seamlessly.
- Using clean hands, gently roll the mixture into compact, uniform spheres approximately one inch in diameter. Arrange these delicate balls on a parchment-lined tray.
- Chill the formed truffles in the refrigerator for approximately 25-35 minutes, allowing them to firm up and maintain their shape during the coating process.
- Carefully melt chocolate in a microwave-safe vessel, stirring between 30-second intervals to prevent scorching and ensure a silky, smooth consistency.
- Delicately immerse each chilled truffle into the melted chocolate, using a fork to ensure complete, even coverage. Gently tap to remove excess chocolate coating.
- While the chocolate remains wet, sprinkle reserved Oreo crumbs or decorative elements across the surface for added visual appeal and texture.
- Return the chocolate-coated truffles to the refrigerator, allowing them to set completely for roughly 60 minutes.
- Once solidified, transfer the truffles to an airtight container and store in the refrigerator, where they will maintain optimal flavor and texture for up to seven days.
Notes
- Crumb Consistency Matters: Pulse Oreos into ultra-fine crumbs for smooth, cohesive truffle texture that ensures perfect binding with cream cheese.
- Chill Before Coating: Refrigerate truffle balls for at least 30 minutes to help them maintain shape and prevent falling apart during chocolate dipping.
- Chocolate Melting Technique: Use low, gentle microwave heat and stir frequently to prevent chocolate from burning or seizing during melting process.
- Dietary Modifications: Swap regular cream cheese with dairy-free alternatives like vegan cream cheese for lactose-intolerant or plant-based diets. Use gluten-free Oreo varieties for celiac-friendly version.
- Prep Time: 20 minutes
- Cook Time: 1 hour
- Category: Desserts, Snacks
- Method: Mixing
- Cuisine: American
Nutrition
- Serving Size: 36
- Calories: 130
- Sugar: 10 g
- Sodium: 50 mg
- Fat: 7 g
- Saturated Fat: 4 g
- Unsaturated Fat: 3 g
- Trans Fat: 0 g
- Carbohydrates: 16 g
- Fiber: 1 g
- Protein: 2 g
- Cholesterol: 20 mg
Jenna Stewart
Head Chef & Recipe Innovator
Expertise
Farm-to-Table Cooking; Seasonal Menu Development; Visual Plating Techniques; Flavor Layering and Simple Prep Hacks.
Education
The Culinary Institute of America, Hyde Park, NY
Jenna Stewart is the inventive spirit behind many of our standout dishes at Pro of Delicious Creations. A proud graduate of The Culinary Institute of America, she built her skills mastering both classic recipes and fresh, modern twists.
Now, Jenna celebrates the beauty of seasonal, local ingredients, often sourced from her garden and nearby markets, to create recipes that are bursting with flavor yet easy to follow. When she’s not experimenting in the kitchen, Jenna loves exploring nature on hikes and discovering new treasures at local co-ops.