
Dreamy No-Bake Oreo Mint Cheesecake Recipe for Sweet Cravings
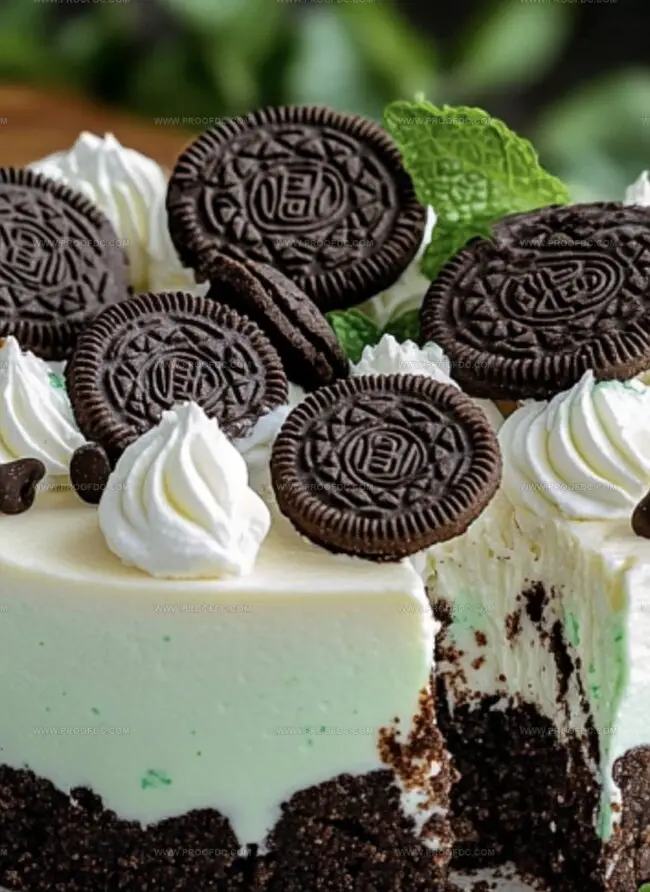
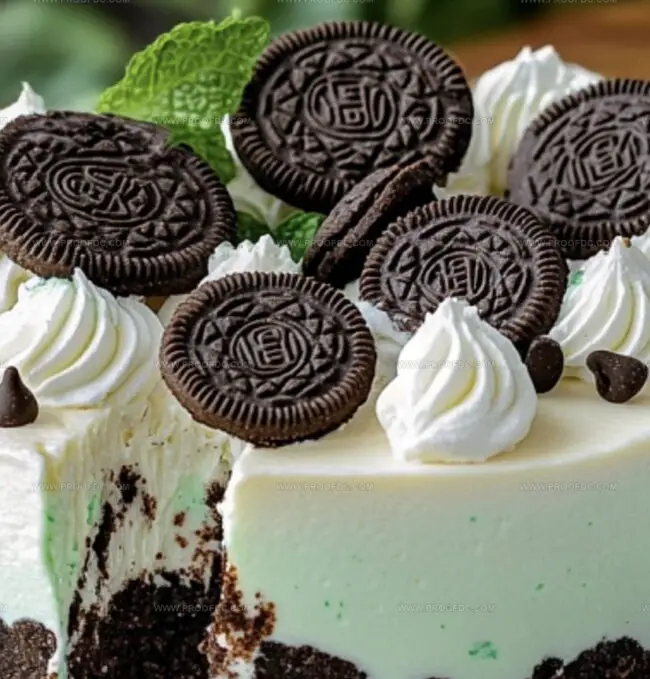
Creamy dreams come alive with this no-bake Oreo mint cheesecake that promises pure indulgence.
Cool mint whispers through each velvety bite, creating a dessert sensation.
Chocolate cookie crumbs form a delectable foundation for this irresistible treat.
Layers of smooth cream cheese and refreshing mint blend seamlessly in every spoonful.
No oven required means less hassle and maximum enjoyment for anyone seeking a delightful dessert.
Sweet tooths and mint lovers unite – this recipe delivers pure magic in minutes.
We bet you cannot resist diving into this chilled, decadent masterpiece that screams summer comfort.
Why No-Bake Oreo Mint Cheesecake Is So Cool
What’s Inside No-Bake Oreo Mint Cheesecake
Crust Base:Cheesecake Filling:Decoration and Topping:Step-By-Step Guide to No-Bake Oreo Mint Cheesecake
Step 1: Craft the Crumbly Crust
Grab your Oreo cookies and crush them into fine crumbs. Melt some butter and mix it thoroughly with the cookie crumbs. Press this magical mixture into the bottom of a springform pan, creating a solid base. Slide the pan into the refrigerator and let it chill and set for about half an hour.
Step 2: Whip Up the Creamy Filling
In a spacious mixing bowl, beat cream cheese until it’s silky smooth. Sprinkle in powdered sugar and mix until the texture becomes dreamy. Add these ingredients:Fold in whipped cream gently to create a light, airy texture. Carefully mix in crushed Oreo pieces, creating delightful chocolate specks throughout the filling.
Step 3: Layer the Deliciousness
Spread the minty cream cheese mixture evenly over the chilled crust. Use a spatula to create a perfectly smooth surface.
Step 4: Decorate with Crunchy Topping
Scatter additional crushed Oreo cookies across the top of the cheesecake, creating a tempting chocolate crown.
Step 5: Chill and Set
Tuck the cheesecake into the refrigerator for at least 4 hours. This allows the flavors to mingle and the texture to become perfectly firm.
Step 6: Serve and Enjoy
Carefully remove the cheesecake from the pan. Slice into generous pieces. If you’re feeling extra indulgent, add a dollop of whipped cream on top. Serve and watch everyone’s eyes light up with excitement!
Tips for Nailing No-Bake Oreo Mint Cheesecake
Chill and Store No-Bake Oreo Mint Cheesecake Right
What Matches With No-Bake Oreo Mint Cheesecake
Ideas to Change Up No-Bake Oreo Mint Cheesecake
Top Questions About No-Bake Oreo Mint Cheesecake
This dessert combines the classic crunch of Oreos with a refreshing mint flavor, creating a cool and creamy treat that doesn’t require any baking. It’s perfect for those who want a delicious dessert without turning on the oven.
While the peppermint extract gives the cheesecake its signature mint flavor, you can omit it if you prefer. The cheesecake will still be delicious with just the vanilla extract, though it won’t have the minty taste.
Make sure your cream cheese is at room temperature before mixing. Beat it thoroughly with the powdered sugar until completely smooth, and fold in the whipped cream gently to maintain the light, fluffy texture. This prevents lumps and ensures a creamy consistency.
Absolutely! Kids love the combination of Oreo cookies and the fun mint color. It’s a great dessert to make together, and there’s no complicated baking process involved.
Print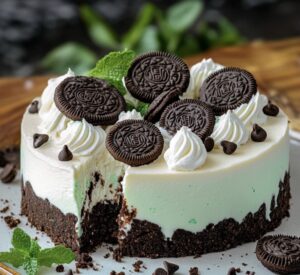
No-Bake Oreo Mint Cheesecake Recipe
- Total Time: 4 hours 20 minutes
- Yield: 10 1x
Description
Creamy no-bake oreo mint cheesecake delivers cool refreshment with its velvety layers of chocolate and mint. Rich crumbly crust and smooth filling promise delightful indulgence for dessert lovers seeking quick, delectable treats.
Ingredients
Main Ingredients:
- 2 cups (200 g) Oreo cookie crumbs
- 8 oz (225 g) cream cheese
- 1 ½ cups (360 ml) heavy whipping cream
- 46 Oreos, crushed
Dairy and Sweeteners:
- 5 tablespoons (75 g) unsalted butter
- ½ cup (65 g) powdered sugar
Flavor Enhancers:
- 1 teaspoon peppermint extract
- ½ teaspoon vanilla extract
- Optional: A few drops of green food coloring
Garnish:
- Whipped cream (optional)
Instructions
- Craft a sturdy foundation by pulverizing Oreo cookies into fine crumbs and blending them with melted butter, creating a compact base layer for the cheesecake.
- Press the crumb mixture thoroughly into the bottom of a springform pan, ensuring an even and solid crust that will support the creamy filling.
- Chill the crust in the refrigerator to solidify and set the buttery cookie foundation, allowing it to become firm and stable.
- Whip cream cheese in a large mixing bowl until silky and smooth, gradually incorporating powdered sugar to enhance the texture and sweetness.
- Infuse the cream cheese mixture with peppermint extract and vanilla, creating a vibrant and aromatic flavor profile that will define the dessert’s character.
- Gently fold whipped cream into the cream cheese blend, achieving a light and airy consistency that promises a delicate, mousse-like texture.
- Incorporate crushed Oreo cookies into the filling, distributing them evenly to create delightful chocolate cookie pockets throughout the cheesecake.
- Carefully spread the mint-infused filling over the chilled crust, using a spatula to create a smooth and even surface.
- Garnish the top of the cheesecake with additional crushed Oreo cookies, adding visual appeal and a crunchy textural contrast.
- Refrigerate the cheesecake for several hours, allowing the filling to set and the flavors to meld together completely.
- When ready to serve, carefully release the springform pan and slice the cheesecake into elegant portions.
- Optional: Embellish with a dollop of whipped cream for an extra touch of indulgence.
Notes
- Crush Oreo cookies finely for a smoother, more consistent crust that holds together perfectly when sliced.
- Use room temperature cream cheese to ensure a silky, lump-free filling that blends seamlessly.
- Adjust peppermint extract gradually, tasting as you go to prevent overwhelming the delicate mint flavor.
- For a gluten-free version, swap regular Oreos with gluten-free chocolate sandwich cookies and ensure all ingredients are certified gluten-free.
- Prep Time: 20 minutes
- Cook Time: 4 hours
- Category: Desserts, Snacks
- Method: Mixing
- Cuisine: American
Nutrition
- Serving Size: 10
- Calories: 500
- Sugar: 34 g
- Sodium: 300 mg
- Fat: 35 g
- Saturated Fat: 20 g
- Unsaturated Fat: 10 g
- Trans Fat: 0 g
- Carbohydrates: 42 g
- Fiber: 1 g
- Protein: 6 g
- Cholesterol: 70 mg
Jenna Stewart
Head Chef & Recipe Innovator
Expertise
Farm-to-Table Cooking; Seasonal Menu Development; Visual Plating Techniques; Flavor Layering and Simple Prep Hacks.
Education
The Culinary Institute of America, Hyde Park, NY
Jenna Stewart is the inventive spirit behind many of our standout dishes at Pro of Delicious Creations. A proud graduate of The Culinary Institute of America, she built her skills mastering both classic recipes and fresh, modern twists.
Now, Jenna celebrates the beauty of seasonal, local ingredients, often sourced from her garden and nearby markets, to create recipes that are bursting with flavor yet easy to follow. When she’s not experimenting in the kitchen, Jenna loves exploring nature on hikes and discovering new treasures at local co-ops.