
Quick & Fun No Bake Coconut Cream Balls Recipe – Sweet Treats!
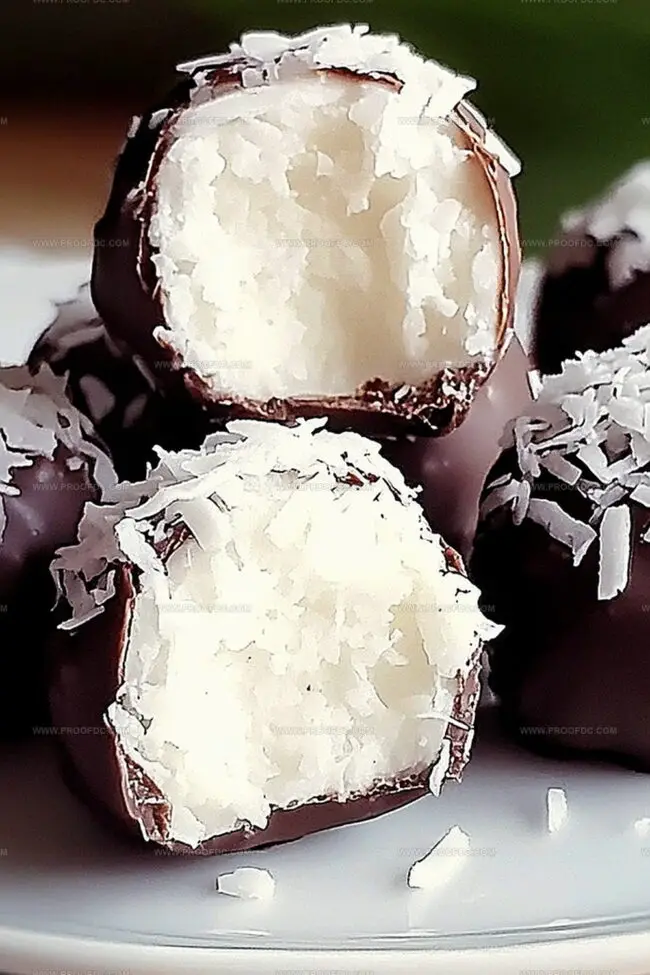
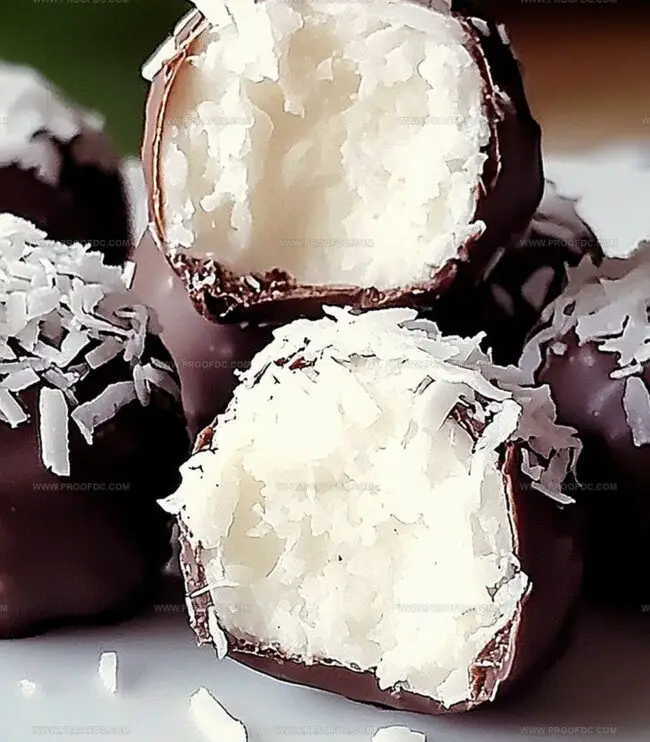
Smooth coconut cream balls offer a delightful twist on traditional dessert treats.
These magical little bites melt perfectly in your mouth with minimal effort.
no oven required means you can whip up something special without breaking a sweat.
Cool kitchen techniques make this recipe incredibly simple and stress-free.
Surprising guests with an elegant yet effortless sweet that looks professionally crafted.
Rich coconut flavors blend seamlessly with creamy textures, creating an irresistible snack.
Grab a mixing bowl and let’s craft something truly delectable that will have everyone asking for seconds.
Why No Bake Coconut Cream Balls Are So Simple And Sweet
Everything You Need For No Bake Coconut Cream Balls
Base Ingredients:Coating Ingredients:Preparation Ingredients:Steps To Prepare No Bake Coconut Cream Balls
Step 1: Whip Creamy Base
Grab a mixing bowl and blend softened cream cheese with butter using an electric mixer. Keep whipping until the mixture turns silky smooth. Slowly incorporate powdered sugar, continuing to mix until the texture becomes thick and luscious. Gently fold in shredded coconut, ensuring an even distribution throughout the mixture.
Step 2: Chill and Firm
Cover the bowl and pop it into the refrigerator. Let the mixture cool and set for about an hour. This cooling time helps the mixture become more manageable and easier to shape into perfect little balls.
Step 3: Roll Delightful Spheres
Dust your hands with a light coating of powdered sugar to prevent sticking. Scoop out small portions of the coconut mixture and roll them into bite-sized spheres. Carefully place each truffle on a parchment-lined baking sheet. Once all truffles are formed, transfer the sheet to the freezer for an hour to help them firm up completely.
Step 4: Melt Chocolate Coating
Select a microwave-safe bowl for melting chocolate chips. Use 30-second intervals, stirring between each session to ensure smooth, glossy melting. Continue until the chocolate reaches a perfect, silky consistency.
Step 5: Chocolate Dipping Technique
Use a fork to carefully dunk each coconut truffle into the melted chocolate. Make sure each ball gets a complete chocolate bath. Allow excess chocolate to drip off gently. Return the chocolate-covered truffles to the parchment-lined sheet.
Optional add-ons:Step 6: Set Chocolate Shell
Slide the tray into the refrigerator. Let the truffles chill for 10-15 minutes until the chocolate coating becomes firm and glossy.
Step 7: Serve and Enjoy
Bring the truffles to room temperature or serve chilled. Store any remaining treats in an airtight container in the refrigerator. These delectable bites will keep for several days – if they last that long!
Tips To Shape Perfect No Bake Coconut Cream Balls
How To Store No Bake Coconut Cream Balls Easily
What Goes Well With No Bake Coconut Cream Balls
Flavor Ideas For No Bake Coconut Cream Balls
No Bake Coconut Cream Balls FAQs
Cream cheese provides a rich, creamy texture and helps bind the ingredients together, creating a smooth and luxurious base for the coconut mixture that makes the balls extra soft and delicious.
Absolutely! You can roll the coconut balls in additional shredded coconut, powdered sugar, or leave them plain. The chocolate coating is optional but adds a delightful extra layer of flavor and richness.
When stored in an airtight container in the refrigerator, these coconut balls will stay fresh for up to 7-10 days. Just make sure to keep them chilled to maintain their texture and prevent the cream cheese from spoiling.
These coconut balls can be gluten-free if you use gluten-free powdered sugar and ensure your chocolate chips are certified gluten-free. Always check ingredient labels if you have specific dietary concerns.
Print
No Bake Coconut Cream Balls Recipe
- Total Time: 1 hour 30 minutes
- Yield: 24 1x
Description
Coconut cream balls bring tropical sweetness to dessert lovers seeking simple indulgence. Creamy, no-bake treats combine rich coconut with smooth chocolate, offering a quick escape to island-inspired bliss you can savor in minutes.
Ingredients
Main Ingredients:
- 4 cups powdered sugar
- 8 ounces (226 grams) cream cheese, softened
- 1 cup shredded coconut (unsweetened or sweetened, as desired)
Binding Ingredients:
- 1 tablespoon butter, softened
Coating Ingredients:
- 12 ounces (340 grams) melting chocolate chips (milk, dark, or white chocolate)
Instructions
- Whip the base mixture using a hand mixer, blending cream cheese and butter until silky and uniform. Incorporate powdered sugar gradually, creating a thick, luxurious texture that holds its shape.
- Fold shredded coconut into the creamy mixture, ensuring even distribution throughout the base. Mix thoroughly to guarantee consistent flavor in every bite.
- Transfer the coconut blend to the refrigerator, allowing it to firm and solidify for approximately one hour. This chilling process enhances the mixture’s malleability for shaping.
- Dust hands with powdered sugar to prevent sticking. Carefully form uniform spherical portions using a tablespoon as a measuring guide. Arrange the delicate orbs on a parchment-lined tray.
- Chill the shaped coconut spheres in the freezer for precisely one hour, which helps maintain their structural integrity during the chocolate coating process.
- Melt chocolate chips in a microwave-safe vessel, utilizing short intervals and stirring between each to achieve a smooth, glossy consistency without scorching.
- Employ a fork to delicately submerge each coconut sphere into the molten chocolate, ensuring complete and elegant coverage. Allow excess chocolate to elegantly cascade back into the bowl.
- Optional: Sprinkle additional coconut or a whisper of sea salt atop the chocolate while still liquid, adding textural intrigue and visual appeal.
- Refrigerate the chocolate-enrobed delicacies for 10-15 minutes until the coating crystallizes and hardens completely.
- Serve chilled or at ambient temperature. Store remaining treats in a sealed container within the refrigerator to maintain optimal freshness and texture.
Notes
- Softening cream cheese completely ensures a smooth, lump-free mixture that blends seamlessly with other ingredients.
- Use room temperature butter to create a more uniform texture and prevent clumping during mixing.
- Chilling the mixture helps solidify the coconut balls, making them easier to shape and handle without falling apart.
- Dust hands with powdered sugar to prevent sticky mixture from clinging to your fingers during rolling.
- For a gluten-free version, confirm all ingredients are certified gluten-free, especially chocolate chips and powdered sugar.
- Experiment with dark, milk, or white chocolate for different flavor profiles and visual appeal.
- Add a splash of vanilla extract to enhance the coconut mixture’s depth of flavor.
- Swap regular coconut for toasted coconut to introduce a nutty, caramelized undertone.
- Create diet-friendly alternatives by using sugar-free chocolate and low-fat cream cheese for a lighter treat.
- Freeze extras for up to one month, separating layers with parchment paper to prevent sticking.
- Prep Time: 30 minutes
- Cook Time: 1 hour
- Category: Snacks, Desserts
- Method: Mixing
- Cuisine: American
Nutrition
- Serving Size: 24
- Calories: 190
- Sugar: 17 g
- Sodium: 50 mg
- Fat: 9 g
- Saturated Fat: 5 g
- Unsaturated Fat: 4 g
- Trans Fat: 0 g
- Carbohydrates: 26 g
- Fiber: 1 g
- Protein: 2 g
- Cholesterol: 25 mg
Jenna Stewart
Head Chef & Recipe Innovator
Expertise
Farm-to-Table Cooking; Seasonal Menu Development; Visual Plating Techniques; Flavor Layering and Simple Prep Hacks.
Education
The Culinary Institute of America, Hyde Park, NY
Jenna Stewart is the inventive spirit behind many of our standout dishes at Pro of Delicious Creations. A proud graduate of The Culinary Institute of America, she built her skills mastering both classic recipes and fresh, modern twists.
Now, Jenna celebrates the beauty of seasonal, local ingredients, often sourced from her garden and nearby markets, to create recipes that are bursting with flavor yet easy to follow. When she’s not experimenting in the kitchen, Jenna loves exploring nature on hikes and discovering new treasures at local co-ops.