
Sizzling Grilled Cheeseburger Wraps Recipe: Fun Twist on a Classic
Burgers have a special place in our hearts, especially when they’re reimagined as delicious grilled cheeseburger wraps that blend classic flavors with a creative twist.
These handheld delights capture all the mouthwatering goodness of a traditional burger in a convenient, easy-to-eat format.
Loaded with juicy ground beef, melted cheese, and fresh toppings, these wraps bring a playful spin to your standard burger experience.
Each bite promises a perfect balance of savory meat, gooey cheese, and crisp vegetables wrapped in a warm tortilla.
The grilling process adds a subtle smoky char that elevates the entire dish to new heights of deliciousness.
Quick to prepare and even faster to devour, these wraps are sure to become a go-to meal for busy weeknights or casual gatherings.
Dive into this recipe and transform your dinner routine with a crowd-pleasing favorite that everyone will love.
Quick Recipe Overview
What You Need For Grilled Cheeseburger Wraps
For Meat Base:For Seasoning Blend:For Wrap Components:Gear For Grilled Cheeseburger Wraps
Steps To Make Grilled Cheeseburger Wraps
Brown ground beef with onions, infusing the meat with zesty Worcestershire sauce and a blend of spices. Let the flavors mingle and dance together, creating a mouthwatering base for your wrap.
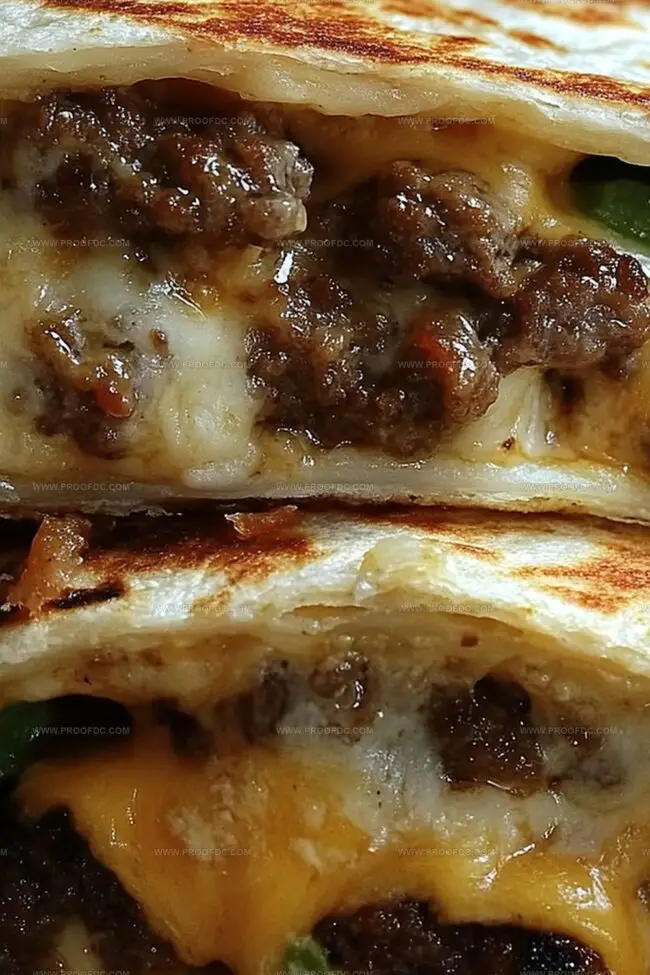
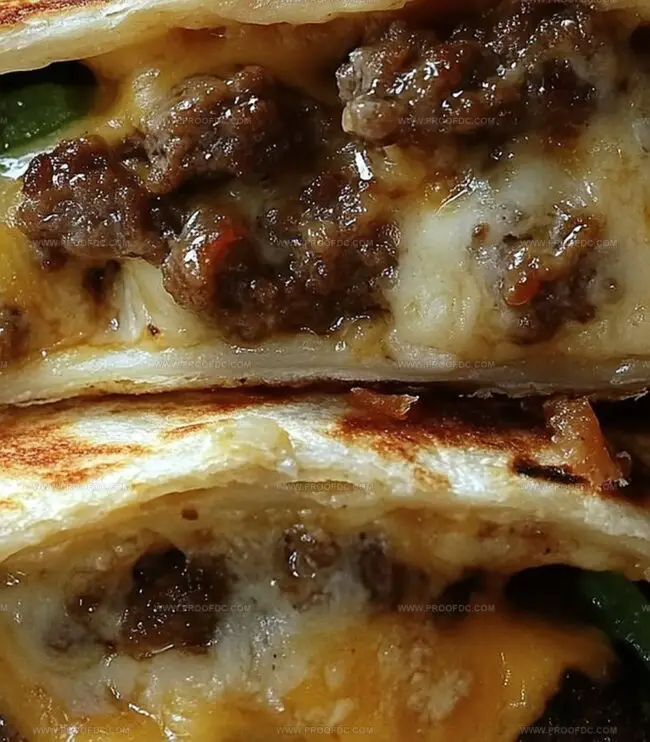
Spread a canvas of soft tortilla with tangy condiments. Layer crisp lettuce, juicy tomato slices, and crunchy pickles for texture and freshness. Sprinkle a generous helping of melty cheese over the seasoned beef.
Fold the tortilla sides inward like a culinary origami, rolling from bottom to top. Create a snug package that holds all the delicious ingredients securely.
Butter a hot skillet and place your wrap seam-side down. Grill until the exterior turns golden and crispy, with cheese melting into gooey perfection. The outside becomes wonderfully crunchy while the inside stays succulent.
Slice your wrap diagonally, revealing the beautiful layers inside. Serve immediately with your favorite side – perhaps crispy fries or a light salad – and enjoy your handheld burger experience.
Tips To Nail Grilled Cheeseburger Wraps
Serving Grilled Cheeseburger Wraps With Ease
How To Store Grilled Cheeseburger Wraps Properly
Keeping Grilled Cheeseburger Wraps Fresh
Print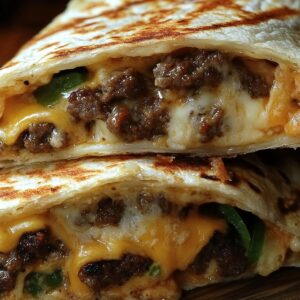
Mouthwatering Cheeseburger Wraps Recipe
- Total Time: 30 minutes
- Yield: 3 1x
Description
Savory grilled cheeseburger wraps bring classic American burger flavors into a convenient handheld meal. Crisp tortillas enfold seasoned ground beef, melted cheese, and fresh toppings for a quick and satisfying dinner option you’ll crave often.
Ingredients
- 1 lb (450 g) ground beef
- 1.5 cups (150 g) shredded cheddar or American cheese
- 1 small onion, finely chopped
- 1 tbsp Worcestershire sauce
- 1 tsp garlic powder
- 1 tsp paprika
- Salt and pepper, to taste
- 4 large flour tortillas
- Lettuce leaves
- Sliced tomatoes
- Dill pickles (optional)
- Ketchup and mustard (or your favorite burger sauce)
- 1 tbsp butter or cooking spray
Instructions
- Meat Preparation: Heat a skillet over medium flame, sautéing ground beef and onions until meat browns and onions soften. Drain excess grease thoroughly.
- Seasoning Integration: Infuse the beef with Worcestershire sauce, garlic powder, paprika, salt, and pepper. Allow seasonings to meld for two minutes, then remove from heat and cool slightly.
- Tortilla Assembly: Spread ketchup and mustard across the tortilla center. Layer lettuce, tomato slices, and pickle rounds to create a vibrant vegetable foundation.
- Filling Distribution: Evenly spread the seasoned beef mixture over the vegetable layer. Generously sprinkle shredded cheese to ensure optimal melting.
- Wrap Formation: Fold tortilla sides inward, then roll from the bottom to create a compact, leak-proof package that secures all ingredients.
- Grilling Technique: Coat a skillet or grill pan with butter or cooking spray. Place wraps seam-side down, ensuring direct heat contact.
- Final Cooking: Grill each side for 2-3 minutes, applying gentle spatula pressure to achieve a golden, crispy exterior and complete cheese melting. Slice diagonally and serve immediately with preferred accompaniments like fries or salad.
Notes
- Manage Meat Moisture: Drain ground beef thoroughly to prevent soggy wraps and ensure a crispy, appetizing texture that holds together perfectly.
- Control Cheese Melt: Use room temperature cheese for even melting and sprinkle directly onto warm beef to help it integrate smoothly without clumping.
- Master Wrap Technique: Fold tortilla sides tightly inward before rolling to create a secure seal that prevents filling from escaping during grilling, maintaining a neat presentation.
- Customize for Dietary Needs: Swap ground beef with lean turkey or plant-based crumbles, use low-carb tortillas, or opt for dairy-free cheese to accommodate different dietary preferences without compromising flavor.
- Prep Time: 10 minutes
- Cook Time: 20 minutes
- Category: Lunch, Dinner, Snacks
- Method: Grilling
- Cuisine: American
Nutrition
- Serving Size: 3
- Calories: 500
- Sugar: 2 g
- Sodium: 800 mg
- Fat: 30 g
- Saturated Fat: 15 g
- Unsaturated Fat: 10 g
- Trans Fat: 0 g
- Carbohydrates: 38 g
- Fiber: 2 g
- Protein: 25 g
- Cholesterol: 90 mg
Marcus Foley
Food Critic & Kitchen Coach
Expertise
Recipe Testing and Troubleshooting; Time-Saving Kitchen Hacks; Global Flavor Exploration; Engaging Food Writing and Honest Reviews.
Education
Institute of Culinary Education (ICE), New York, NY
Marcus Foley, based in Atlanta, GA, is a friendly food expert who makes cooking fun and simple.
With hands-on training from the Institute of Culinary Education and years of tasting everything from street food to fine dining, he shares easy kitchen hacks, global flavor ideas, and step-by-step recipes that turn kitchen mishaps into delicious surprises.