
The Perfect Gourmet Caramel Apples Recipe for Fall Sweetness
Sweet memories of autumn festivals spark excitement for these gourmet caramel apples that blend nostalgic charm with culinary creativity.
Fall’s crisp breeze whispers promises of delectable treats waiting to be crafted.
Biting into a perfectly coated apple, its glossy caramel shell glistening with unexpected toppings.
Professional pastry chefs and home cooks alike adore this delightful dessert that transforms simple ingredients into an art form.
Selecting the right apple variety makes all the difference in creating a mouthwatering masterpiece.
Each ingredient contributes its unique magic to this irresistible confection.
Gather your enthusiasm and let’s make something extraordinary that will have everyone asking for your secret recipe.
Why How To Make Gourmet Caramel Apples Is Worth Trying

Everything You’ll Need To Make Gourmet Caramel Apples
Main Ingredients:
Apples: Fresh, firm apples with smooth skin are perfect for caramel coating. Crisp varieties like Granny Smith or Honeycrisp work best.
Caramel Base Ingredients:Decoration and Topping Ingredients:Steps To Build Your Gourmet Caramel Apples
Step 1: Select Spectacular Apples
Handpick crisp, firm apples from your local farmers market or grocery store. Look for apples with smooth, unblemished skin that will create the perfect canvas for your caramel masterpiece. Choose varieties like:Thoroughly cleanse each apple under cool running water, then pat completely dry with a clean kitchen towel.
Step 2: Prepare Candy Sticks
Insert sturdy wooden skewers or craft sticks into the apple’s core where the stem meets the fruit. Push firmly but gently to ensure a secure hold. Place prepared apples on a parchment-lined baking sheet and chill in the refrigerator.
Step 3: Craft Luscious Caramel Coating
In a heavy-bottomed saucepan, begin your caramel magic:Melt ingredients together over medium heat, stirring constantly with a silicone spatula. Watch your candy thermometer carefully until it reaches the perfect 240°F soft-ball stage. This typically takes 12-15 minutes of patient stirring.
Step 4: Transform Apples into Caramel Treasures
Remove caramel from heat and stir in vanilla extract. Allow mixture to cool slightly for 3-4 minutes. Carefully dip each chilled apple, twirling to create an even, glossy coat. Let excess caramel drip off by gently tapping the stick against the pan’s edge.
Step 5: Add Delightful Embellishments
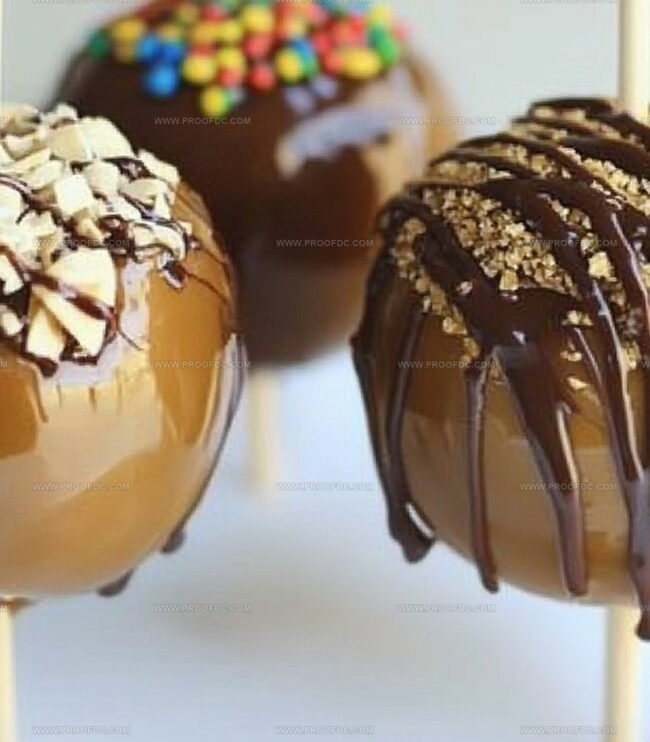
While caramel remains slightly tacky, roll or sprinkle with exciting toppings:For an extra touch of decadence, drizzle melted chocolate using a spoon or piping bag.
Step 6: Chill and Celebrate
Place decorated apples on fresh parchment paper. Refrigerate for 15-20 minutes until caramel sets completely. Wrap individually in clear cellophane for gifting or enjoy immediately as a show-stopping dessert.
Helpful Tips For Decorating Gourmet Caramel Apples
How To Keep Gourmet Caramel Apples Fresh
Fun Toppings For Gourmet Caramel Apples
Tasty Variations Of Gourmet Caramel Apples
Gourmet Caramel Apples FAQs
Drying the apples removes any moisture that could prevent the caramel from sticking properly. Wet apples will cause the caramel to slide off, resulting in an uneven and messy coating.
Use a candy thermometer to check that the caramel reaches exactly 240F (soft-ball stage). This ensures the perfect consistency – not too runny and not too hard – that will create a smooth, glossy coating on your apples.
Swirl the apple carefully in the caramel, then let excess drip off. Gently scrape the bottom of the apple against the pan’s edge to remove extra caramel and prevent pooling at the base. This technique creates a clean, even coating every time.
Yes! You can prepare caramel apples up to 2 days in advance. Store them in the refrigerator on a parchment-lined baking sheet, covered loosely with plastic wrap to maintain their freshness and prevent sticking.
Print
How To Make Gourmet Caramel Apples Recipe
- Total Time: 1 hour
- Yield: 68 1x
Description
Gourmet caramel apples blend sweet nostalgia with culinary artistry, creating a delightful dessert that elevates classic autumn treats. Crisp Granny Smith apples draped in rich caramel and adorned with premium toppings will delight your senses and satisfy seasonal cravings.
Ingredients
Fruits:
- 6 medium apples (Granny Smith or Honeycrisp)
Primary Caramel Base:
- 1 cup (227 grams) unsalted butter (2 sticks)
- 2 cups (440 grams) packed light brown sugar
- 1 cup (240 milliliters) light corn syrup
- 1 14-ounce (396 grams) can sweetened condensed milk
- 1 teaspoon vanilla extract
Toppings and Additional Ingredients:
- 1 cup (170 grams) semi-sweet or white chocolate chips (melted)
- Chopped nuts
- Crushed cookies
- Mini M&Ms
- Sprinkles
- Sea salt
- Wooden sticks or skewers
- Candy thermometer
- Parchment paper or silicone baking mat
Instructions
- Meticulously clean each crisp apple under cool running water, eliminating any waxy residue. Pat thoroughly with paper towels to create a perfectly dry surface for caramel adhesion.
- Carefully insert sturdy wooden skewers into the apple’s core, ensuring a secure grip. Arrange prepared apples on a chilled parchment-lined tray, then refrigerate while crafting the caramel coating.
- Select a heavy-bottomed copper or stainless steel saucepan for precise caramel creation. Gently meld butter, brown sugar, corn syrup, and sweetened condensed milk over medium heat, stirring continuously to prevent scorching.
- Attach a precise candy thermometer to monitor temperature. Maintain constant stirring as the mixture transforms, watching carefully until it reaches the classic 240°F soft-ball stage. This delicate process typically requires 10-15 minutes of dedicated attention.
- Remove caramel from heat and incorporate vanilla extract with smooth, deliberate movements. Allow the molten mixture to cool slightly, developing a perfect dipping consistency for about 3-4 minutes.
- Grasp each apple by its wooden handle, submerging it gracefully into the warm caramel. Rotate to ensure complete, even coverage, allowing excess to cascade back into the pan. Gently scrape the bottom against the pan’s edge to prevent unsightly pooling.
- Position each caramel-coated apple onto the prepared parchment, maintaining careful spacing. While the coating remains slightly tacky, embellish with an array of toppings – chopped nuts, colorful sprinkles, or finely crushed cookies.
- For an elegant finishing touch, melt premium chocolate chips using a double boiler or microwave. Drizzle artfully over the apples using a delicate spoon or precision piping bag.
- Chill the decorated masterpieces in the refrigerator for 15-20 minutes, allowing the caramel to set completely and toppings to adhere. Serve immediately or store in a cool environment for maximum freshness.
Notes
- Choose crisp, firm apples like Granny Smith or Honeycrisp for the best caramel coating and texture.
- Thoroughly dry apples to prevent caramel from sliding off during dipping.
- Use a candy thermometer for precise caramel temperature to avoid burning or runny consistency.
- Refrigerate apples briefly between caramel coating and decorating to help toppings stick better.
- Create allergen-friendly versions by using dairy-free butter and alternative milk for caramel.
- Experiment with different toppings like crushed cookies, coconut flakes, or sea salt for unique flavor combinations.
- Store caramel apples in the refrigerator for up to 3 days, wrapped individually in wax paper to maintain freshness.
- Allow apples to sit at room temperature for 10-15 minutes before serving to soften caramel slightly.
- Prep Time: 15 minutes
- Cook Time: 30 minutes
- Category: Desserts, Snacks
- Method: Simmering
- Cuisine: American
Nutrition
- Serving Size: 68
- Calories: 222
- Sugar: 30 g
- Sodium: 15 mg
- Fat: 9 g
- Saturated Fat: 5 g
- Unsaturated Fat: 3 g
- Trans Fat: 0 g
- Carbohydrates: 34 g
- Fiber: 1 g
- Protein: 1 g
- Cholesterol: 20 mg
Jenna Stewart
Head Chef & Recipe Innovator
Expertise
Farm-to-Table Cooking; Seasonal Menu Development; Visual Plating Techniques; Flavor Layering and Simple Prep Hacks.
Education
The Culinary Institute of America, Hyde Park, NY
Jenna Stewart is the inventive spirit behind many of our standout dishes at Pro of Delicious Creations. A proud graduate of The Culinary Institute of America, she built her skills mastering both classic recipes and fresh, modern twists.
Now, Jenna celebrates the beauty of seasonal, local ingredients, often sourced from her garden and nearby markets, to create recipes that are bursting with flavor yet easy to follow. When she’s not experimenting in the kitchen, Jenna loves exploring nature on hikes and discovering new treasures at local co-ops.