
Cozy Hot Chocolate Cookie Cups Recipe for Sweet Moments
Biting into a warm hot chocolate cookie cup that melts in your mouth like a cozy winter dream.
chocolate lovers unite around this irresistible treat that combines the richness of cocoa with a playful dessert design.
Delicate cookie shells cradle a smooth, velvety filling that whispers comfort with every bite.
These charming little cups look complicated but come together surprisingly easily in your kitchen.
Each morsel promises a delightful surprise that transforms an ordinary sweet into something magical.
Small gatherings or quiet moments alone become special when you serve these adorable cookies.
Anyone can create these delectable treats, and the smiles they generate are guaranteed to brighten even the chilliest day.
Come with me and let’s make something deliciously unforgettable that will have everyone asking for seconds.
Why Hot Chocolate Cookie Cups Make Winter Sweeter
What You’ll Need For Hot Chocolate Cookie Cups
Cookie Base Ingredients:Dry Ingredients:Filling and Topping Ingredients:Steps To Prepare Hot Chocolate Cookie Cups
Step 1: Prepare Baking Space
Warm up the oven to 350°F. Grab a mini muffin tin and coat every nook and cranny with cooking spray or butter to prevent sticking.
Step 2: Create Cookie Dough Magic
In a large mixing bowl, blend together:Whip until the mixture looks fluffy and light. Add eggs one at a time, mixing thoroughly after each. Splash in vanilla extract for extra flavor.
In a separate bowl, combine:Gently fold the dry ingredients into the wet mixture until everything comes together smoothly.
Step 3: Shape Delightful Cups
Scoop a tablespoon of dough into each muffin tin cavity. Use your thumb or the back of a spoon to press down and create a cozy little well in the center of each cookie.
Step 4: Bake to Perfection
Pop the tin into the oven for 10-12 minutes. The edges should look set and slightly crisp. Once out, use a spoon or rolling pin end to reshape the wells while they’re still warm and pliable. Let the cookie cups cool completely inside the tin.
Step 5: Craft Silky Ganache
Warm heavy cream in a small saucepan until it starts steaming (but not boiling). Pour the hot cream over chocolate chips in a bowl. Let it sit for 2-3 minutes, then stir until you have a smooth, glossy chocolate mixture.
Step 6: Fill with Chocolatey Goodness
Carefully spoon or pipe the ganache into each cooled cookie cup, filling them right to the top.
Step 7: Add Festive Touches
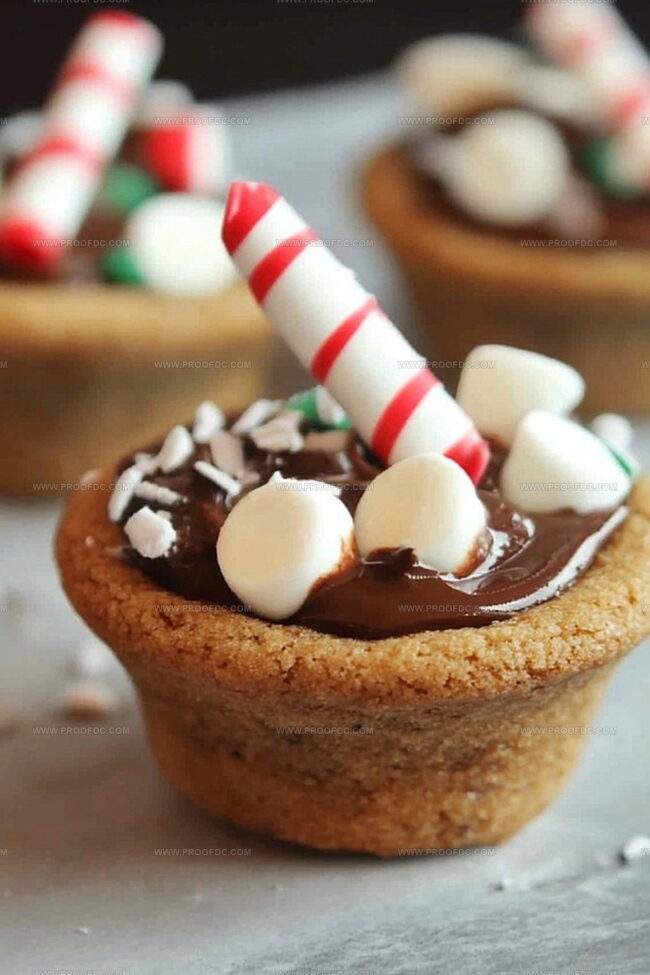
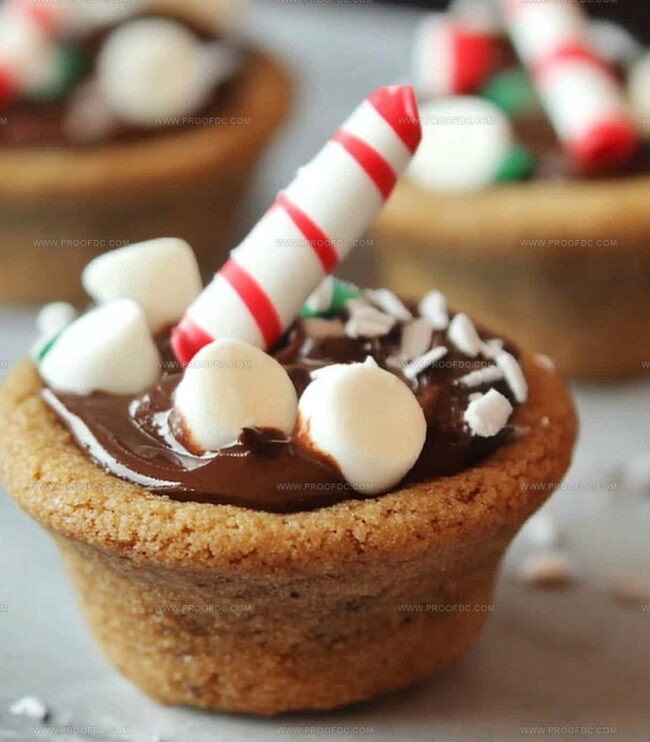
Crown each cookie cup with mini marshmallows. For extra flair, drizzle melted white chocolate and sprinkle crushed candy canes on top.
Step 8: Chill and Enjoy
Allow the ganache to set for about 30 minutes at room temperature or speed things up in the refrigerator. Serve these delectable treats and watch everyone’s eyes light up!
Pro Tip: These cookie cups are perfect for holiday gatherings, winter parties, or when you need a special sweet treat that combines the comfort of hot chocolate with the joy of cookies.
Tips For Soft Hot Chocolate Cookie Cups
How To Store Hot Chocolate Cookie Cups Properly
What Matches Hot Chocolate Cookie Cups Best
New Flavors For Hot Chocolate Cookie Cups
Your Hot Chocolate Cookie Cups Questions Answered
These cookie cups combine the rich, comforting flavors of hot chocolate in a delightful handheld dessert. The chocolate cookie base is perfectly complemented by smooth ganache and topped with marshmallows, creating a nostalgic winter treat.
Absolutely! You can prepare the cookie cups and ganache a day in advance. Store the unfilled cups in an airtight container and the ganache separately. Fill and decorate them just before serving to maintain the best texture and freshness.
Not at all! While they look impressive, these cookie cups are surprisingly simple to create. The key is using a mini muffin tin to shape the cups and pressing the center while they’re still warm to create the perfect well for ganache.
Generously grease your mini muffin tin with cooking spray or butter. Allow the cookies to cool completely in the pan before attempting to remove them. This helps them set and makes removal much easier.
Print
Hot Chocolate Cookie Cups Recipe
- Total Time: 1 hour
- Yield: 12 1x
Description
Indulgent hot chocolate cookie cups blend rich chocolate cookies with marshmallow-lined interiors for a delightful winter treat. Chocolate lovers will savor the perfect combination of crisp cookie shells and creamy marshmallow centers that melt in each delectable bite.
Ingredients
Main Dry Ingredients:
- 2 ½ cups (315 g) all-purpose flour
- ¾ cup (90 g) cocoa powder
- 1 teaspoon baking soda
- ½ teaspoon salt
- 1 cup (170 g) semi-sweet chocolate chips
Sweeteners and Binding Ingredients:
- 1 cup (225 g) unsalted butter, softened
- 1 cup (200 g) granulated sugar
- ½ cup (100 g) brown sugar
- 2 large eggs
- 1 teaspoon vanilla extract
Topping and Filling Ingredients:
- ½ cup (120 ml) heavy cream
- Mini marshmallows
- Crushed candy canes (optional)
- White chocolate, melted (optional, for drizzle)
Instructions
- Prepare the baking workspace by coating a mini muffin tin thoroughly with cooking spray, ensuring complete coverage to prevent sticking. Position the oven rack in the center and heat to 350F (175C).
- Create the cookie base by whipping butter with granulated and brown sugars until the mixture transforms into a light, airy texture. Incorporate eggs individually, blending after each addition. Mix in vanilla extract for depth of flavor.
- Combine dry ingredients – flour, cocoa powder, baking soda, and salt – in a separate bowl. Gradually fold these ingredients into the wet mixture, stirring until a uniform dough forms.
- Portion the cookie dough into mini muffin cavities, using approximately one tablespoon per section. Gently press the dough against the sides and bottom, forming a shallow well in the center using your thumb or a rounded utensil.
- Transfer the muffin tin to the preheated oven and bake for 10-12 minutes. The edges should appear set and slightly firm. Immediately after removing from the oven, use a small spoon to reshape the wells while the cookies remain warm and pliable.
- Allow the cookie cups to cool completely within the tin, which helps them maintain their distinctive shape and prevents potential cracking.
- Prepare the ganache by warming heavy cream until it reaches a steaming point, avoiding boiling. Pour the hot cream over chocolate chips and let it rest for 2-3 minutes. Whisk until the mixture achieves a smooth, glossy consistency.
- Once the cookie cups have cooled, carefully fill each with the rich chocolate ganache, ensuring an even distribution to the rim.
- Embellish the filled cups with mini marshmallows. For an optional festive touch, drizzle melted white chocolate and sprinkle crushed candy canes on top.
- Let the ganache set by allowing the cookie cups to rest at room temperature or expedite the process by chilling in the refrigerator for approximately 30 minutes before serving.
Notes
- Achieve perfect texture by ensuring butter and eggs are at room temperature before mixing, which helps create a smoother, more uniform cookie dough.
- Prevent cookie cups from sticking by generously greasing the mini muffin tin and using a non-stick cooking spray or butter with a silicone brush.
- Create uniform cookie cups by using a small cookie scoop or tablespoon measure to distribute dough evenly, ensuring consistent baking and shape.
- Modify for gluten-free diets by substituting all-purpose flour with a gluten-free flour blend, maintaining the rich chocolate flavor while accommodating dietary restrictions.
- Enhance ganache stability by using high-quality chocolate with at least 60% cocoa content, which provides a more intense flavor and smoother consistency.
- Keep cookie cups fresh by storing in an airtight container at room temperature for up to 3 days, or refrigerate for extended shelf life.
- Experiment with flavor variations by adding a pinch of espresso powder to the dough or using different chocolate types for unique ganache profiles.
- Prep Time: 20 minutes
- Cook Time: 40 minutes
- Category: Desserts, Snacks
- Method: Baking
- Cuisine: American
Nutrition
- Serving Size: 12
- Calories: 266 kcal
- Sugar: 17 g
- Sodium: 75 mg
- Fat: 14 g
- Saturated Fat: 8 g
- Unsaturated Fat: 6 g
- Trans Fat: 0 g
- Carbohydrates: 33 g
- Fiber: 1 g
- Protein: 3 g
- Cholesterol: 44 mg
Jenna Stewart
Head Chef & Recipe Innovator
Expertise
Farm-to-Table Cooking; Seasonal Menu Development; Visual Plating Techniques; Flavor Layering and Simple Prep Hacks.
Education
The Culinary Institute of America, Hyde Park, NY
Jenna Stewart is the inventive spirit behind many of our standout dishes at Pro of Delicious Creations. A proud graduate of The Culinary Institute of America, she built her skills mastering both classic recipes and fresh, modern twists.
Now, Jenna celebrates the beauty of seasonal, local ingredients, often sourced from her garden and nearby markets, to create recipes that are bursting with flavor yet easy to follow. When she’s not experimenting in the kitchen, Jenna loves exploring nature on hikes and discovering new treasures at local co-ops.