The Ultimate Homemade Garlic Butter Cheese Bombs Recipe
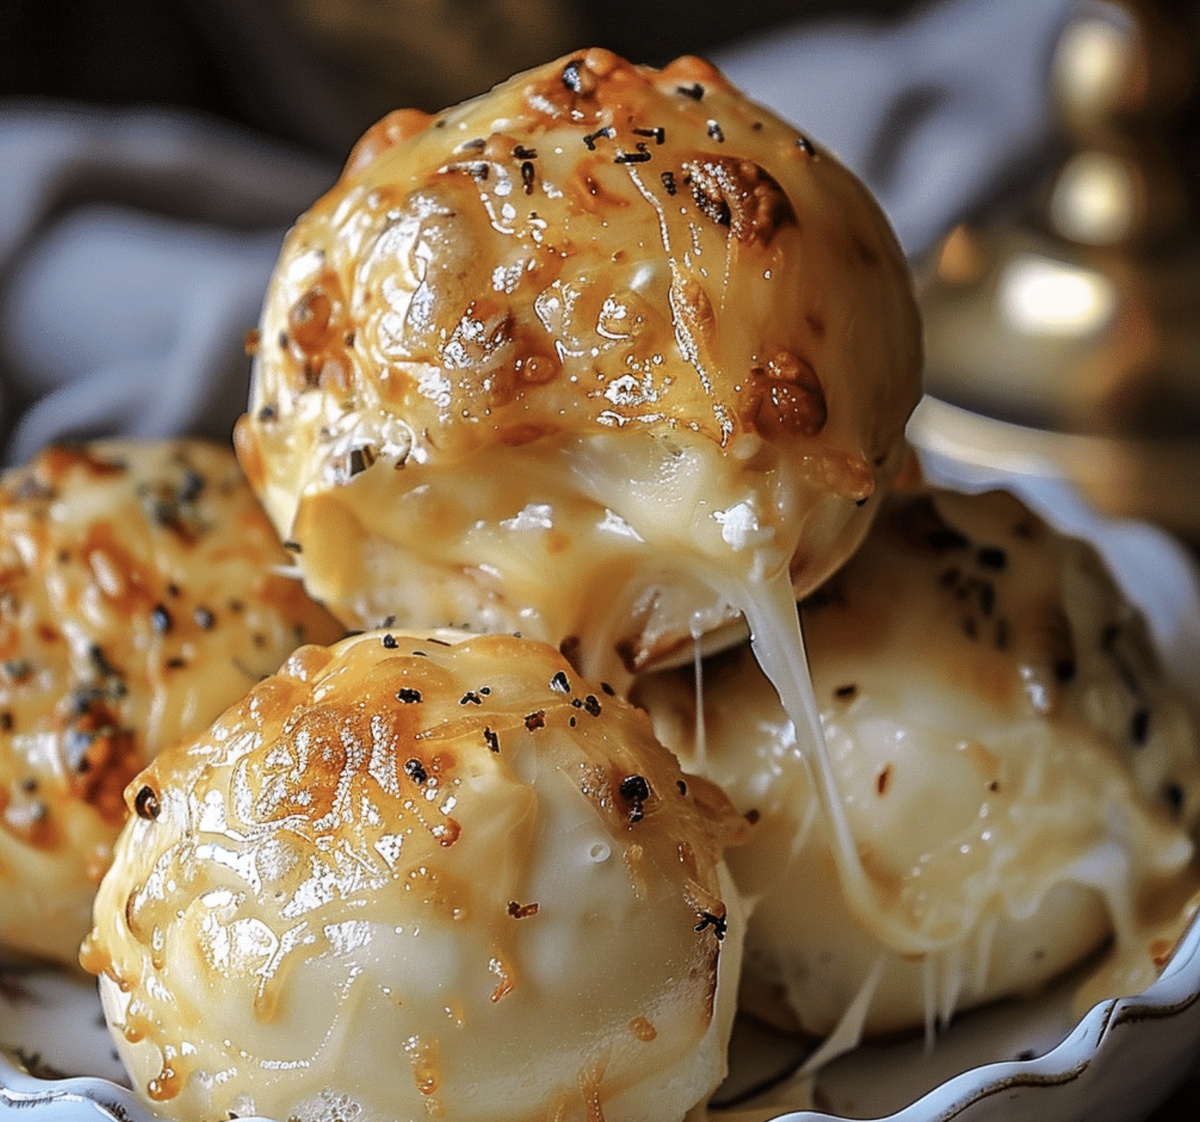
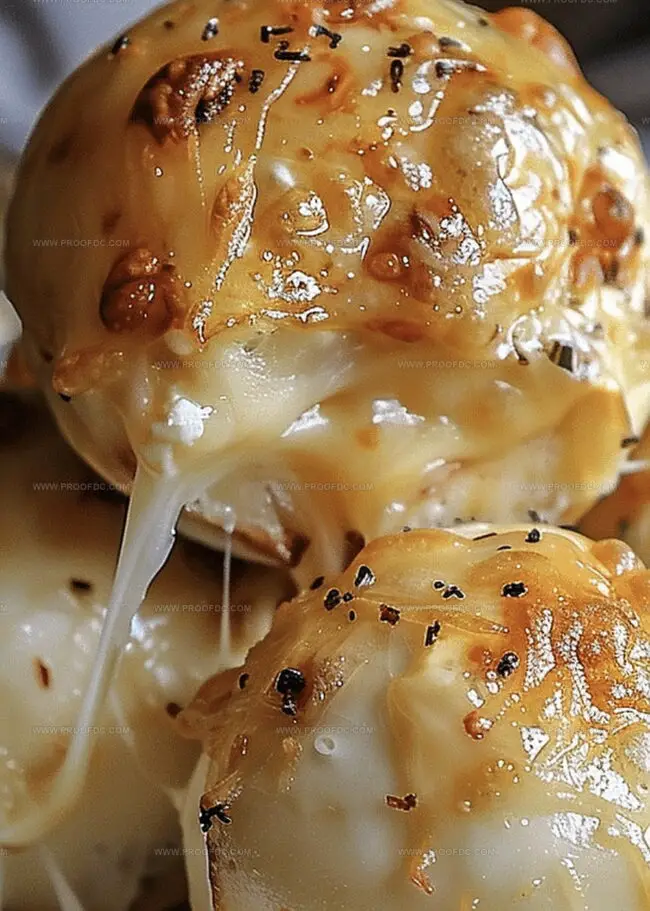
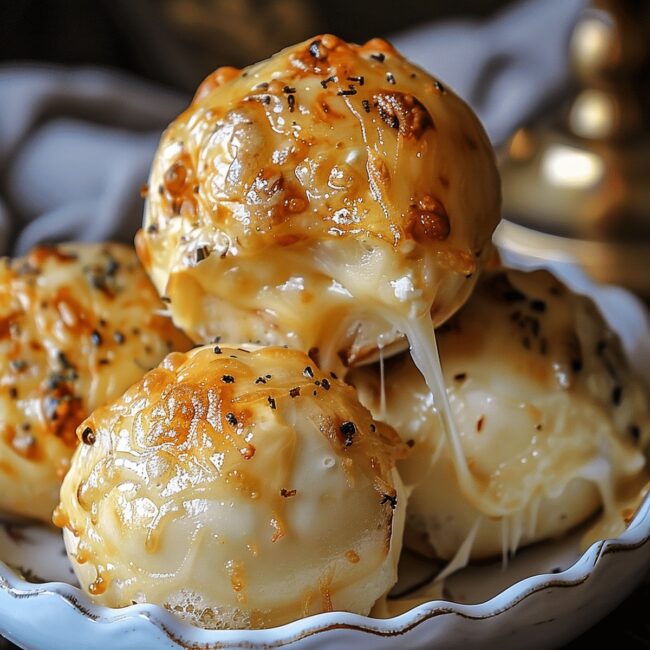
Biting into a warm, gooey garlic butter cheese bomb that melts in your mouth.
These irresistible appetizers pack serious flavor into every single bite.
Soft dough envelops pockets of molten cheese, creating a delectable surprise with each serving.
cheese lovers will go crazy for this simple yet impressive snack that looks like it came from a fancy restaurant kitchen.
Quick and easy preparation means you can whip up these delightful treats in minutes.
Fresh ingredients transform ordinary dinner rolls into something spectacular.
The aroma of melted cheese and garlic will draw everyone to the kitchen, eager to sample these crowd-pleasing bites.
Why Homemade Garlic Butter Cheese Bombs Hit The Spot
Simple Ingredients For Homemade Garlic Butter Cheese Bombs
Bread Base:Cheese Filling:Garlic Butter Coating:Easy Way To Make Homemade Garlic Butter Cheese Bombs
Step 1: Warm Up the Oven
Crank your oven to a toasty 375F (190C). Grab a baking sheet and line it with parchment paper to prevent any sticky situations.
Step 2: Prepare Dough Circles
Gently separate each biscuit from the package. Using your fingertips, softly press and spread each piece into a delicate round shape, creating the perfect canvas for cheesy goodness.
Step 3: Create Cheese Pockets
Place a cube of mozzarella right in the center of each biscuit circle. Carefully wrap the dough around the cheese, pinching and sealing the edges until you form a perfect little ball. Make sure no cheese can escape!
Step 4: Bake to Golden Perfection
Arrange the cheese-filled dough balls on the parchment-lined sheet with the sealed side facing down. Slide the baking sheet into the preheated oven and let them transform for 10-12 minutes until they turn a gorgeous golden brown.
Step 5: Whip Up Garlic Magic
While the bombs are baking, mix up the flavor-packed garlic butter:Stir these ingredients together in a small bowl, creating an aromatic mixture that will make taste buds dance.
Step 6: Add the Finishing Touch
Pull the cheese bombs out of the oven. Immediately brush each one generously with the prepared garlic butter. Sprinkle freshly chopped parsley on top for a burst of color and extra flavor.
Step 7: Serve and Enjoy
Present these hot, gooey delights immediately. Watch as the cheese stretches dramatically when pulled apart. For an extra treat, serve with marinara sauce on the side for dipping.
Top Pointers For Homemade Garlic Butter Cheese Bombs

How To Store Homemade Garlic Butter Cheese Bombs Right
Best Matches For Homemade Garlic Butter Cheese Bombs
Try These New Takes On Homemade Garlic Butter Cheese Bombs
Homemade Garlic Butter Cheese Bombs FAQs You Should Know
Mozzarella is perfect because it melts smoothly and creates those delicious, stretchy cheese pulls when you bite into the bombs.
Yes! You can prepare the cheese bombs and refrigerate them before baking. Just add 2-3 extra minutes to the baking time when cooking from cold.
Make sure to pinch the dough edges tightly and seal completely around the cheese cube. Avoid stretching the dough too thin when wrapping the cheese.
Absolutely! Kids love the cheesy center and crispy exterior. They’re easy to eat and make a fun appetizer or snack that children will enjoy.
Print
Homemade Garlic Butter Cheese Bombs Recipe
- Total Time: 22 minutes
- Yield: 8 1x
Description
Cheesy garlic butter bombs bring explosive flavor to your dinner table with golden, crispy edges and a molten center. Melted cheese and herbed butter create an irresistible side dish that pulls apart with pure deliciousness.
Ingredients
Main Ingredients:
- 1 can (16 ounces / 454 grams) refrigerated biscuit dough (8 biscuits)
- 4 ounces (113 grams) mozzarella cheese, cut into 8 cubes
Butter and Seasoning:
- 4 tablespoons (60 milliliters) unsalted butter, melted
- 2 cloves garlic, minced
- ½ teaspoon (2.5 milliliters) Italian seasoning
- 1 tablespoon (15 milliliters) fresh parsley, chopped (or 1 teaspoon / 5 milliliters dried parsley)
Instructions
- Assemble all necessary ingredients and tools on a clean, spacious kitchen workspace to streamline the preparation process.
- Carefully unfold the biscuit dough, gently separating each piece to maintain its delicate texture and prevent tearing.
- Using your fingertips, delicately flatten each biscuit into a uniform circular shape, ensuring an even surface for the cheese filling.
- Position a single mozzarella cheese cube precisely in the center of each flattened biscuit round, creating a focal point for the filling.
- Skillfully gather the edges of the dough, enveloping the cheese completely and creating a secure pouch by pinching and sealing the edges with careful, precise movements.
- Arrange the transformed dough spheres on a parchment-lined baking sheet, positioning them seam-side down to prevent premature cheese leakage.
- Slide the baking sheet into a preheated oven, allowing the cheese bombs to transform into golden, crispy parcels over 10-12 minutes.
- Simultaneously, craft a fragrant garlic butter infusion by blending melted butter with finely minced garlic and aromatic Italian seasoning.
- Upon removing the perfectly baked cheese bombs, immediately lavish them with the prepared garlic butter, ensuring each morsel receives a generous coating.
- Sprinkle freshly chopped parsley across the surface, adding a vibrant green garnish that enhances both visual appeal and flavor profile.
- Serve the cheese bombs immediately while molten and irresistible, optionally accompanying them with a classic marinara sauce for additional dipping pleasure.
Notes
- Seal the cheese completely inside the dough to prevent leakage during baking, ensuring a perfect cheesy center.
- Experiment with different cheese varieties like cheddar, pepper jack, or blue cheese for unique flavor profiles that match your taste preferences.
- Create a gluten-free version by using gluten-free biscuit dough or making your own homemade dough with alternative flour blends.
- Prep these bombs ahead of time by assembling and refrigerating before baking, making them perfect for last-minute entertaining or quick appetizers.
- Prep Time: 10 minutes
- Cook Time: 12 minutes
- Category: Appetizer, Snacks
- Method: Baking
- Cuisine: American
Nutrition
- Serving Size: 8
- Calories: 180
- Sugar: 1 g
- Sodium: 350 mg
- Fat: 12 g
- Saturated Fat: 7 g
- Unsaturated Fat: 4 g
- Trans Fat: 0 g
- Carbohydrates: 16 g
- Fiber: 0 g
- Protein: 4 g
- Cholesterol: 30 mg
Jenna Stewart
Head Chef & Recipe Innovator
Expertise
Farm-to-Table Cooking; Seasonal Menu Development; Visual Plating Techniques; Flavor Layering and Simple Prep Hacks.
Education
The Culinary Institute of America, Hyde Park, NY
Jenna Stewart is the inventive spirit behind many of our standout dishes at Pro of Delicious Creations. A proud graduate of The Culinary Institute of America, she built her skills mastering both classic recipes and fresh, modern twists.
Now, Jenna celebrates the beauty of seasonal, local ingredients, often sourced from her garden and nearby markets, to create recipes that are bursting with flavor yet easy to follow. When she’s not experimenting in the kitchen, Jenna loves exploring nature on hikes and discovering new treasures at local co-ops.