
Tropical Hawaiian Pineapple Coconut Dream Cake Recipe
My latest baking adventure with pineapple coconut dream cake has me dancing in the kitchen like I’m on a tropical getaway.
Sweet memories of island breezes inspire this delightful dessert that captures sunshine on a plate.
Friends always ask about my secret weapon when I serve this dreamy creation.
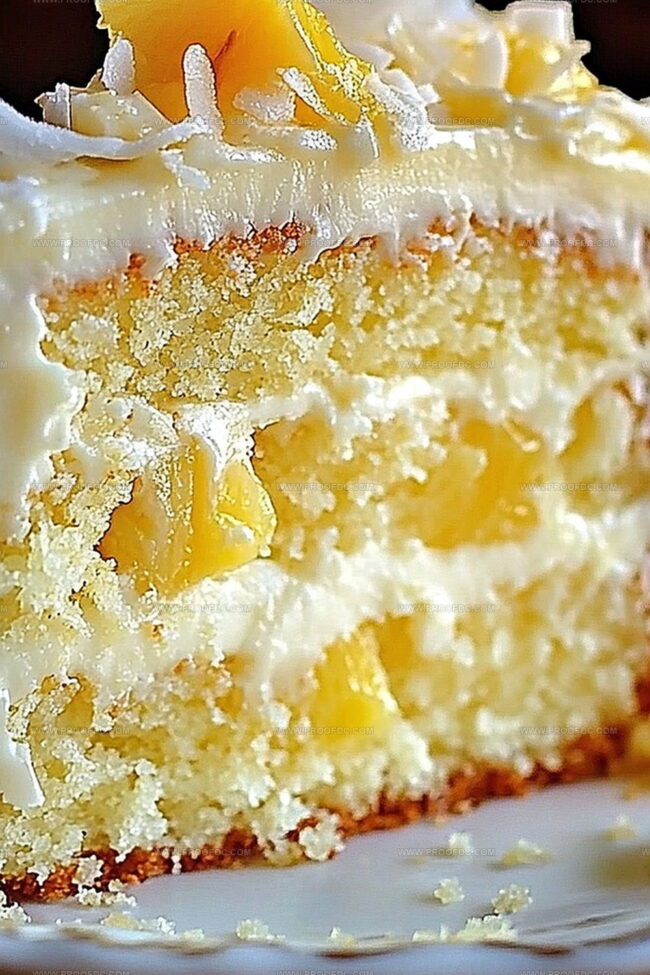
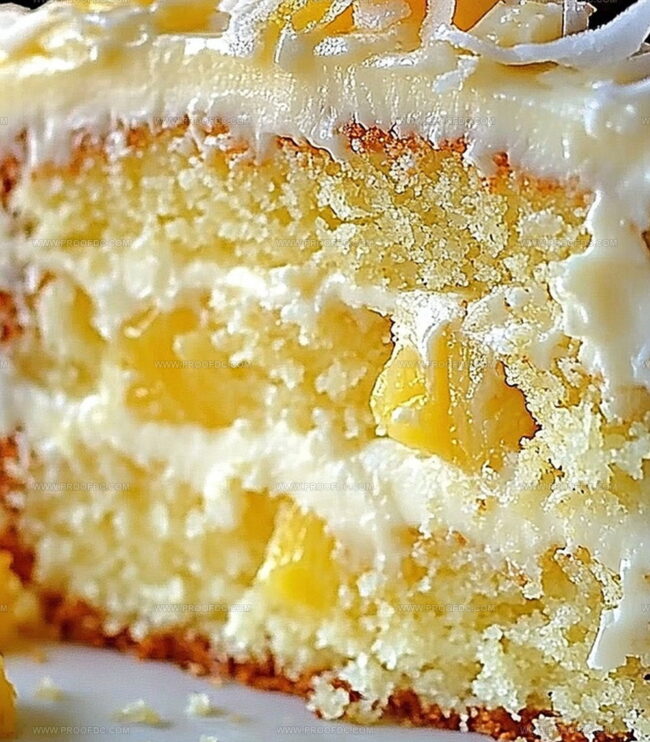
Layers of moist cake blend tropical ingredients into a magical experience that transports you instantly.
Creamy coconut frosting whispers hints of paradise with each delectable bite.
Unexpected texture and rich flavors make this cake more than just a typical dessert.
You’ll want to savor every single moment of this culinary escape.
Grab a fork and let the tropical magic begin!
What Makes Hawaiian Pineapple Coconut Dream Cake Special
What You’ll Need For Hawaiian Pineapple Coconut Dream Cake
Cake Base:Moisture and Flavor Enhancers:Topping and Finishing:How To Bake Hawaiian Pineapple Coconut Dream Cake
Step 1: Warm Up the Oven
Crank the oven to a toasty 350F. Grab a 9×13-inch baking pan and give it a quick spray with cooking oil, then dust it with a light coating of flour to prevent sticking.
Step 2: Mix the Magical Cake Batter
Gather your ingredients:In a spacious mixing bowl, whip up the cake mix following the package instructions. Here’s the secret twist: swap out water for the entire can of crushed pineapple. Stir everything until smooth and well-blended.
Step 3: Bake to Perfection
Pour the pineapple-infused batter into the prepared pan. Slide it into the preheated oven and bake for 25-30 minutes. Check for doneness by inserting a toothpick – it should come out clean when the cake is ready.
Step 4: Create the Tropical Soak
While the cake is still warm, grab a fork and create a network of holes across the surface. This will help the upcoming liquid soak deep into the cake.
Whisk together:Gently pour this creamy mixture over the warm cake, letting it seep into every delightful crevice.
Step 5: Add Coconut Blanket
Sprinkle shredded coconut evenly across the top of the cake. Let the cake cool down completely, allowing all those tropical flavors to mingle and dance.
Step 6: Whip Up the Dreamy Topping
In a large mixing bowl, combine:Whip these ingredients until they form luxurious, standing peaks.
Step 7: Frost and Finish
Spread the whipped cream evenly over the cooled cake, creating a cloud-like layer of deliciousness.
Step 8: Final Tropical Touch
Scatter toasted coconut flakes across the top. If you’re feeling extra fancy, add some fresh pineapple slices for garnish.
Step 9: Chill and Serve
Tuck the cake into the refrigerator for at least an hour. This allows the flavors to become best friends and create a truly magical dessert experience. Serve chilled and watch everyone’s eyes light up!
Tips To Nail Hawaiian Pineapple Coconut Dream Cake
Keep Hawaiian Pineapple Coconut Dream Cake Fresh And Soft
Best Matches For Hawaiian Pineapple Coconut Dream Cake
Fun Twists On Hawaiian Pineapple Coconut Dream Cake
Questions On Hawaiian Pineapple Coconut Dream Cake
This cake combines tropical flavors of pineapple and coconut, creating a moist, rich dessert that’s like a Hawaiian vacation in every bite. The unique soaking method with condensed and coconut milk makes the cake incredibly tender and flavorful.
While canned crushed pineapple works best because it’s already soft and provides moisture, you can use fresh pineapple. Just make sure to finely chop it and drain excess liquid to prevent the cake from becoming too wet.
The cake has a balanced sweetness. The whipped cream frosting is lighter than traditional buttercream, and the pineapple adds a tangy freshness that cuts through the sweetness, making it enjoyable for those who prefer less sugary desserts.
This recipe is quite beginner-friendly! It uses a cake mix as a base, and the additional steps are simple. The most important part is following the soaking and cooling instructions carefully to achieve the signature dreamy texture.
Print
Hawaiian Pineapple Coconut Dream Cake Recipe
- Total Time: 1 hour 45 minutes
- Yield: 12 1x
Description
Tropical Hawaiian Pineapple Coconut Dream Cake blends island paradise with sweet bakery magic. Creamy layers and luscious flavors invite dessert lovers to savor a delightful Caribbean-inspired culinary escape you’ll crave after one bite.
Ingredients
Cake Base:
- 1 box yellow cake mix
- Eggs (as per box instructions)
- Oil (as per box instructions)
- Water (as per box instructions)
Filling and Moisture Ingredients:
- 1 can (20 ounces / 567 grams) crushed pineapple, undrained
- 1 can (14 ounces / 397 grams) sweetened condensed milk
- 1 cup (240 milliliters) coconut milk
Topping and Garnish:
- 2 cups (480 milliliters) heavy whipping cream
- ¼ cup (30 grams) powdered sugar
- 1 teaspoon vanilla extract
- 1 cup (80 grams) shredded sweetened coconut
- ½ cup (40 grams) toasted coconut flakes
- Pineapple slices or chunks (optional)
Instructions
- Preheat the oven to 350F (175C) and prepare a 9×13-inch baking pan by greasing and lightly dusting with flour, ensuring complete coverage to prevent sticking.
- Create the cake batter by combining the yellow cake mix with undrained crushed pineapple instead of water, mixing thoroughly until a smooth, consistent texture is achieved.
- Transfer the batter into the prepared pan, spreading evenly and ensuring an uniform surface for consistent baking.
- Bake the cake for 25-30 minutes, monitoring closely and testing for doneness by inserting a toothpick into the center – it should emerge clean and without wet batter.
- While the cake is still warm, use a fork to carefully puncture the surface with multiple holes, creating channels for the upcoming liquid mixture to penetrate deeply.
- Whisk together sweetened condensed milk and coconut milk in a separate bowl, creating a rich, creamy liquid infusion.
- Gently pour the milk mixture over the warm cake, allowing it to seep into the holes and permeate the entire dessert, ensuring complete absorption.
- Generously sprinkle shredded coconut across the surface, creating an even layer of tropical texture.
- Allow the cake to cool completely at room temperature, enabling the flavors to meld and settle.
- Prepare the whipped cream topping by combining heavy cream, powdered sugar, and vanilla extract, whipping until stiff peaks form and the mixture holds its shape.
- Spread the whipped cream evenly across the cooled cake, creating a smooth, elegant covering.
- Enhance the presentation by sprinkling toasted coconut flakes and optionally garnishing with fresh pineapple slices.
- Refrigerate the cake for a minimum of one hour to intensify flavors and achieve optimal serving temperature.
- Slice and serve chilled, enjoying the harmonious blend of tropical flavors and creamy textures.
Notes
- Swap yellow cake mix with gluten-free version for celiac-friendly option, ensuring everyone can enjoy this tropical dessert.
- Reduce sugar content by using unsweetened coconut milk and low-fat condensed milk for a lighter, healthier alternative.
- Toast coconut flakes beforehand to enhance nutty flavor and create delightful crunchy texture on cake’s surface.
- Cool cake completely before adding whipped cream to prevent melting and maintain perfect frosting consistency.
- Prep Time: 15 minutes
- Cook Time: 30 minutes
- Category: Desserts
- Method: Baking
- Cuisine: Hawaiian
Nutrition
- Serving Size: 12
- Calories: 450
- Sugar: 32 g
- Sodium: 180 mg
- Fat: 28 g
- Saturated Fat: 18 g
- Unsaturated Fat: 8 g
- Trans Fat: 0 g
- Carbohydrates: 50 g
- Fiber: 1 g
- Protein: 5 g
- Cholesterol: 80 mg
Jenna Stewart
Head Chef & Recipe Innovator
Expertise
Farm-to-Table Cooking; Seasonal Menu Development; Visual Plating Techniques; Flavor Layering and Simple Prep Hacks.
Education
The Culinary Institute of America, Hyde Park, NY
Jenna Stewart is the inventive spirit behind many of our standout dishes at Pro of Delicious Creations. A proud graduate of The Culinary Institute of America, she built her skills mastering both classic recipes and fresh, modern twists.
Now, Jenna celebrates the beauty of seasonal, local ingredients, often sourced from her garden and nearby markets, to create recipes that are bursting with flavor yet easy to follow. When she’s not experimenting in the kitchen, Jenna loves exploring nature on hikes and discovering new treasures at local co-ops.