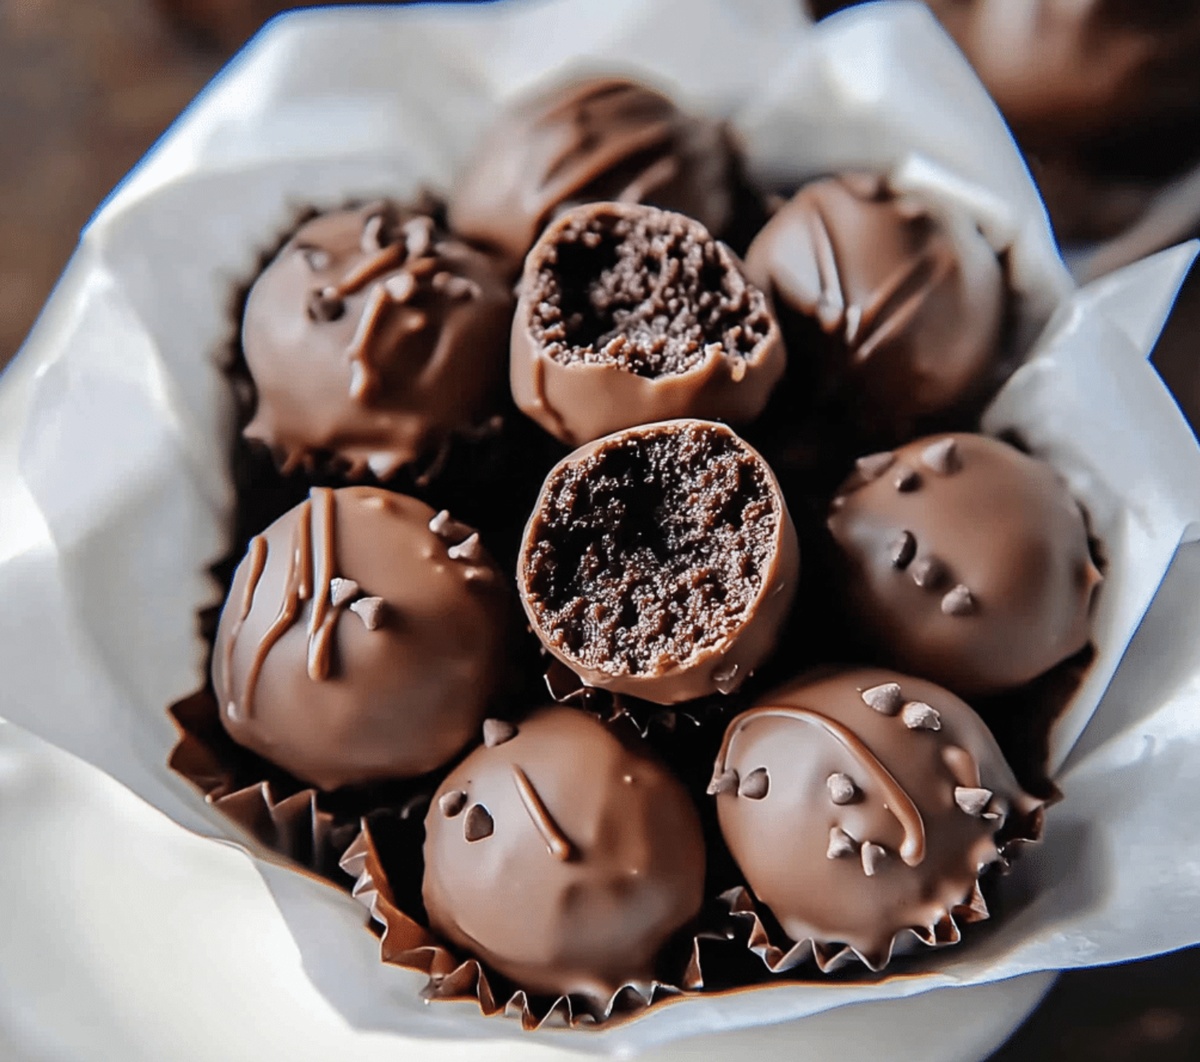
The Creamiest Easy Brownie Truffles Recipe for Sweet Tooths
Rolling creamy brownie truffles between your fingertips, watching chocolate magic unfold before you.
These decadent little bites promise pure indulgence in every single morsel.
Chocolate lovers will absolutely swoon over the rich, fudgy texture that melts instantly on your tongue.
Homemade treats like these always spark conversation and bring instant smiles around the table.
Professional bakers and kitchen novices alike can master this simple yet impressive dessert in minutes.
Each truffle becomes a miniature canvas of deliciousness, blending deep cocoa notes with smooth, silky coating.
You’ll want to savor every single bite – trust me, these truffles disappear faster than you can say “chocolate heaven”!
Why Easy Brownie Truffles Are Always A Good Choice

What You’ll Need For Easy Brownie Truffles
Base Ingredients:Coating and Decoration:Preparation Essentials:How To Make Easy Brownie Truffles Fast
Step 1: Bake Chocolatey Base
Grab a brownie mix and follow the package directions. After baking, let the brownies cool completely on a wire rack. Crumble the brownies into fine, moist crumbs using your hands or a fork. If the mixture feels too dry, add cream cheese or frosting to help the balls stick together.
Ingredients:Step 2: Roll Delightful Nuggets
Scoop small portions of the brownie mixture and roll them between your palms to create smooth, round balls. Place the balls on a parchment-lined tray. Pop the tray into the refrigerator and chill for about 30 minutes until they’re firm and easy to handle.
Step 3: Chocolate Dunk Extravaganza
Melt chocolate in a microwave-safe bowl, stirring every 30 seconds until silky smooth. Carefully dip each brownie ball into the melted chocolate, using a fork to help drain excess coating. Place the chocolate-covered balls back on the parchment-lined tray.
Ingredients:Step 4: Finishing Touches
Sprinkle your favorite toppings over the wet chocolate before it sets. Allow the truffles to sit at room temperature or refrigerate until the chocolate hardens completely. Transfer to a beautiful serving platter or store in an airtight container in the refrigerator.
Tip: These blissful bites will keep for up to a week when stored properly. Perfect for parties, gifts, or a midnight chocolate craving!
Tips That Help With Easy Brownie Truffles Every Time
How To Store And Reheat Easy Brownie Truffles
Great Pairings With Easy Brownie Truffles
Easy Brownie Truffles Variations Worth Trying
FAQs About Easy Brownie Truffles To Know
Adding cream cheese or frosting helps bind the dry brownie crumbs together, creating a smooth, moldable texture that makes it easier to roll into perfect truffle balls. Without this, your truffles might crumble apart.
Absolutely! While semi-sweet or dark chocolate works great, you can experiment with milk chocolate, white chocolate, or even colored candy melts to create different flavor profiles and appearances for your truffles.
Use a fork or dedicated dipping tool to ensure even chocolate coverage. Gently tap the fork on the bowl’s edge to remove excess chocolate, which helps create a smooth, clean finish on your truffles. Let the excess drip off before placing them on the parchment paper.
Get creative with toppings like crushed candy canes, chopped nuts, colorful sprinkles, cocoa powder, shredded coconut, or crushed Oreo cookies. These add extra texture and visual appeal to your delicious truffles.
Print
Easy Brownie Truffles Recipe
- Total Time: 1 hour 15 minutes
- Yield: 24 1x
Description
Chocolate-packed brownie truffles deliver a delightful dessert experience that blends rich fudgy goodness with smooth truffle elegance. Bite-sized morsels of pure indulgence will transport you to a world of irresistible sweet satisfaction.
Ingredients
Main Ingredients:
- 1 box (18-20 ounces/500 grams) brownie mix
- 200 grams (7 ounces) semi-sweet or dark chocolate
Supporting Ingredients:
- 3 tablespoons cream cheese or frosting
Garnish Options:
- Sprinkles
- Chopped nuts
- Cocoa powder
- Crushed cookies
Instructions
- Transform freshly baked brownies into delectable bite-sized morsels by thoroughly crumbling the cooled dessert into fine, moist fragments within a spacious mixing bowl. Incorporate cream cheese or frosting gradually to ensure the mixture maintains a cohesive, moldable consistency that permits effortless shaping.
- Meticulously craft uniform spherical truffles by scooping precise portions of the brownie mixture and gently rolling between palms until smooth and compact. Arrange the delicate orbs on a parchment-lined tray, then refrigerate for approximately half an hour to stabilize their structural integrity.
- Prepare a luxurious chocolate coating by melting semi-sweet or dark chocolate using precise microwave intervals, stirring between each session to achieve a velvety, glossy texture. Immerse each chilled brownie sphere completely, allowing excess chocolate to elegantly cascade back into the melting vessel.
- Embellish the chocolate-enrobed truffles with complementary garnishes like chopped nuts, colorful sprinkles, or crushed cookie fragments while the coating remains glistening and receptive. Position the decorated morsels on the parchment surface, permitting them to solidify at ambient temperature or within a refrigerated environment.
- Once the chocolate shell has fully crystallized, transfer the truffles to an elegant serving platter or store within an hermetic container to preserve their impeccable texture and rich, decadent flavor profile.
Notes
- Choose high-quality brownie mix for richer, more indulgent truffles that elevate the overall flavor and texture.
- Ensure brownies are completely cooled before crumbling to prevent a sticky, messy mixture that won’t hold shape.
- Use cream cheese sparingly when binding; too much can make the truffles too soft and difficult to handle.
- Experiment with different chocolate coatings like white, milk, or dark chocolate to create unique flavor combinations.
- Chill truffles between steps to maintain firmness and make dipping in chocolate easier and less messy.
- Add a splash of flavor extract like peppermint or orange to the melted chocolate for an unexpected taste twist.
- Store truffles in the refrigerator for up to a week, separated by parchment paper to prevent sticking.
- Create gluten-free versions by using a gluten-free brownie mix and checking chocolate coating ingredients.
- Prep Time: 15 minutes
- Cook Time: 30 minutes
- Category: Desserts, Snacks
- Method: Mixing
- Cuisine: American
Nutrition
- Serving Size: 24
- Calories: 150
- Sugar: 10 g
- Sodium: 100 mg
- Fat: 8 g
- Saturated Fat: 4 g
- Unsaturated Fat: 3 g
- Trans Fat: 0 g
- Carbohydrates: 18 g
- Fiber: 1 g
- Protein: 2 g
- Cholesterol: 15 mg
Jenna Stewart
Head Chef & Recipe Innovator
Expertise
Farm-to-Table Cooking; Seasonal Menu Development; Visual Plating Techniques; Flavor Layering and Simple Prep Hacks.
Education
The Culinary Institute of America, Hyde Park, NY
Jenna Stewart is the inventive spirit behind many of our standout dishes at Pro of Delicious Creations. A proud graduate of The Culinary Institute of America, she built her skills mastering both classic recipes and fresh, modern twists.
Now, Jenna celebrates the beauty of seasonal, local ingredients, often sourced from her garden and nearby markets, to create recipes that are bursting with flavor yet easy to follow. When she’s not experimenting in the kitchen, Jenna loves exploring nature on hikes and discovering new treasures at local co-ops.