Crispy Taco Ranch Bites Recipe

Zesty Taco Ranch Bites Recipe: Crowd-Pleasing Party Snacks

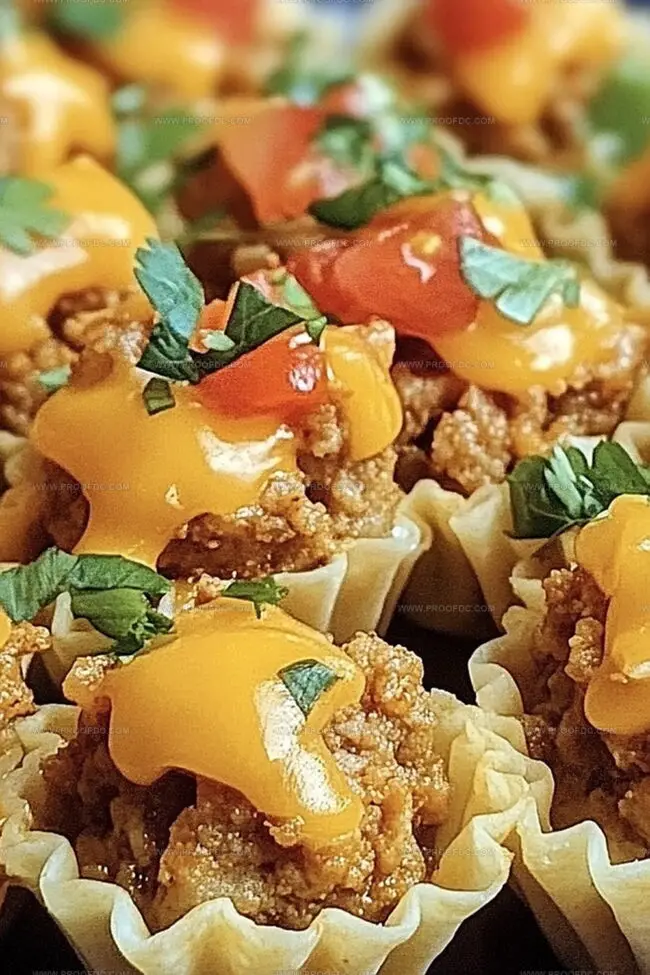
Crispy and golden, these taco ranch bites burst with zesty flavors that dance across your taste buds.

A perfect blend of crunchy texture and bold ranch seasoning promises an irresistible snack experience.

Each bite delivers a punch of southwestern-inspired goodness that keeps you coming back for more.

The recipe combines simple ingredients with bold spices to create a crowd-pleasing appetizer.

Melted cheese and seasoned meat nestled inside a crispy shell make these bites a definite party favorite.

Zero complicated steps mean you can whip up this delectable treat in minutes.

Fun Ways To Serve Taco Ranch Bites

  • Fiesta Party Platter: Arrange these zesty bites on a colorful platter with small bowls of extra ranch, salsa, and guacamole for dipping.
  • Appetizer Extravaganza: Serve these mini treats as a crowd-pleasing starter at game day parties, movie nights, or casual gatherings with friends.
  • Brunch Brilliance: Pair the Taco Ranch Bites with a fresh fruit salad and mimosas for a fun weekend brunch that will impress your guests.
  • Kid-Friendly Delight: Cut the bites into smaller pieces for younger kids, making them perfect for lunch boxes or after-school snacks with a side of fresh veggies.

Storing Taco Ranch Bites The Easy Way

  • Refrigeration Strategy: Store leftover Taco Ranch Bites in an airtight container in the refrigerator for up to 3-4 days. Separate layers with parchment paper to prevent sticking and maintain texture.
  • Reheating Technique: Warm bites in a preheated oven at 175C (350F) for 8-10 minutes to restore crispiness. Avoid microwave reheating to prevent soggy pastry and maintain original crunch.
  • Freezing Method: Prepare and freeze uncooked bites before baking by placing them on a baking sheet. Once frozen solid, transfer to freezer bags. Seal tightly and store for up to 2 months. Bake directly from frozen, adding 3-5 extra minutes to cooking time.
  • Make-Ahead Magic: Prepare filling and dough cups separately up to 24 hours in advance. Keep filling refrigerated and dough covered at room temperature. Assemble and bake just before serving to ensure maximum freshness and best flavor profile.

Quick Recipe Overview

Prep Time: 10 minutes

Cook Time: 20 minutes

Total Time: 30 minutes

Calories: 270 kcal

Servings: 7

What You’ll Need For Taco Ranch Bites

For Meat Base:
  • Ground Beef or Turkey: Lean protein that provides a hearty and savory foundation for the taco bites, choose freshly ground meat with minimal fat content.
  • Taco Seasoning: Authentic spice blend that infuses a zesty southwestern flavor, select a high-quality mix or create a homemade version for deeper taste.
  • Water: Helps distribute the seasoning evenly and keeps the meat moist during cooking.
For Creamy Binding:
  • Cream Cheese: Adds rich, smooth texture and helps bind the filling, opt for full-fat version for maximum creaminess.
  • Ranch Dressing: Introduces tangy, herbal notes that complement the meat, select a robust brand with pronounced herb flavors.
  • Shredded Cheddar Cheese: Provides melty, sharp taste and creates a golden topping, choose a sharp variety for more intense flavor.
For Pastry Cups:
  • Crescent Roll Dough or Puff Pastry: Creates light, flaky base for the bites, ensure dough is fresh and cold for best results.
  • Sour Cream: Optional garnish that adds cool, creamy contrast to the warm bites, select full-fat version for richness.
  • Tomatoes: Fresh topping that brings brightness and acidity, use ripe, firm varieties.
  • Lettuce: Adds crisp texture and freshness, choose crisp varieties like romaine.
  • Green Onions: Provides mild, sharp accent and visual appeal, select bright green, firm stalks.

Tools For Making Taco Ranch Bites

  • Skillet: Essential for cooking ground meat and mixing fillings.
  • Mini Muffin Tin: Crucial for creating perfectly shaped bite-sized cups.
  • Cutting Board: Needed for cutting dough and preparing toppings.
  • Sharp Knife: Used for precise cutting of dough and ingredients.
  • Measuring Cups/Spoons: Help ensure accurate ingredient quantities.
  • Wooden Spoon or Spatula: Perfect for stirring meat and mixing ingredients.
  • Oven: Required for baking the taco ranch bites.
  • Paper Towels: Helpful for draining excess fat from meat.

How To Bake Taco Ranch Bites

  • Taco Ranch Filling

Sizzle ground meat in a hot skillet until perfectly brown. Shake in zesty taco seasoning and let flavors mingle. Cool slightly and blend with creamy ranch and soft cream cheese. The mixture should look rich and inviting.

  • Pastry Preparation

Warm the oven and grab your mini muffin tin. Unroll crescent dough and slice into small squares. Gently press each square into the tin, creating tiny edible cups that will cradle your delicious filling.

  • Bite Assembly

Dollop the seasoned meat mixture into each delicate pastry pocket. Shower the tops with a sprinkle of sharp cheddar cheese, creating a golden promise of flavor.

  • Baking Magic

Slide the tray into the heated oven. Watch as the edges turn a beautiful golden brown and cheese bubbles seductively. Bake until the pastry looks perfectly crisp and irresistible.

  • Serving Style

Let the bites cool just enough to handle. Lift them carefully from the tin. Top with fresh garnishes like crisp lettuce, juicy tomatoes, or a dollop of cool sour cream. Serve immediately and watch everyone’s eyes light up.

Tips For The Best Taco Ranch Bites

  • Meal Prep Magic: Prepare the meat mixture up to two days ahead and store in the refrigerator, saving precious time when you're ready to assemble the bites. This trick lets you whip up appetizers in minutes for unexpected guests.
  • Protein Flexibility: Swap ground beef with ground chicken, turkey, or plant-based meat alternatives to suit different dietary preferences. Each protein brings a unique flavor profile while keeping the core recipe intact.
  • Gluten-Free Option: Use gluten-free crescent roll dough or almond flour-based pastry to create a celiac-friendly version. Ensure all seasoning packets are certified gluten-free for complete safety.
  • Spice Level Control: Adjust the heat by selecting mild, medium, or hot taco seasoning. For extra kick, add diced jalapeños or a sprinkle of cayenne pepper to the meat mixture before filling the cups.
  • Make-Ahead Freezer Hack: Assemble the bites completely, then freeze unbaked in the muffin tin. Transfer frozen bites to a freezer bag for storage up to one month. Bake directly from frozen, adding 3-5 extra minutes to cooking time for perfect golden-brown results.
Print
clock clock iconcutlery cutlery iconflag flag iconfolder folder iconinstagram instagram iconpinterest pinterest iconfacebook facebook iconprint print iconsquares squares iconheart heart iconheart solid heart solid icon
Crispy Taco Ranch Bites Recipe

Crispy Taco Ranch Bites Recipe


5 Stars 4 Stars 3 Stars 2 Stars 1 Star

4.6 from 18 reviews

  • Total Time: 30 minutes
  • Yield: 7 1x

Description

Delightful taco ranch bites showcase zesty Mexican-inspired flavors in bite-sized appetizers. Ranch seasoning and ground beef create a perfect handheld snack for casual gatherings and game day celebrations. You’ll love these crowd-pleasing little treats.


Ingredients

Scale
  • 1 package (250 g) refrigerated crescent roll dough
  • 250 g (½ lb) ground beef or turkey
  • 100 g (1 cup) shredded cheddar cheese
  • 60 g (¼ cup) cream cheese, softened
  • 1 tbsp taco seasoning
  • 2 tbsps ranch dressing
  • 2 tbsps water
  • sour cream (optional)
  • diced tomatoes (optional)
  • shredded lettuce (optional)
  • green onions (optional)

Instructions

  1. Meat Preparation: Brown ground beef or turkey in a skillet over medium heat, drain excess fat, and infuse with taco seasoning for 1-2 minutes to develop robust flavors.
  2. Filling Creation: Combine cooled seasoned meat with cream cheese, ranch dressing, and half the cheddar cheese, mixing until a smooth, creamy consistency forms.
  3. Oven Preparation: Preheat oven to 190C (375F) and liberally spray a mini muffin tin with cooking spray to prevent sticking.
  4. Dough Configuration: Divide crescent roll dough into 24 precise squares, slightly smaller than muffin tin openings, ensuring uniform size and shape.
  5. Dough Placement: Carefully press each dough square into muffin cavities, creating delicate cups with elevated edges for optimal filling retention.
  6. Filling Distribution: Evenly disperse the meat and cheese mixture into dough cups, filling approximately three-quarters full to maintain structural integrity.
  7. Cheese Topping: Generously sprinkle remaining cheddar cheese over each bite, creating a golden, appetizing surface.
  8. Baking Process: Bake for 12-15 minutes until pastry achieves a crisp, golden-brown texture and cheese melts completely.
  9. Cooling and Garnishing: Allow bites to rest briefly, then adorn with optional toppings like sour cream, diced tomatoes, shredded lettuce, or chopped green onions for added freshness and flavor.

Notes

  • Manage Meat Moisture: Drain excess fat thoroughly after browning meat to prevent soggy pastry and ensure a crisp, clean bite texture.
  • Control Dough Thickness: Stretch crescent roll squares gently and evenly to create uniform cups that cook consistently without tearing or uneven baking.
  • Cheese Melting Technique: Sprinkle cheese in two stages – some mixed into filling and some on top – for maximum flavor and perfect golden-brown surface.
  • Temperature Precision: Let bites cool 3-5 minutes after baking to set filling and prevent burning, allowing easier removal from muffin tin and ideal serving temperature.
  • Prep Time: 10 minutes
  • Cook Time: 20 minutes
  • Category: Appetizer, Snacks
  • Method: Baking
  • Cuisine: Mexican

Nutrition

  • Serving Size: 7
  • Calories: 270
  • Sugar: 1 g
  • Sodium: 600 mg
  • Fat: 18 g
  • Saturated Fat: 8 g
  • Unsaturated Fat: 9 g
  • Trans Fat: 0 g
  • Carbohydrates: 17 g
  • Fiber: 1 g
  • Protein: 14 g
  • Cholesterol: 50 mg
Marcus Foley

Marcus Foley

Food Critic & Kitchen Coach

Expertise

Recipe Testing and Troubleshooting; Time-Saving Kitchen Hacks; Global Flavor Exploration; Engaging Food Writing and Honest Reviews.

Education

Institute of Culinary Education (ICE), New York, NY

  • Program: Diploma in Culinary Arts
  • Focus: Hands-on training in foundational techniques, flavor development, recipe creation, and kitchen efficiency, with an emphasis on real-world application and storytelling through food.

Marcus Foley, based in Atlanta, GA, is a friendly food expert who makes cooking fun and simple.

With hands-on training from the Institute of Culinary Education and years of tasting everything from street food to fine dining, he shares easy kitchen hacks, global flavor ideas, and step-by-step recipes that turn kitchen mishaps into delicious surprises.

Leave a Reply

Your email address will not be published. Required fields are marked *

Recipe rating 5 Stars 4 Stars 3 Stars 2 Stars 1 Star