Irresistible Hasselback Cheesy Bread Recipe for Bread Lovers
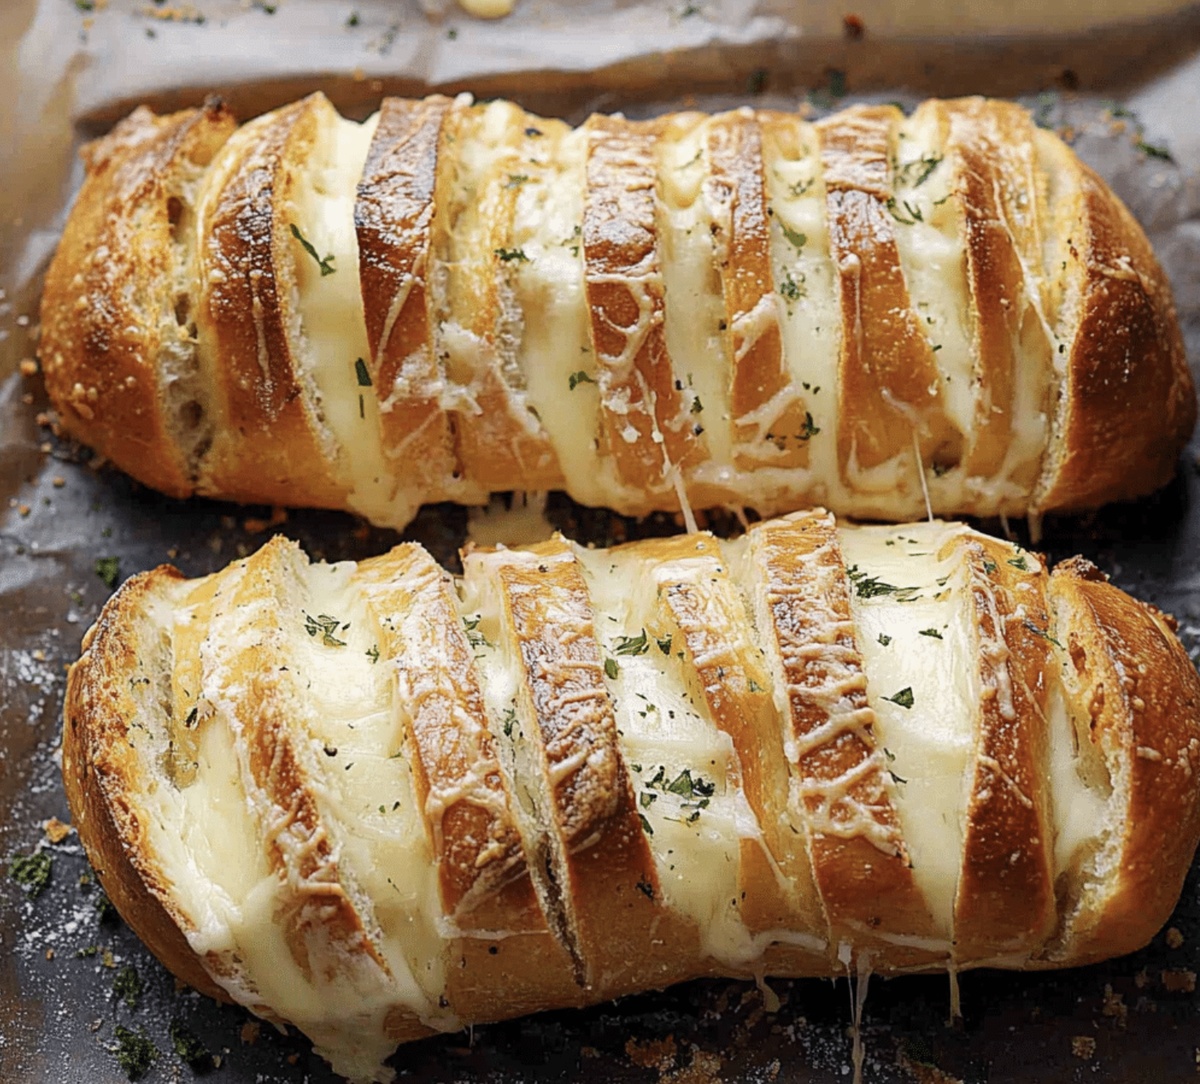
Golden, crusty bread meets melted cheesy hasselback magic in this irresistible side dish that transforms an ordinary meal.
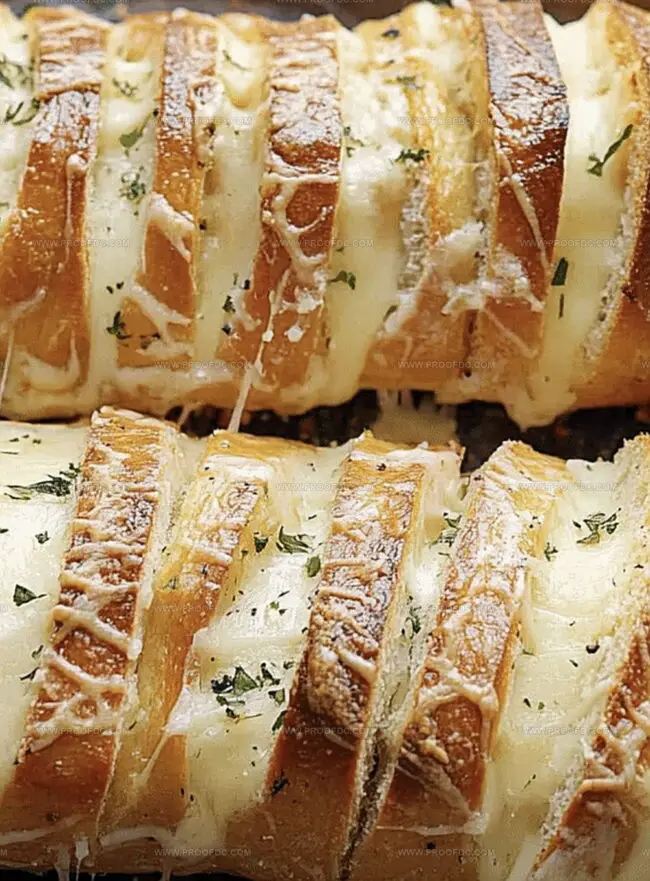
Sharp cheddar and soft butter weave between precisely sliced bread layers, creating a mouthwatering masterpiece.
Precise cutting techniques give this bread its signature accordion-like appearance, promising crispy edges and gooey center.
Each slice becomes a delectable canvas for rich, bubbling cheese and aromatic herbs.
The technique looks complicated but comes together effortlessly with just a few simple movements.
Layers of flavor emerge as the bread bakes, filling your kitchen with an enticing aroma that draws everyone to the table.
This crowd-pleasing recipe will become your new go-to for instant dinner excitement.
Quick Recipe Overview
What To Gather For Hasselback Cheesy Bread
For Bread Base:For Cheese Filling:For Flavor Enhancers:Tools That Help You Make Hasselback Cheesy Bread
Step-By-Step Guide For Hasselback Cheesy Bread

Grab a fresh loaf and transform it into a delicious masterpiece. Create beautiful, intricate cuts across the surface without slicing completely through, forming a lovely crosshatch pattern that will cradle melted cheese perfectly.
Whip up a magical mixture of warm butter, aromatic garlic, and fragrant herbs. This liquid gold will seep into every crevice, promising explosive flavor in each delectable bite.
Generously tuck mozzarella and cheddar between the bread’s delicate cuts. Let the cheese peek out, promising a golden, bubbling landscape of deliciousness that will make mouths water.
Wrap the bread gently in foil, creating a cozy package that will protect its delicate flavors. Slide into a warm oven and let the transformation begin. After initial baking, unwrap and allow the edges to turn a gorgeous golden brown.
Remove from the oven and let the bread rest briefly. Watch as guests pull apart the steaming, cheese-filled sections, revealing a masterpiece of culinary creativity that’s sure to impress.
Tips To Elevate Your Hasselback Cheesy Bread
Fun Ways To Slice And Serve Hasselback Cheesy Bread
Storing Leftover Hasselback Cheesy Bread The Easy Way
Print
Crispy Hasselback Cheesy Bread Recipe
- Total Time: 35 minutes
- Yield: 3 1x
Description
Creamy Swedish hasselback cheesy bread delivers a mouthwatering twist on classic bakery traditions. Crisp edges and melted cheese create irresistible comfort for hungry diners seeking delicious home-style indulgence.
Ingredients
- 1 large crusty loaf (sourdough or Italian bread)
- 1 cup (100 g / 3.5 oz) mozzarella cheese, shredded
- ½ cup (50 g / 1.8 oz) cheddar cheese, shredded
- 3 tbsps unsalted butter, melted
- 2 tbsps olive oil
- 3 garlic cloves, minced
- 1 tsp dried Italian seasoning
- 2 tbsps fresh parsley, chopped (optional)
- 1 pinch red pepper flakes (optional, for spicy kick)
Instructions
- Preparation: Preheat oven to 375F (190C) and line a baking sheet with parchment paper for easy cleanup.
- Bread Slicing: Position bread loaf on a cutting board and create precise, uniform cuts approximately one inch apart, maintaining the base’s integrity. Execute a meticulous crosshatch pattern by rotating the loaf and making perpendicular incisions.
- Flavor Infusion: Whisk warm butter, olive oil, minced garlic, Italian seasoning, parsley, and red pepper flakes in a mixing bowl to create a robust, aromatic butter blend.
- Cheese and Seasoning: Carefully separate bread sections and tuck mozzarella and cheddar cheese into each crevice. Generously drizzle herbed butter mixture throughout the slits, ensuring complete flavor penetration and cheese distribution.
- Baking Process: Loosely wrap the prepared loaf in aluminum foil and bake for 15 minutes. Uncover and continue baking until cheese melts into golden pools and bread edges turn crisp and golden brown.
- Serving: Rest the bread briefly after removing from oven, allowing cheese to set. Transfer to a serving platter, presenting an irresistible pull-apart bread that promises a garlicky, cheesy sensory experience.
Notes
- Prevent Bread Crushing: Slice carefully and maintain bread’s structural integrity by using a sharp knife and placing wooden spoons or chopsticks on bread sides to limit cutting depth.
- Cheese Melting Technique: Choose high-moisture cheeses like mozzarella and cheddar for optimal gooey texture, and slice cheese thinly to ensure even melting across bread crevices.
- Butter Infusion Hack: Warm butter and oil mixture slightly before drizzling to enhance herb and garlic absorption, creating deeper flavor penetration throughout bread slices.
- Customize Dietary Variations: Swap regular bread with gluten-free alternatives, use vegan cheese substitutes, or incorporate different herb blends to accommodate various dietary preferences without compromising taste profile.
- Prep Time: 10 minutes
- Cook Time: 25 minutes
- Category: Snacks, Appetizer
- Method: Baking
- Cuisine: Swedish
Nutrition
- Serving Size: 3
- Calories: 400
- Sugar: 1 g
- Sodium: 600 mg
- Fat: 22 g
- Saturated Fat: 10 g
- Unsaturated Fat: 9 g
- Trans Fat: 0 g
- Carbohydrates: 36 g
- Fiber: 2 g
- Protein: 14 g
- Cholesterol: 40 mg
Marcus Foley
Food Critic & Kitchen Coach
Expertise
Recipe Testing and Troubleshooting; Time-Saving Kitchen Hacks; Global Flavor Exploration; Engaging Food Writing and Honest Reviews.
Education
Institute of Culinary Education (ICE), New York, NY
Marcus Foley, based in Atlanta, GA, is a friendly food expert who makes cooking fun and simple.
With hands-on training from the Institute of Culinary Education and years of tasting everything from street food to fine dining, he shares easy kitchen hacks, global flavor ideas, and step-by-step recipes that turn kitchen mishaps into delicious surprises.