
Dreamy Coconut Dome with Chocolate Spread Recipe
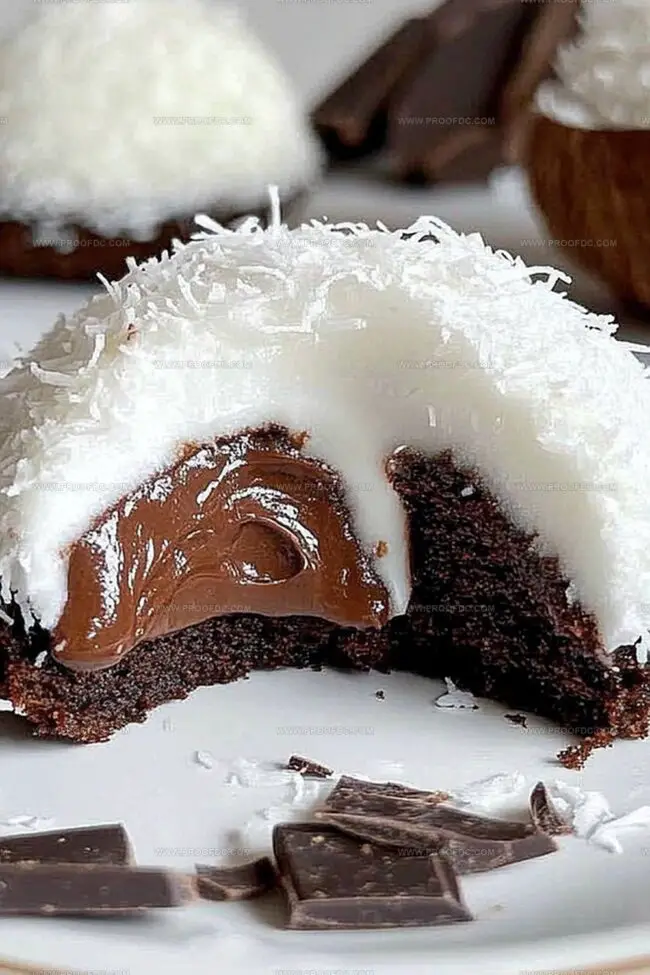
A coconut dome hiding silky chocolate spread inside promises pure indulgence.
Sweet mysteries await you in this delectable dessert.
Each bite reveals layers of creamy textures and rich flavors.
Cracking through a delicate coconut shell to discover molten chocolate treasure.
Home bakers can easily craft this impressive treat with minimal ingredients.
Minimal skills and maximum excitement define this elegant dessert.
Come create something truly spectacular that will spark conversation at your next gathering.
Why Coconut Dome With Chocolate Spread Is A Showstopper
What’s In Coconut Dome With Chocolate Spread
Base Ingredients:Filling Ingredient:Coating Ingredients:Steps To Make Coconut Dome With Chocolate Spread
Step 1: Whip Up the Coconut Base
Grab a spacious mixing bowl and combine:Blend the ingredients thoroughly until they form a cohesive mixture that holds together when pressed.
Step 2: Create Chocolate-Filled Coconut Spheres
Scoop out a generous portion of the coconut mixture and roll it into a perfectly round ball. Gently flatten the ball and place a dollop of chocolate spread right in the center. Carefully wrap the coconut mixture around the chocolate, molding it into a smooth dome shape. Continue this process until you’ve used all the mixture.
Pro tip: Place these delightful domes on a parchment-lined baking sheet and pop them in the refrigerator for 20-30 minutes to help them firm up.
Step 3: Chocolate Dipping Extravaganza
Melt your chosen chocolate (dark or milk) using the microwave method. Heat in short 30-second bursts, stirring between each interval until the chocolate becomes silky smooth. For an extra glossy finish, consider adding a touch of coconut oil to the melted chocolate.
Carefully dunk each coconut dome into the melted chocolate, ensuring a complete and even coating. Allow any excess chocolate to drip off before placing the treat back on the baking sheet.
Step 4: Let the Chocolate Set
Allow your chocolate-covered treats to set at room temperature. If you’re in a hurry, slide the baking sheet into the refrigerator for 15-20 minutes to speed up the process.
Step 5: Serve and Savor
Transfer your magnificent coconut chocolate domes to a beautiful serving plate. Store any leftovers in an airtight container to maintain their delectable texture and flavor.
Enjoy your homemade tropical chocolate treats that are sure to impress family and friends!
Helpful Tips For Coconut Dome With Chocolate Spread
How To Keep Coconut Dome With Chocolate Spread Fresh
What Pairs Well With Coconut Dome With Chocolate Spread
Tasty Variations For Coconut Dome With Chocolate Spread
Your Coconut Dome With Chocolate Spread Questions
FAQs for Coconut Dome with Chocolate Spread
Yes, but you’ll need to add some sugar or powdered sugar to balance the sweetness. Start with 2-3 tablespoons and adjust to taste.
Add a little more condensed milk, one teaspoon at a time. The mixture should hold together when pressed without being too wet.
Ensure the coconut mixture fully covers the chocolate spread and seal the edges carefully. Chilling the domes before coating helps them hold their shape better.
Absolutely! These coconut domes can be prepared 2-3 days in advance and stored in the refrigerator. Just keep them in an airtight container to maintain their freshness.
Print
Coconut Dome With Chocolate Spread Recipe
- Total Time: 55 minutes
- Yield: 8 1x
Description
Silky coconut dome blends tropical sweetness with rich chocolate spread in this elegant dessert. Luxurious layers of creamy coconut and smooth chocolate create a delightful experience you’ll savor with each heavenly bite.
Ingredients
Main Ingredients:
- 2 cups (473 ml) shredded sweetened coconut
- ½ cup (118 ml) sweetened condensed milk
- 1 cup (236 ml) dark or milk chocolate (melted)
- ¼ cup (59 ml) chocolate spread (Nutella or similar)
Flavor Enhancers:
- ½ teaspoon vanilla extract
Optional Ingredient:
- 1 tablespoon coconut oil (for smoother melted chocolate)
Instructions
- Create a homogeneous blend of shredded coconut, sweetened condensed milk, and vanilla extract in a spacious mixing vessel, ensuring the mixture maintains structural integrity when compressed.
- Using a portioning scoop, gather approximately two tablespoons of the coconut mixture and shape into a rounded form. Gently flatten the sphere, strategically positioning a dollop of chocolate spread at its core.
- Delicately encase the chocolate center with the coconut mixture, molding into a smooth, dome-like silhouette. Continue this process with the remaining mixture, arranging the crafted confections on a parchment-lined tray.
- Refrigerate the coconut spheres for approximately 25 minutes to stabilize their structure and enhance cohesion.
- Transform the chocolate into a luxurious liquid state through gentle microwave warming, stirring intermittently to achieve a silky consistency. Optional: incorporate coconut oil for enhanced glossiness.
- Immerse each coconut dome completely into the molten chocolate, allowing excess to cascade off naturally. Carefully return the chocolate-enrobed treats to the lined surface.
- Permit the chocolate coating to solidify at ambient temperature, or expedite the process through brief refrigeration.
- Transfer the finished coconut domes to an elegant serving plate or preserve within a sealed container for later indulgence.
Notes
- Ensure the coconut mixture is well-combined and compact to prevent crumbling during coating.
- Use cold hands or slightly dampen them to easily shape the coconut domes without sticking.
- Create a smooth chocolate center by warming the chocolate spread slightly before filling.
- Experiment with different chocolate types like white or ruby chocolate for unique flavor variations.
- For a gluten-free option, verify all ingredients are certified gluten-free, especially the chocolate spread.
- Add a pinch of salt to the coconut mixture to enhance the overall sweetness and balance flavors.
- Decorate the finished domes with toasted coconut flakes or a drizzle of contrasting chocolate for extra visual appeal.
- Store in the refrigerator for up to 5 days, separating layers with parchment paper to prevent sticking.
- Prep Time: 25 minutes
- Cook Time: 30 minutes
- Category: Desserts, Snacks
- Method: Mixing
- Cuisine: Fusion
Nutrition
- Serving Size: 8
- Calories: 290
- Sugar: 22 g
- Sodium: 30 mg
- Fat: 17 g
- Saturated Fat: 10 g
- Unsaturated Fat: 7 g
- Trans Fat: 0 g
- Carbohydrates: 32 g
- Fiber: 2 g
- Protein: 3 g
- Cholesterol: 5 mg
Jenna Stewart
Head Chef & Recipe Innovator
Expertise
Farm-to-Table Cooking; Seasonal Menu Development; Visual Plating Techniques; Flavor Layering and Simple Prep Hacks.
Education
The Culinary Institute of America, Hyde Park, NY
Jenna Stewart is the inventive spirit behind many of our standout dishes at Pro of Delicious Creations. A proud graduate of The Culinary Institute of America, she built her skills mastering both classic recipes and fresh, modern twists.
Now, Jenna celebrates the beauty of seasonal, local ingredients, often sourced from her garden and nearby markets, to create recipes that are bursting with flavor yet easy to follow. When she’s not experimenting in the kitchen, Jenna loves exploring nature on hikes and discovering new treasures at local co-ops.