
The Best Classic Chocolate Snowball Cookies Recipe for Winter Joy
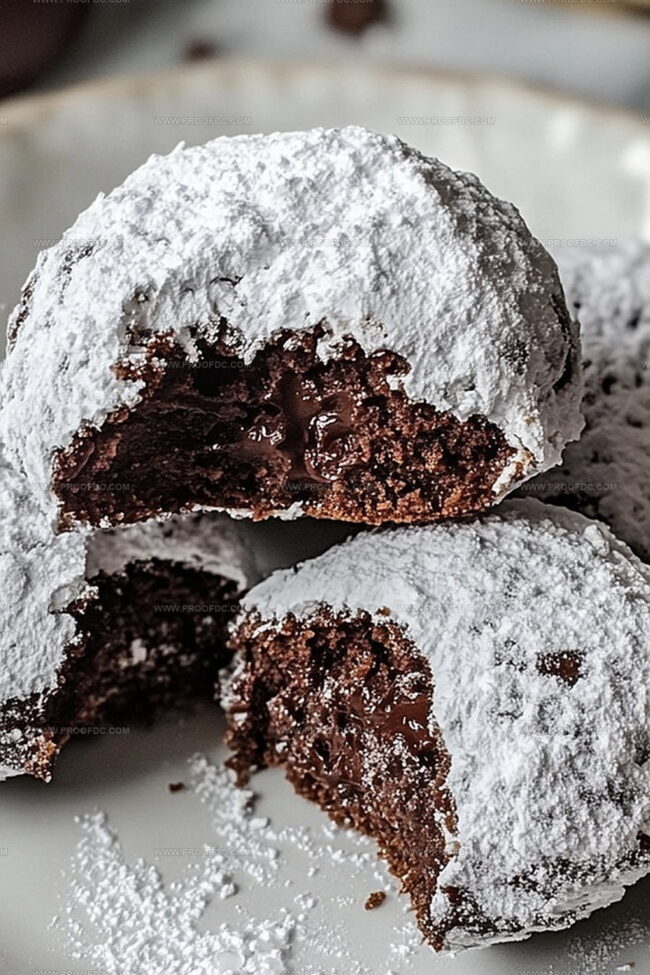
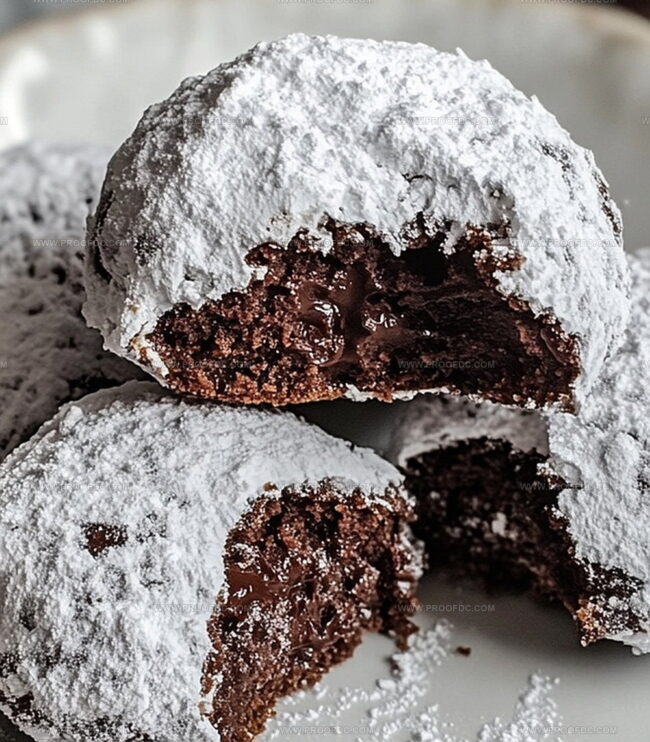
Sinking your teeth into a classic chocolate snowball cookies delight that melts right in your mouth.
These delectable treats bring pure winter magic to your kitchen with minimal effort.
Powdery sugar coats each morsel like a gentle snowfall, creating an irresistible visual and flavor experience.
Soft, crumbly textures hint at the rich chocolate hidden within each delicate sphere.
Everyone at the table will marvel at how such simple ingredients can produce such an elegant dessert.
Simple pantry staples transform into something extraordinary with just a few careful mixing steps.
Trust me, these cookies will become your new favorite winter indulgence that sparks joy with every delightful bite.
Why Everyone Raves About Classic Chocolate Snowball Cookies Recipe
What You’ll Use For Classic Chocolate Snowball Cookies Recipe
Base Ingredients:Dry Ingredients:Optional Add-Ins:Coating Ingredient:Steps To Make Classic Chocolate Snowball Cookies Recipe
Step 1: Prepare the Oven
Crank up your oven to 350°F (175°C). Grab two baking sheets and line them with parchment paper for a smooth baking experience.
Step 2: Whip Up the Creamy Base
In a spacious mixing bowl, transform softened butter and powdered sugar into a fluffy, dreamy mixture. Use your mixer on medium speed, blending until the texture becomes light and airy. Splash in vanilla extract and sprinkle of salt, mixing until everything comes together in delicious harmony.
Step 3: Combine Dry Ingredients
Grab a separate bowl and sift together:Slowly introduce the dry ingredients to your creamy butter mixture, mixing on low speed. Watch as the dough begins to take shape. For an extra flavor boost, gently fold in:Ensure these tasty morsels are evenly distributed throughout the dough.
Step 4: Shape Your Cookies
Scoop out small portions of dough, about a tablespoon each. Roll these into perfect little balls. Arrange them on your prepared baking sheets, giving each cookie enough breathing room – about 2 inches apart.
Step 5: Bake to Perfection
Slide the baking sheets into the preheated oven. Bake for 10-12 minutes, keeping a watchful eye. You’re looking for cookies that are set but not browned, with firm bottoms that promise a melt-in-your-mouth experience.
Step 6: Create the Snowball Magic
Once out of the oven, let the cookies rest on the baking sheets for 5 minutes. While still warm, give them their first powdered sugar coating. After completely cooling, roll them in powdered sugar once more for that irresistible snowy finish that makes these cookies absolute showstoppers.
Tips For Making Classic Chocolate Snowball Cookies Recipe
Keep Classic Chocolate Snowball Cookies Recipe Fresh
What To Serve With Classic Chocolate Snowball Cookies Recipe
New Takes On Classic Chocolate Snowball Cookies Recipe
Classic Chocolate Snowball Cookies Recipe FAQs
No, these cookies are surprisingly easy! Even beginner bakers can master this recipe with simple ingredients and straightforward steps. The process is quick and fun, requiring basic mixing and rolling techniques.
The powdered sugar creates a beautiful “snow-like” appearance and adds a delightful sweet layer to the chocolate cookies. Rolling them while warm and then again when cool ensures a thick, even white coating that looks just like freshly fallen snow.
Absolutely! The chopped nuts are optional. If you have nut allergies or simply don’t enjoy them, you can skip the nuts entirely without affecting the cookie’s overall texture and taste. The mini chocolate chips will still provide extra flavor and richness.
Look for firm bottoms and a set appearance. They shouldn’t brown significantly. The cookies will look slightly soft but will firm up as they cool. Baking for 10-12 minutes at 350F is the perfect time to achieve the right texture for these delicate chocolate snowballs.
Print
Classic Chocolate Snowball Cookies Recipe
- Total Time: 42 minutes
- Yield: 24 1x
Description
Sweet Mexican wedding cookies blend rich buttery flavor with powdered sugar coating in this classic chocolate snowball delight. Delicate chocolate-infused cookie spheres melt gracefully, promising pure winter comfort and nostalgic holiday charm.
Ingredients
Main Ingredients:
- 2 cups (250 g) all-purpose flour
- ½ cup (40 g) unsweetened cocoa powder
- 1 cup (225 g) unsalted butter, softened
Binding and Flavoring Ingredients:
- ½ cup (60 g) powdered sugar, plus extra for coating
- 1 teaspoon vanilla extract
- ¼ teaspoon salt
Optional Additions:
- 1 cup (120 g) finely chopped nuts (walnuts, pecans, or almonds)
- ½ cup (90 g) mini chocolate chips
Instructions
- Prepare the oven environment by heating to 350F (175C) and lining two baking surfaces with parchment paper for optimal cookie performance.
- In a spacious mixing vessel, whip softened butter and powdered sugar until achieving a fluffy, airy consistency with a pale, creamy texture.
- Introduce vanilla extract and salt to the butter mixture, blending thoroughly to create a harmonious flavor foundation.
- Carefully sift flour and cocoa powder together in a separate container, then gradually incorporate into the butter mixture using low-speed mixing until a cohesive dough emerges.
- Gently integrate chopped nuts and mini chocolate chips throughout the dough, ensuring even distribution of delectable morsels.
- Craft uniform dough spheres by carefully portioning and rolling small amounts into perfectly round shapes, positioning them with precise spacing on prepared baking surfaces.
- Transfer cookie-laden baking sheets to the preheated oven, allowing them to transform for 10-12 minutes until the edges set and maintain a delicate, tender structure.
- Remove cookies from the oven and let them rest momentarily on baking sheets, allowing initial cooling and slight firming.
- While cookies retain a gentle warmth, delicately enrobe each in a generous coating of powdered sugar, creating an initial snowy layer.
- Complete the cooling process, then revisit each cookie with a second luxurious dusting of powdered sugar, achieving a pristine, winter-inspired finish.
Notes
- Enhance the chocolate flavor by using high-quality cocoa powder for a richer, more intense taste.
- Ensure butter is softened at room temperature but not melted to achieve the perfect cookie texture.
- Chill the dough for 30 minutes before shaping if the mixture feels too soft or sticky, helping cookies maintain their round shape.
- For gluten-free options, substitute all-purpose flour with almond flour or a gluten-free flour blend, keeping the same measurements.
- Prep Time: 15 minutes
- Cook Time: 15 minutes
- Category: Desserts, Snacks
- Method: Baking
- Cuisine: American
Nutrition
- Serving Size: 24
- Calories: 180
- Sugar: 6 g
- Sodium: 50 mg
- Fat: 12 g
- Saturated Fat: 7 g
- Unsaturated Fat: 4 g
- Trans Fat: 0 g
- Carbohydrates: 20 g
- Fiber: 1 g
- Protein: 2 g
- Cholesterol: 30 mg
Jenna Stewart
Head Chef & Recipe Innovator
Expertise
Farm-to-Table Cooking; Seasonal Menu Development; Visual Plating Techniques; Flavor Layering and Simple Prep Hacks.
Education
The Culinary Institute of America, Hyde Park, NY
Jenna Stewart is the inventive spirit behind many of our standout dishes at Pro of Delicious Creations. A proud graduate of The Culinary Institute of America, she built her skills mastering both classic recipes and fresh, modern twists.
Now, Jenna celebrates the beauty of seasonal, local ingredients, often sourced from her garden and nearby markets, to create recipes that are bursting with flavor yet easy to follow. When she’s not experimenting in the kitchen, Jenna loves exploring nature on hikes and discovering new treasures at local co-ops.