
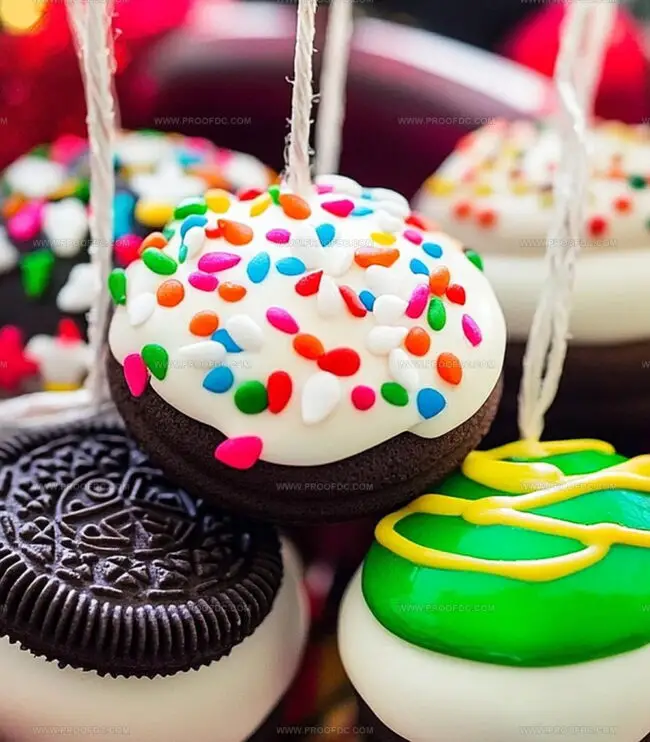
Create Jolly Christmas Oreo Ornaments: A Sweet Holiday Recipe
Sweet memories sparkle when these Christmas Oreo ornaments dance onto your holiday table.
Festive baking takes unexpected turns with simple ingredients and playful creativity.
Kids absolutely adore decorating these magical treats that look just like miniature holiday baubles.
Colorful sprinkles and melted chocolate turn ordinary cookies into something extraordinary.
Imagination meets deliciousness in these charming edible decorations that will make everyone smile.
Grab some oreos and let’s turn your kitchen into a winter wonderland of sugary delight.
You’ll become the holiday hero with these adorable, crowd-pleasing treats that are sure to become a new seasonal tradition.
Why Christmas Oreo Ornaments Are A Cute DIY Dessert

Everything You Need For Christmas Oreo Ornaments
Base Ingredients:Decorative Elements:Finishing Touches:How To Make Christmas Oreo Ornaments Step By Step
Step 1: Preparing Ornament Hangers
Snap mini pretzels into cute little hooks or slice candy canes into curved pieces that look like tiny ornament loops. These will be our magical hanging points for our delicious treats.
Step 2: Melting Chocolate Magic
Grab your white chocolate or candy melts and transform them into a silky smooth coating. Use a microwave-safe bowl and zap in short bursts, stirring gently between each round until the chocolate becomes a luxurious, glossy pool of sweetness.
Step 3: Dipping and Coating Oreos
Dive each Oreo into the melted chocolate wonderland. Make sure every inch gets a delightful white chocolate hug! Lift carefully with a fork, letting excess chocolate drip back into the bowl. Gently place each chocolate-covered cookie onto a parchment-lined baking sheet.
Step 4: Attaching Ornament Hooks
While the chocolate is still wet and dreamy, carefully press your pretzel or candy cane hook onto the top of each Oreo. This creates the perfect hanging mechanism for our edible ornaments.
Step 5: Decorative Extravaganza
Time to get creative! Drizzle colorful candy melts in playful patterns:Sprinkle on some festive touches:Step 6: Setting and Cooling
Let your masterpieces chill and set. You can:Allow about 15-20 minutes for the chocolate to completely harden and become firm.
Step 7: Presenting Your Edible Ornaments
Once set, arrange these delightful treats in a festive box or on a charming serving platter. They’re ready to dazzle at holiday parties or become a sweet gift for loved ones!
Tips For Making Pretty Christmas Oreo Ornaments
How To Store Christmas Oreo Ornaments Without Smudges
Tasty Ideas To Serve With Christmas Oreo Ornaments
Fun Ways To Style Christmas Oreo Ornaments
FAQs About Christmas Oreo Ornaments
These fun treats look exactly like hanging Christmas tree ornaments but are completely edible! The pretzel or candy cane hook makes them look like actual ornaments you’d hang on a Christmas tree.
Not at all! This recipe is super easy and perfect for kids and adults. If you can melt chocolate and dip cookies, you can totally make these festive treats.
Absolutely! While white chocolate works best for a clean, bright look, you can use milk or dark chocolate too. Just make sure the chocolate melts smoothly and coats the Oreos evenly.
They’ll stay delicious for about 3-5 days if stored in an airtight container at room temperature. Just keep them away from direct heat or sunlight to maintain their shape and flavor.
Print
Christmas Oreo Ornaments Recipe
- Total Time: 30 minutes
- Yield: 12 1x
Description
Festive Christmas Oreo Ornaments bring holiday cheer to dessert tables with whimsical charm. Guests will adore these playful treats that blend sweet chocolate coating, sprinkles, and holiday spirit into delightful edible decorations you can’t resist.
Ingredients
Main Ingredients:
- 12 Oreo cookies
- 1 ½ cups (300 grams) white chocolate or candy melts
- ½ cup (100 grams) colored candy melts (red, green, blue, etc.)
Decorative Ingredients:
- Sprinkles
- Edible glitter
- Small candies
Ornament Hook Ingredients:
- Mini pretzel twists
- Candy canes
Instructions
- Craft unique ornament hooks by carefully snapping mini pretzels into curved shapes or trimming candy canes into delicate arcs, preparing them for later assembly.
- Create a smooth chocolate coating by gently melting white chocolate or candy melts in a microwave-safe vessel, stirring carefully between brief heating intervals to prevent scorching.
- Immerse each Oreo completely in the molten white chocolate, using a fork to lift and drain excess coating, then transfer to a parchment-lined surface with precision.
- While the chocolate remains fluid, delicately position the pretzel or candy cane hooks atop each decorated Oreo, ensuring secure attachment.
- Embellish the chocolate-covered Oreos with artistic drizzles of colored candy melts, creating intricate patterns like elegant swirls, dynamic zigzags, or playful polka dots. Enhance the design with a sprinkle of festive decorations such as shimmering edible glitter or tiny candies.
- Allow the ornamental treats to solidify naturally at room temperature or expedite the process by placing them in the refrigerator for approximately 15-20 minutes until completely set.
- Present the Christmas Oreo Ornaments in a charming gift box or arrange them beautifully on a decorative serving platter, ready to delight and impress.
Notes
- Work with room temperature Oreos for smoother chocolate coating and fewer cracks during dipping.
- Use a deep, narrow bowl for chocolate melting to make dipping easier and more precise.
- Choose candy melts or white chocolate with good melting consistency to ensure smooth, even coverage on Oreos.
- Keep extra melted chocolate nearby to touch up any spots or fix imperfections during decorating process.
- Clean and dry hands thoroughly before handling to prevent moisture from disrupting chocolate’s smooth texture.
- Consider using gel food coloring for white chocolate to prevent seizing and maintain glossy finish.
- Experiment with different chocolate colors like red, green, and blue for varied festive looks.
- Place wax paper underneath decorating area for quick cleanup and easy removal of finished ornaments.
- Allow chocolate to set completely at cool room temperature to prevent condensation from forming.
- Store in single layer to maintain ornament shape and prevent accidental breakage.
- Prep Time: 15 minutes
- Cook Time: 15 minutes
- Category: Desserts, Snacks
- Method: Mixing
- Cuisine: American
Nutrition
- Serving Size: 12
- Calories: 100
- Sugar: 10 g
- Sodium: 50 mg
- Fat: 5 g
- Saturated Fat: 3 g
- Unsaturated Fat: 2 g
- Trans Fat: 0 g
- Carbohydrates: 15 g
- Fiber: 0 g
- Protein: 1 g
- Cholesterol: 5 mg
Jenna Stewart
Head Chef & Recipe Innovator
Expertise
Farm-to-Table Cooking; Seasonal Menu Development; Visual Plating Techniques; Flavor Layering and Simple Prep Hacks.
Education
The Culinary Institute of America, Hyde Park, NY
Jenna Stewart is the inventive spirit behind many of our standout dishes at Pro of Delicious Creations. A proud graduate of The Culinary Institute of America, she built her skills mastering both classic recipes and fresh, modern twists.
Now, Jenna celebrates the beauty of seasonal, local ingredients, often sourced from her garden and nearby markets, to create recipes that are bursting with flavor yet easy to follow. When she’s not experimenting in the kitchen, Jenna loves exploring nature on hikes and discovering new treasures at local co-ops.