
Sweet & Nostalgic Cherry Mash Bars Recipe for Dessert Lovers
Sweet memories of childhood nostalgia dance through this incredible cherry mash bars creation that connects classic candy flavors with homemade magic.
Grandma’s secret recipes always spark excitement in my kitchen.
Unexpected combinations can turn simple ingredients into something extraordinary.
Chocolate and cherry lovers unite around this delightful treat that brings pure joy to every bite.
Bold cherry flavors mingle perfectly with rich chocolate undertones.
Each bar promises a delicious journey through texture and taste.
Whip up these irresistible bars and watch smiles bloom across eager faces.
Why Cherry Mash Bars Taste So Good
Cherry Mash Bars Ingredients Breakdown
Cherry Layer:Chocolate-Peanut Topping:Preparation Essentials:Cherry Mash Bars Cooking Directions
Step 1: Create Dreamy Cherry Base
In a spacious mixing bowl, whip powdered sugar and softened butter until silky smooth. Add:Blend until perfectly combined. The mixture should feel thick yet spreadable. Carefully spread this luscious cherry mixture into a greased or parchment-lined 9×13-inch baking dish. Pop the dish into the freezer for about 30 minutes to set firmly.
Step 2: Craft Chocolate-Peanut Topping
Grab a microwave-safe bowl and combine:Zap in 30-second bursts, stirring between each interval, until the mixture becomes wonderfully smooth and glossy. Fold in chopped peanuts for an extra crunch.
Step 3: Layer and Assemble
Retrieve the chilled cherry base from the freezer. Gently pour the molten chocolate-peanut mixture over the cherry layer. Use a spatula to spread evenly, creating a perfect blanket of chocolatey goodness.
Step 4: Chill and Solidify
Slide the assembled bars into the refrigerator. Let them rest and set for a minimum of 2 hours, allowing the layers to become perfectly united.
Step 5: Slice and Enjoy
Once the bars are completely firm, slice into delectable squares or bars. Serve chilled for the ultimate refreshing treat, or let them sit at room temperature for a softer texture.
Pro Tip: These bars are perfect for summer gatherings, potlucks, or when you need a quick sweet indulgence!
Helpful Tricks For Cherry Mash Bars
Keep Cherry Mash Bars Fresh And Warm
Snack Ideas With Cherry Mash Bars
Ways To Change Up Cherry Mash Bars
Answers About Cherry Mash Bars
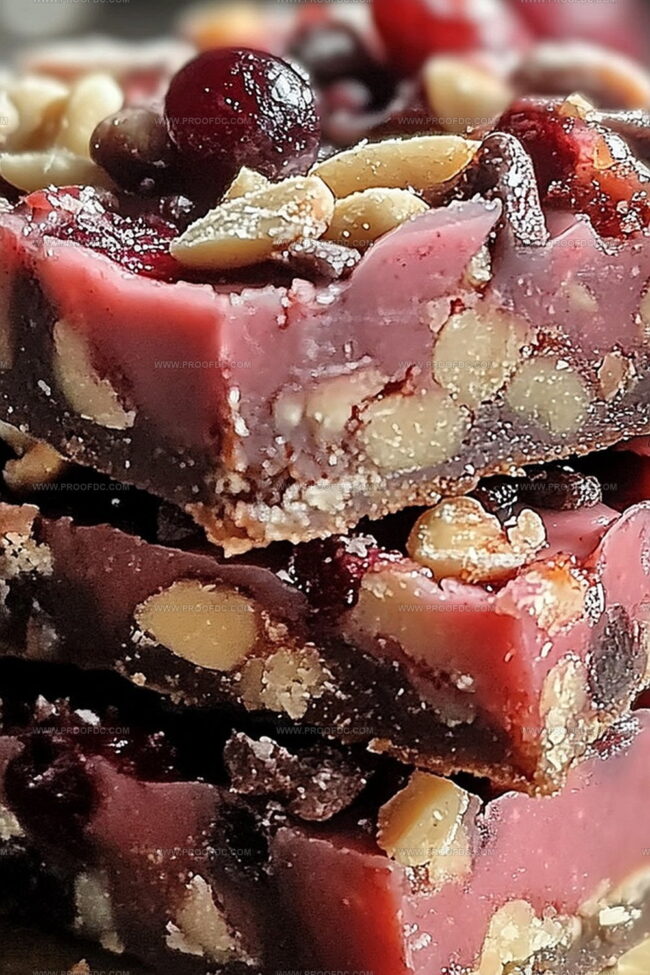
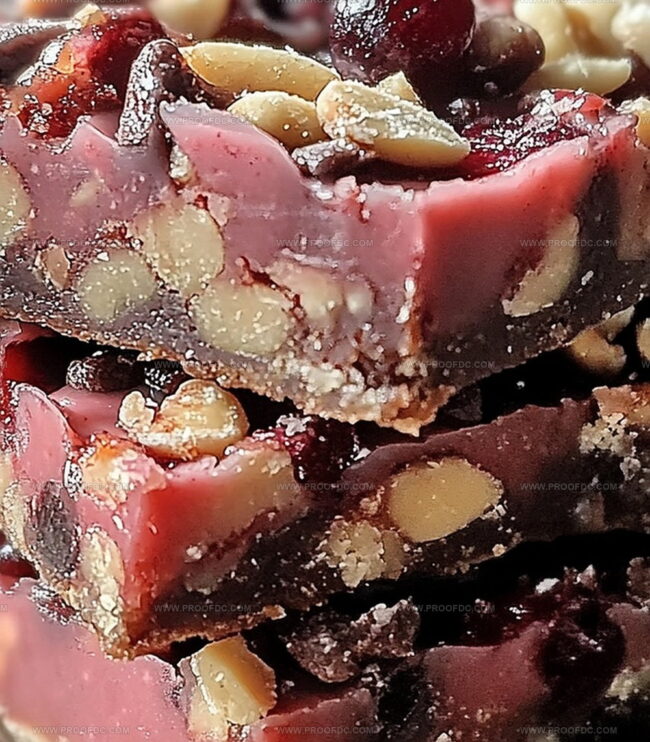
The combination of maraschino cherries, almond extract, chocolate, and peanuts creates a delightful sweet-and-salty flavor profile that makes these bars incredibly addictive.
Absolutely! These Cherry Mash Bars are perfect for making in advance. You can prepare them up to 3-4 days before serving and keep them refrigerated until you’re ready to enjoy.
Yes! These bars are reminiscent of a homemade version of a classic cherry-chocolate candy, with a nostalgic flavor that combines the sweetness of cherries with rich chocolate and crunchy peanuts.
Not at all! You’ll just need a mixing bowl, a 9×13-inch baking dish, a microwave-safe bowl, and basic kitchen tools like a spatula and measuring cups.
Print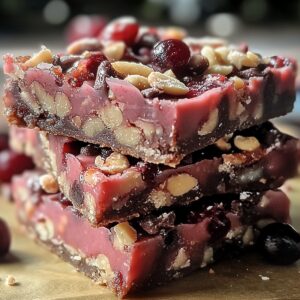
Cherry Mash Bars Recipe
- Total Time: 2 hours 50 minutes
- Yield: 16 1x
Description
Chocolate-loving dessert enthusiasts will adore these cherry mash bars, a nostalgic treat blending sweet cherries and creamy chocolate. Homemade magic delivers a delightful confection perfect for satisfying midnight cravings when traditional desserts just won’t do.
Ingredients
Main Ingredients:
- 1 jar (10 oz / 285 g) maraschino cherries, drained and chopped
- 2 cups (350 g) semi-sweet chocolate chips
- 1 cup (250 g) creamy peanut butter
Cherry Layer Ingredients:
- 2 cups (200 g) powdered sugar
- ½ cup (115 g) unsalted butter, softened
- ¼ cup (60 ml) maraschino cherry juice (from the jar)
- 1 teaspoon almond extract
Topping Ingredients:
- 1 cup (120 g) chopped peanuts
Instructions
- Craft the luscious cherry foundation by whipping softened butter with powdered sugar until silky. Fold in finely chopped maraschino cherries, vibrant cherry juice, and a whisper of almond extract, creating a decadent, spreadable mixture.
- Evenly distribute the cherry blend into a prepared baking dish, ensuring a smooth surface. Chill in the freezer for approximately half an hour, allowing the layer to solidify and develop a firm consistency.
- Create the luxurious chocolate-peanut topping by gently melting chocolate chips and peanut butter in short microwave intervals, stirring between each to achieve a glossy, uniform texture. Incorporate roughly chopped peanuts for an added crunch.
- Extract the chilled cherry layer from the freezer and generously cascade the molten chocolate-peanut mixture across the surface, using a spatula to distribute evenly and eliminate any potential air pockets.
- Transfer the assembled dessert to the refrigerator, allowing it to set completely for a minimum of two hours. The cooling process will transform the bars into a delectable, firm treat.
- Once fully set, slice into elegant squares or rectangular bars. Serve directly from the refrigerator or permit a brief rest at room temperature for optimal enjoyment.
Notes
- Swap maraschino cherries with fresh cherries for a more natural, less processed flavor profile.
- Use gluten-free powdered sugar to make this recipe suitable for those with gluten sensitivities.
- Experiment with different nut butter options like almond or cashew butter for unique flavor variations.
- Store bars in an airtight container in the refrigerator for up to one week to maintain optimal texture and freshness.
- Prep Time: 20 minutes
- Cook Time: 2 hours 30 minutes
- Category: Desserts, Snacks
- Method: Mixing
- Cuisine: American
Nutrition
- Serving Size: 16
- Calories: 290
- Sugar: 23 g
- Sodium: 110 mg
- Fat: 18 g
- Saturated Fat: 7 g
- Unsaturated Fat: 9 g
- Trans Fat: 0 g
- Carbohydrates: 30 g
- Fiber: 2 g
- Protein: 6 g
- Cholesterol: 15 mg
Jenna Stewart
Head Chef & Recipe Innovator
Expertise
Farm-to-Table Cooking; Seasonal Menu Development; Visual Plating Techniques; Flavor Layering and Simple Prep Hacks.
Education
The Culinary Institute of America, Hyde Park, NY
Jenna Stewart is the inventive spirit behind many of our standout dishes at Pro of Delicious Creations. A proud graduate of The Culinary Institute of America, she built her skills mastering both classic recipes and fresh, modern twists.
Now, Jenna celebrates the beauty of seasonal, local ingredients, often sourced from her garden and nearby markets, to create recipes that are bursting with flavor yet easy to follow. When she’s not experimenting in the kitchen, Jenna loves exploring nature on hikes and discovering new treasures at local co-ops.