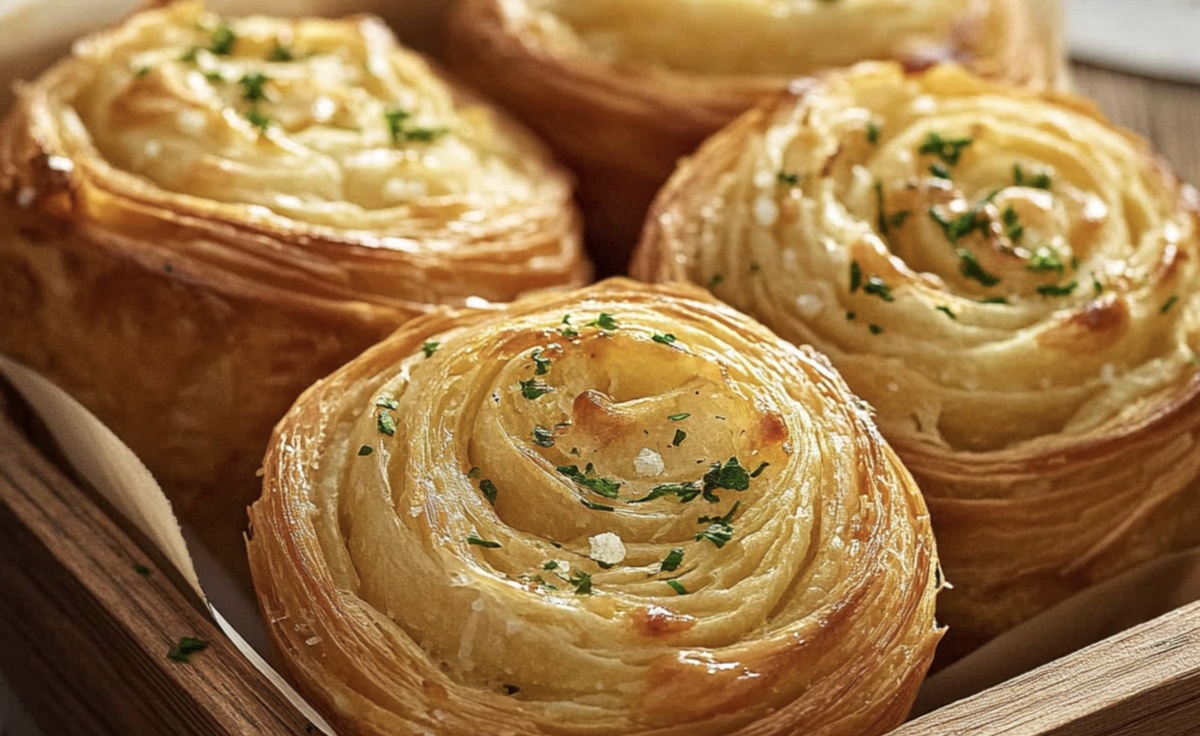
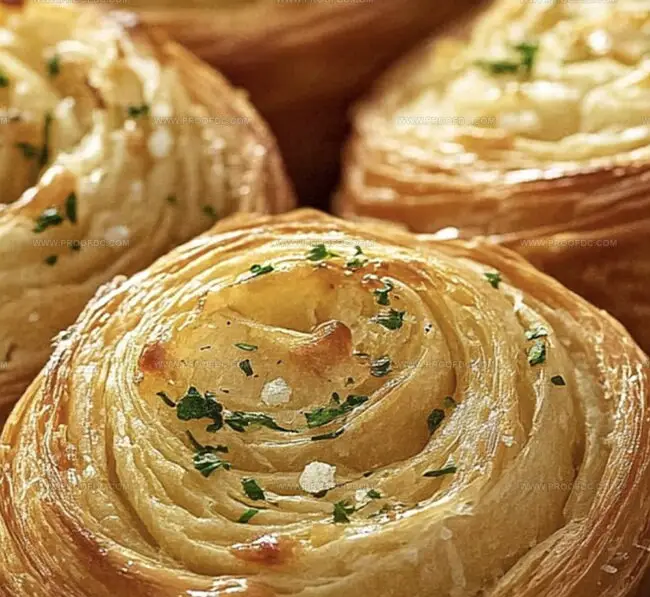
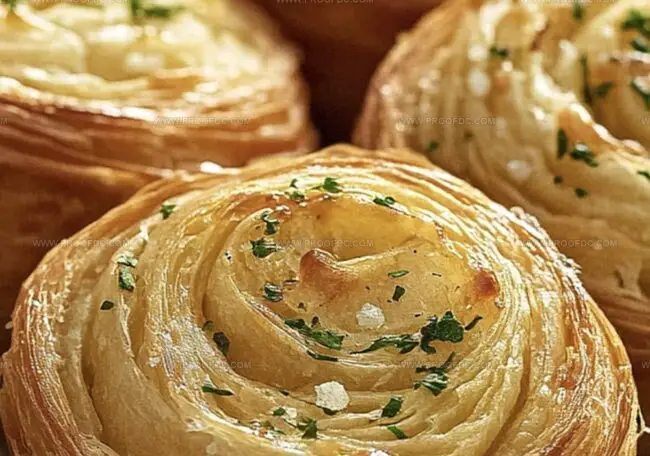
Irresistibly Gooey Cheesy Garlic Cruffin Recipe for Bread Lovers
Biting into a crispy, golden cheesy garlic cruffin that melts in your mouth with incredible flavor.
Pastry lovers will adore this innovative twist on traditional croissants and muffins.
A perfect blend of flaky layers and savory cheese creates a mouthwatering experience.
garlic adds a delightful punch that makes each bite irresistible.
Kitchen experiments like this bring excitement to your baking adventures.
We promise this recipe will become your new favorite weekend treat.
Get ready to impress everyone with these incredible pastry delights.
Why Cheesy Garlic Cruffin Is Totally Addictive
What You’ll Need for Cheesy Garlic Cruffin
Pastry Base:Flavoring and Filling:Cheese Components:Finishing Touch:Steps for Flaky Cheesy Garlic Cruffin
Step 1: Warm Up the Oven
Crank your oven to a toasty 375°F (190°C). Give your muffin tin a light coating of cooking spray or butter to prevent sticking.
Step 2: Create Magical Garlic Butter
Grab a mixing bowl and combine:Blend everything until it becomes a fragrant, smooth mixture.
Step 3: Stretch and Prepare Pastry
Dust your countertop with flour. Roll out the puff pastry into a generous rectangle. Spread the garlic butter across the surface, leaving a small border around the edges. Sprinkle generously with:Step 4: Shape Delightful Cruffin Rolls
Start rolling the pastry from the long side, creating a tight log. Slice the log into six equal pieces. Place each piece cut-side up in a muffin cup, gently pressing down to showcase those delicious layers.
Step 5: Give a Golden Touch
Whisk an egg and brush the tops of each cruffin, ensuring a beautiful golden finish.
Step 6: Bake to Perfection
Slide the muffin tin into the preheated oven. Bake for 20-25 minutes until the cruffins rise beautifully, turn golden brown, and the cheese melts into irresistible bubbles.
Step 7: Rest and Serve
Let the cruffins rest in the tin for 5 minutes. Transfer to a serving plate and dive into these cheesy, garlicky delights while they’re warm and inviting.
Kitchen Tips for Cheesy Garlic Cruffin
How to Reheat Cheesy Garlic Cruffin Easily
Tasty Combos for Cheesy Garlic Cruffin
Flavor Ideas for Cheesy Garlic Cruffin
Cheesy Garlic Cruffin FAQ Guide
Cruffins are a unique hybrid pastry that combines the flaky layers of a croissant with the shape of a muffin. They’re made with puff pastry instead of traditional muffin batter, creating a more delicate, buttery texture with multiple crispy layers.
Absolutely! Pre-minced garlic works perfectly fine. Just use the same measurement and adjust to your taste preference. Fresh garlic will give a slightly more intense flavor, but pre-minced is a convenient alternative that still delivers great taste.
Make sure to thoroughly grease your muffin tin with butter or cooking spray before placing the pastry pieces. This will help ensure easy removal and prevent any sticking after baking. If you’re extra cautious, you can also line the bottom of each cup with a small piece of parchment paper.
Yes, this cheesy garlic cruffin recipe is vegetarian-friendly. It contains no meat products, using only butter, cheese, puff pastry, and seasonings. Just ensure you’re using vegetarian-friendly cheese if that’s a specific dietary requirement for you.
Print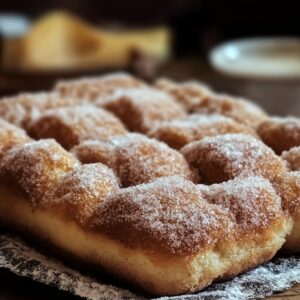
Cinnamon Sugar Donut Sweet Bread Recipe
- Total Time: 1 hour 15 minutes
- Yield: 8 1x
Description
Homemade Cinnamon Sugar Donut Sweet Bread brings warmth and comfort to kitchen counters across America. Delicate swirls of cinnamon and sugar create a delightful breakfast treat you’ll crave again and again.
Ingredients
Flour and Dairy Ingredients:
- 2 cups (250 g / 8.8 ounces) all-purpose flour
- 1 cup (240 milliliters / 8 fluid ounces) buttermilk
- 1 tablespoon vinegar or lemon juice (if making homemade buttermilk)
Leavening and Seasoning Ingredients:
- 1 teaspoon baking powder
- ½ teaspoon baking soda
- ½ teaspoon salt
- 1 teaspoon ground cinnamon (for swirl)
- 1 ½ teaspoons ground cinnamon (for topping)
Wet and Sweet Ingredients:
- ½ cup (115 g / 4 ounces) unsalted butter, softened
- 1 cup (200 g / 7 ounces) granulated sugar
- ⅓ cup (70 g / 2.5 ounces) granulated sugar (for swirl)
- ¼ cup (50 g / 1.8 ounces) granulated sugar (for topping)
- 2 large eggs
- 1 teaspoon vanilla extract
- 2 tablespoons unsalted butter, melted (for topping)
Instructions
- Prepare the oven environment by heating to 175C (350F). Create a non-stick surface in a 9×5-inch loaf pan using grease and flour or parchment paper.
- Combine dry ingredients in a medium bowl, whisking flour, leavening agents, and salt until thoroughly integrated.
- Transform butter and granulated sugar into a creamy, airy mixture using an electric mixer, continuing until the texture becomes light and voluminous.
- Incorporate eggs individually into the butter mixture, ensuring complete integration after each addition. Infuse the batter with vanilla extract, stirring gently.
- Gradually fold dry ingredients into the wet mixture, alternating with buttermilk. Maintain a gentle mixing technique to prevent overmixing, which can compromise the bread’s texture.
- Distribute initial batter layer into the prepared pan, generously scattering cinnamon sugar mixture across the surface. Repeat with remaining batter and sugar blend. Create intricate swirls using a knife, drawing delicate patterns through the batter.
- Position the pan in the preheated oven, baking for 50-60 minutes. Verify doneness by inserting a toothpick – it should emerge clean without raw batter. Allow bread to rest in the pan for 10 minutes.
- While the bread maintains warmth, delicately brush melted butter across the surface. Sprinkle a luxurious coating of cinnamon-sugar blend, ensuring even distribution.
- Allow the bread to cool completely on a wire rack, enabling it to set and develop optimal flavor. Slice and serve as a delightful accompaniment to morning beverages or an afternoon treat.
Notes
- Always use room temperature ingredients to ensure smooth blending and consistent texture in your sweet bread.
- Softened butter creates a fluffier, more tender crumb, so take it out of the refrigerator 30 minutes before baking.
- Avoid overmixing the batter to prevent a tough, dense bread – stop mixing as soon as the ingredients are just combined.
- For a gluten-free version, substitute all-purpose flour with a cup-for-cup gluten-free flour blend and add 1/2 teaspoon xanthan gum.
- Create deeper cinnamon flavor by toasting whole cinnamon sticks and grinding them fresh before mixing into the sugar topping.
- Reduce sugar content by using monk fruit sweetener or stevia for a lower-calorie alternative without compromising taste.
- Enhance moisture by adding a dollop of sour cream or Greek yogurt to the wet ingredients for an extra rich texture.
- Prep Time: 15 minutes
- Cook Time: 50-60 minutes
- Category: Breakfast, Snacks, Desserts
- Method: Baking
- Cuisine: American
Nutrition
- Serving Size: 8
- Calories: 350
- Sugar: 34 g
- Sodium: 210 mg
- Fat: 18 g
- Saturated Fat: 11 g
- Unsaturated Fat: 7 g
- Trans Fat: 0 g
- Carbohydrates: 44 g
- Fiber: 1 g
- Protein: 4 g
- Cholesterol: 70 mg
Jenna Stewart
Head Chef & Recipe Innovator
Expertise
Farm-to-Table Cooking; Seasonal Menu Development; Visual Plating Techniques; Flavor Layering and Simple Prep Hacks.
Education
The Culinary Institute of America, Hyde Park, NY
Jenna Stewart is the inventive spirit behind many of our standout dishes at Pro of Delicious Creations. A proud graduate of The Culinary Institute of America, she built her skills mastering both classic recipes and fresh, modern twists.
Now, Jenna celebrates the beauty of seasonal, local ingredients, often sourced from her garden and nearby markets, to create recipes that are bursting with flavor yet easy to follow. When she’s not experimenting in the kitchen, Jenna loves exploring nature on hikes and discovering new treasures at local co-ops.