
Candy Bubble Bliss Recipe: Sweet Magical Treats For Everyone
Sweet moments sparkle with this candy bubble bliss that dances between childhood nostalgia and playful creativity.
Crafting a treat that tingles your taste buds and brings instant joy.
Sugary bubbles emerge from simple ingredients you likely have in your kitchen right now.
Whispers of excitement build as colorful spheres take shape, promising delightful surprises.
Every bite promises a whimsical experience that connects you to pure happiness.
Magical textures and unexpected flavors await you in this enchanting confection.
Small hands and big imaginations will love creating these delectable little miracles together.
Why Candy Bubble Bliss Is A Sweet Treat Worth Sharing
What You Need To Make Candy Bubble Bliss
Main Ingredients:
Bubble Base:Coating and Decoration:Garnish:How To Whip Up Candy Bubble Bliss Fast
Step 1: Brew Sparkling Gelatin Mixture
Pour clear soda into a saucepan and warm gently over medium-low heat. Add these ingredients:Stir until everything dissolves completely and becomes a smooth, vibrant liquid.
Step 2: Shape Dreamy Bubble Spheres
Select your preferred molding technique:Chill in the refrigerator until the bubbles become firm and set.
Step 3: Craft Smooth Chocolate Coating
Melt white chocolate using these methods:Stir between heating intervals to ensure a silky, glossy finish.
Step 4: Transform Bubbles with Chocolate Magic
Gently remove gelatin bubbles from molds. Carefully dip each bubble into melted chocolate, allowing excess to drip off. Before chocolate hardens, decorate with:Step 5: Create Spectacular Presentation
Arrange chocolate-coated bubbles on a beautiful serving platter. Add whimsical finishing touches like:Enjoy your enchanting bubble candies!
Tips That Make Candy Bubble Bliss Even Better
How To Store And Reheat Candy Bubble Bliss Properly
Pairing Suggestions For Candy Bubble Bliss
Different Ways To Enjoy Candy Bubble Bliss
Common Questions About Candy Bubble Bliss
These bubbles are a creative fusion of gelatin and candy coating, creating a playful dessert that looks like transparent spheres with a sweet chocolate shell. They’re not just a treat, but an edible art experience.
Absolutely! You can use a piping bag to create bubble shapes directly on parchment paper. This method gives you flexibility in size and shape without needing specific equipment.
Use a clear soda like Sprite or 7-Up and dissolve the gelatin completely over low heat. Stir gently and avoid boiling to maintain the crystal-clear appearance of your bubbles.
Decorate immediately after coating with chocolate while it’s still wet. Sprinkles, edible glitter, or crushed candy work perfectly to add color and texture. Work quickly before the chocolate sets!
Print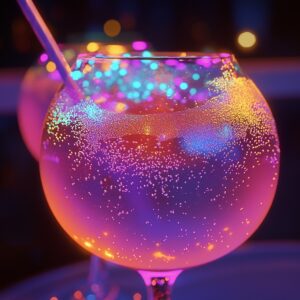
Candy Bubble Bliss Recipe
- Total Time: 1 hour 15 minutes
- Yield: 12 1x
Description
Candy bubble bliss brings childhood nostalgia with a whimsical twist of sugary sweetness. Sweet memories dance through each playful bite, inviting you to savor pure joy in delightful, colorful confections.
Ingredients
Main Ingredients:
- 1 cup (240 ml) clear soda (like Sprite or sparkling water)
- 1 envelope (7 g) unflavored gelatin
- 1 cup (200 g) white chocolate or candy melts
Sweeteners and Colorings:
- 2 tablespoons granulated sugar
- Gel food coloring (variety of colors)
Decorative Elements:
- ¼ cup (50 g) sprinkles, edible glitter, or crushed candy
- Cotton candy
- Whipped cream
- Candy pearls
Instructions
- Prepare the gelatin base by gently warming clear soda in a saucepan, careful not to let it reach a boil. Whisk in sugar and gelatin until completely integrated, creating a translucent liquid mixture.
- Divide the warm gelatin solution into separate small containers, introducing a hint of gel food coloring to each. Stir thoroughly to achieve vibrant, uniform hues.
- Select your shaping technique: either carefully pour the tinted gelatin into spherical silicone molds or use a piping bag to create delicate bubble-like droplets on parchment paper.
- Transfer the molded gelatin shapes to the refrigerator, allowing them to solidify and develop a firm, glossy texture for approximately 1-2 hours.
- While gelatin sets, prepare the chocolate coating by gradually melting white chocolate or candy melts in brief microwave intervals, stirring between each to ensure smooth consistency.
- Gently extract the chilled gelatin bubbles from their molds, handling them with care to maintain their delicate shape.
- Meticulously dip each gelatin bubble into the melted chocolate, allowing excess coating to gracefully drip away, creating an elegant shell.
- Immediately embellish the freshly coated bubbles with decorative elements like sparkling sprinkles, edible glitter, or crushed candy pieces before the chocolate solidifies.
- Artfully arrange the completed candy bubbles on a serving platter, adding whimsical garnishes such as soft cotton candy, billowy whipped cream, or iridescent candy pearls for a stunning presentation.
Notes
- Customize colors by experimenting with different gel food coloring shades for vibrant, eye-catching gelatin bubbles.
- Use silicone molds with various shapes to create unique bubble designs beyond traditional spheres.
- Work quickly when coating bubbles in chocolate to prevent gelatin from melting or losing shape.
- Prevent sticking by lightly greasing molds or parchment paper before pouring gelatin mixture.
- Achieve smoother chocolate coating by tempering white chocolate instead of microwaving, ensuring a glossy professional finish.
- Store decorated bubbles in refrigerator for up to 3 days, separating layers with parchment paper to maintain intricate decorations.
- Adapt recipe for dietary restrictions by using dairy-free chocolate alternatives or sugar-free gelatin for specialized treats.
- Enhance visual appeal by mixing edible glitter or metallic sprinkles for a glamorous, instagram-worthy dessert presentation.
- Prep Time: 15 minutes
- Cook Time: 1 hour
- Category: Desserts, Snacks
- Method: Mixing
- Cuisine: Fusion
Nutrition
- Serving Size: 12
- Calories: 60
- Sugar: 5 g
- Sodium: 0 mg
- Fat: 3 g
- Saturated Fat: 2 g
- Unsaturated Fat: 1 g
- Trans Fat: 0 g
- Carbohydrates: 8 g
- Fiber: 0 g
- Protein: 1 g
- Cholesterol: 5 mg
Jenna Stewart
Head Chef & Recipe Innovator
Expertise
Farm-to-Table Cooking; Seasonal Menu Development; Visual Plating Techniques; Flavor Layering and Simple Prep Hacks.
Education
The Culinary Institute of America, Hyde Park, NY
Jenna Stewart is the inventive spirit behind many of our standout dishes at Pro of Delicious Creations. A proud graduate of The Culinary Institute of America, she built her skills mastering both classic recipes and fresh, modern twists.
Now, Jenna celebrates the beauty of seasonal, local ingredients, often sourced from her garden and nearby markets, to create recipes that are bursting with flavor yet easy to follow. When she’s not experimenting in the kitchen, Jenna loves exploring nature on hikes and discovering new treasures at local co-ops.