
Gooey Butterfinger Caramel Crunch Mini Pies Recipe for Sweet Lovers
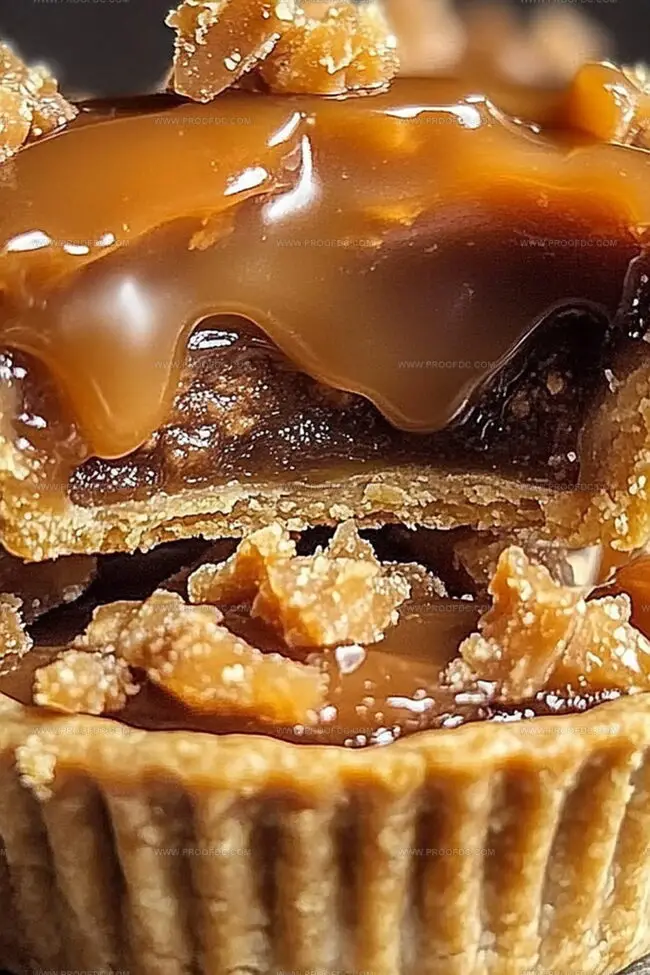
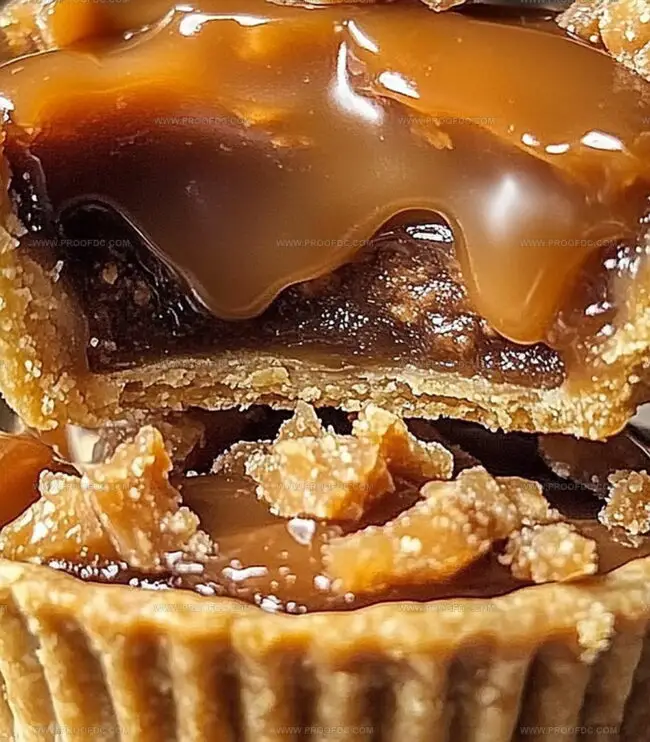
Sinking your teeth into a decadent butterfinger caramel crunch mini pies that combines sweet, crunchy, and creamy textures in one irresistible bite.
Candy lovers will go crazy for these miniature desserts packed with nostalgic flavor.
Each tiny pie brings an explosion of caramel and chocolate-peanut butter goodness that feels like a celebration.
The crisp butterfinger pieces create a delightful contrast against smooth, silky caramel layers.
Small enough to enjoy without guilt yet intense enough to satisfy serious dessert cravings, these mini pies are perfect for any gathering.
No complicated techniques or rare ingredients stand between you and these crowd-pleasing treats.
Grab a fork and get ready to experience pure indulgence in one magical, compact dessert.
Why You’ll Enjoy Butterfinger Caramel Crunch Mini Pies
What Goes Into Butterfinger Caramel Crunch Mini Pies
Crust Base:Filling Components:Topping and Garnish:Steps To Make Butterfinger Caramel Crunch Mini Pies

Step 1: Craft the Crunchy Crust
Warm up your oven to a toasty 350F (175C). Grab a mixing bowl and toss in:Blend everything until the mixture looks like damp beach sand. Gently press this golden mixture into lined muffin tins or mini tart pans, making sure to cover the bottom and sides completely. Pop these into the oven and bake until they turn a light golden brown, about 8-10 minutes. Let them cool down completely – patience is key!
Step 2: Whip Up the Dreamy Filling
In a medium bowl, create magic by whisking together:Fold in some fluffy whipped cream until the mixture becomes light and cloud-like. The goal is a silky-smooth filling that’ll make taste buds dance.
Step 3: Build Your Mini Pie Masterpiece
Take your cooled crusts and lovingly spoon the caramel mixture into each one. Smooth the tops with the back of a spoon for that perfect finish. Now for the fun part – shower each mini pie with crushed Butterfinger pieces. Don’t be shy – more is definitely more!
Step 4: Chill and Embellish
Slide these beauties into the refrigerator for at least 2 hours. This helps the filling set and intensifies all those delicious flavors. When you’re ready to serve, drizzle some extra caramel sauce on top and add a dollop of whipped cream if you’re feeling extra indulgent.
Smart Tips For Butterfinger Caramel Crunch Mini Pies
How To Keep Butterfinger Caramel Crunch Mini Pies Fresh
Pair Butterfinger Caramel Crunch Mini Pies With These
Fun Ways To Tweak Butterfinger Caramel Crunch Mini Pies
Your Butterfinger Caramel Crunch Mini Pies Questions Answered
Absolutely! Crushed Heath bars, Snickers, or even chocolate-covered toffee bits work great as alternatives for adding crunch and flavor to these mini pies.
A standard 12-cup muffin tin or mini tart pans will do the trick. Just make sure to use cupcake liners for easy removal and a clean presentation.
Bake the crust completely before adding the filling and make sure it’s cooled entirely. This helps create a crisp base that stays crunchy even after adding the creamy caramel filling.
Yes! Kids can help crush the Butterfinger candy, mix the crust ingredients, and sprinkle toppings. Just supervise them during the oven and mixing steps.
Print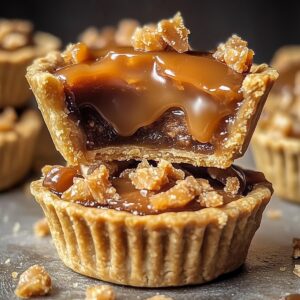
Butterfinger Caramel Crunch Mini Pies Recipe
- Total Time: 2 hours 30 minutes
- Yield: 8 1x
Description
Butterfinger caramel crunch mini pies combine indulgent chocolate, crunchy candy, and silky caramel in a perfect handheld dessert. Chocolate lovers will savor these irresistible mini treats that blend sweet and salty flavors for an unforgettable bite.
Ingredients
Main Ingredients:
- 1 ½ cups (150 g) graham cracker crumbs
- 1 can (14 ounces/397 grams) sweetened condensed milk
- 1 cup (about 6) Butterfinger candy bars
- ½ cup (115 g) unsalted butter
- ½ cup (120 milliliters/4 fluid ounces) caramel sauce
Sweetening and Seasoning Ingredients:
- ¼ cup (50 g) granulated sugar
- ¼ teaspoon salt
Dairy and Cream Ingredients:
- ½ cup (125 milliliters/4.2 fluid ounces) heavy whipping cream
- ¼ cup (60 milliliters/2 fluid ounces) caramel sauce (for drizzling)
- Whipped cream (optional)
Instructions
- Craft graham cracker crusts by pulverizing crackers with sugar and melted butter into a sandy consistency. Press the mixture decisively into muffin liners, creating a uniform base with slightly raised edges.
- Bake the crusts in a preheated oven until the edges turn golden and crisp, approximately 8-10 minutes. Allow the shells to cool completely, ensuring a sturdy foundation for the filling.
- Whisk sweetened condensed milk with caramel sauce and a pinch of salt until the mixture achieves a silky, luxurious texture. Gently incorporate whipped cream, folding delicately to maintain an airy, light consistency.
- Carefully spoon the caramel cream into each cooled crust, filling them almost to the brim. Use a spatula to create smooth, even surfaces.
- Crush Butterfinger candy bars into fine, delectable fragments. Liberally scatter the crumbs across the top of each mini pie, ensuring complete coverage.
- Refrigerate the mini pies for a minimum of two hours, allowing the filling to set and flavors to meld together. The chilling process will transform the dessert into a perfectly structured treat.
- Prior to serving, embellish with an elegant drizzle of additional caramel sauce and an optional dollop of whipped cream for extra indulgence.
Notes
- Customize the graham cracker crust by substituting with gluten-free cookies for a celiac-friendly version.
- Crush Butterfinger bars finely to ensure even distribution and consistent texture across each mini pie.
- Prevent soggy crusts by allowing the baked crust to cool completely before adding the caramel filling.
- Enhance the filling’s stability by chilling the whipped cream and folding gently to maintain its airy structure.
- Prep Time: 20 minutes
- Cook Time: 10 minutes
- Category: Desserts, Snacks
- Method: Baking
- Cuisine: American
Nutrition
- Serving Size: 8
- Calories: 330
- Sugar: 25 g
- Sodium: 150 mg
- Fat: 18 g
- Saturated Fat: 10 g
- Unsaturated Fat: 8 g
- Trans Fat: 0 g
- Carbohydrates: 36 g
- Fiber: 1 g
- Protein: 3 g
- Cholesterol: 40 mg
Jenna Stewart
Head Chef & Recipe Innovator
Expertise
Farm-to-Table Cooking; Seasonal Menu Development; Visual Plating Techniques; Flavor Layering and Simple Prep Hacks.
Education
The Culinary Institute of America, Hyde Park, NY
Jenna Stewart is the inventive spirit behind many of our standout dishes at Pro of Delicious Creations. A proud graduate of The Culinary Institute of America, she built her skills mastering both classic recipes and fresh, modern twists.
Now, Jenna celebrates the beauty of seasonal, local ingredients, often sourced from her garden and nearby markets, to create recipes that are bursting with flavor yet easy to follow. When she’s not experimenting in the kitchen, Jenna loves exploring nature on hikes and discovering new treasures at local co-ops.