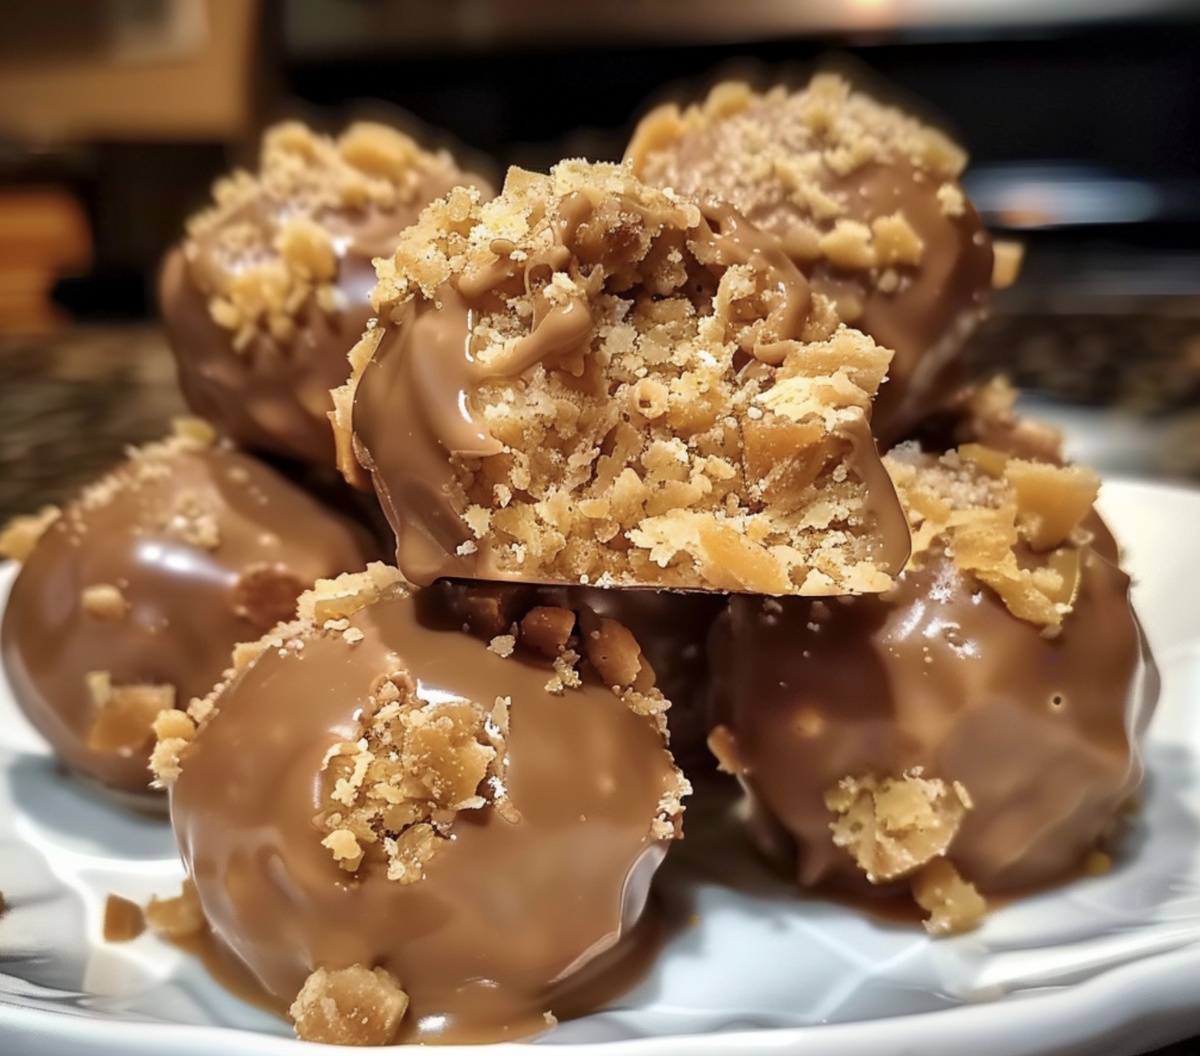
Irresistibly Crispy Butterfinger Balls Recipe for Sweet Treats
Crafting delectable Butterfinger balls can turn an ordinary afternoon into a sweet adventure.
These irresistible treats combine creamy textures with crunchy candy bits that dance across your palate.
Surprising friends with a nostalgic dessert that sparks childhood memories.
Chocolate and peanut butter form a classic partnership in this simple yet indulgent recipe.
Professional bakers and kitchen novices alike can master these delightful confections without stress.
Each bite promises a perfect balance of smooth chocolate and signature Butterfinger crunch.
You’ll want to savor every moment of creating these mouthwatering spheres of happiness.
Let’s make something magical that will have everyone asking for seconds.
Why You’ll Love Butterfinger Balls
What You Need for Butterfinger Balls
Base Ingredients:Coating Ingredients:Optional Garnish:Notes: .
How to Make Butterfinger Balls at Home
Step 1: Whip Up Creamy Confection Base
Grab a spacious mixing bowl and blend:Mix until silky and uniform. Gradually introduce powdered sugar, stirring consistently. Crumble Butterfinger candy bars and fold gently into the mixture.
Step 2: Shape Delightful Spheres
Using clean hands, roll the mixture into bite-sized rounds. Each ball should be about the size of a golf ball. Arrange these tasty globes on a parchment-lined baking sheet. Slide the tray into the freezer for a quick 25-minute chill to help them firm up.
Step 3: Transform Chocolate Into Liquid Gold
Select a microwave-safe container for chocolate melting. Combine chocolate chips with a touch of coconut oil. Microwave in short 20-second bursts, stirring between each interval. Continue until the chocolate transforms into a luxurious, glossy pool.
Step 4: Dunk and Coat
Extract the chilled balls from the freezer. Using a fork or specialized dipping tool, carefully submerge each sphere into the molten chocolate. Ensure complete coverage, allowing excess chocolate to drip off. Return the chocolate-enrobed treats to the parchment sheet.
Step 5: Let Magic Happen
Allow the Butterfinger bombs to rest at room temperature or accelerate setting in the refrigerator. Wait approximately 30 minutes until the chocolate shell becomes completely solid and glossy.
Step 6: Indulge and Celebrate
Your Butterfinger Treasure Bombs are ready! Serve and watch faces light up with pure delight. Store any leftovers in an airtight container in the refrigerator.
Top Tips for Better Butterfinger Balls

How to Keep Butterfinger Balls Tasting Great
What Goes With Butterfinger Balls
Try These Butterfinger Balls Variations
Butterfinger Balls FAQs You Should Know
Absolutely! Chocolate bars like Crunch or Heath bars work great and will give a similar crunchy texture to your Butterfinger Balls.
No special tools required! Just a mixing bowl, baking sheet, and fork or dipping tool will do the trick. Most home cooks already have these kitchen basics.
Yes! Kids can help roll the peanut butter mixture into balls and watch the chocolate coating process. It’s a fun, simple recipe that’s great for family baking time.
They’re quite sweet due to the powdered sugar and candy bars. If you prefer less sweetness, you can reduce the powdered sugar slightly or use dark chocolate for coating.
Print
Butterfinger Balls Recipe
- Total Time: 45 minutes
- Yield: 12 1x
Description
Indulgent Butterfinger Balls blend creamy peanut butter with crispy candy bar pieces, creating a heavenly no-bake dessert. Sweet chocolate coating and crushed butterfinger crumbs make these treats irresistible for chocolate and peanut butter enthusiasts.
Ingredients
Main Ingredients:
- 1 cup (240g) creamy peanut butter
- ½ cup (115g) unsalted butter, softened
- 3 cups (360g) powdered sugar
- 1 ½ cups (about 10 ounces / 283g) crushed Butterfinger candy bars
Coating Ingredients:
- 12 ounces (340g) chocolate chips (milk, semi-sweet, or dark)
- 1 tablespoon coconut oil or vegetable shortening (optional, for smooth coating)
Instructions
- Prepare the creamy base by whisking peanut butter and softened butter together in a spacious mixing bowl until silky and uniform in texture.
- Gradually incorporate powdered sugar, stirring consistently to create a smooth, cohesive mixture without lumps.
- Crush Butterfinger candy bars into fine, delicate crumbs and fold them gently into the peanut butter blend, ensuring even distribution of the sweet, crunchy fragments.
- Shape the mixture into petite, uniform spheres approximately one inch in diameter, carefully rolling between palms to achieve a perfect round form.
- Arrange the delicate orbs on a parchment-lined tray, ensuring they are not touching each other.
- Transfer the tray to the freezer, allowing the balls to firm up and solidify for approximately 25 minutes, which will help maintain their shape during chocolate coating.
- Melt chocolate chips with a touch of coconut oil in a microwave-safe vessel, pausing and stirring at short intervals to prevent scorching and achieve a glossy, smooth consistency.
- Delicately immerse each chilled ball into the molten chocolate, using a fork to ensure complete, elegant coverage and gentle removal of excess chocolate.
- Return chocolate-enrobed balls to the parchment-lined tray, maintaining spacing between each confection.
- Allow the chocolate to set and crystallize at room temperature or expedite the process by placing in the refrigerator, waiting until the coating becomes completely firm and glossy.
Notes
- Chill the mixture thoroughly before rolling to prevent sticky hands and ensure uniform ball shape.
- Crush Butterfinger bars finely for a more consistent texture and even distribution throughout the mixture.
- Use high-quality chocolate with a higher cocoa percentage for a richer, more sophisticated coating that balances the sweetness.
- Create dietary variations by substituting ingredients: use almond butter for a nutty twist, swap regular sugar with powdered monk fruit sweetener for low-carb option, or use dairy-free chocolate for vegan-friendly treats.
- Prep Time: 15 minutes
- Cook Time: 30 minutes
- Category: Desserts, Snacks
- Method: Mixing
- Cuisine: American
Nutrition
- Serving Size: 12
- Calories: 297
- Sugar: 22 g
- Sodium: 72 mg
- Fat: 19 g
- Saturated Fat: 10 g
- Unsaturated Fat: 9 g
- Trans Fat: 0 g
- Carbohydrates: 30 g
- Fiber: 1 g
- Protein: 4 g
- Cholesterol: 24 mg
Jenna Stewart
Head Chef & Recipe Innovator
Expertise
Farm-to-Table Cooking; Seasonal Menu Development; Visual Plating Techniques; Flavor Layering and Simple Prep Hacks.
Education
The Culinary Institute of America, Hyde Park, NY
Jenna Stewart is the inventive spirit behind many of our standout dishes at Pro of Delicious Creations. A proud graduate of The Culinary Institute of America, she built her skills mastering both classic recipes and fresh, modern twists.
Now, Jenna celebrates the beauty of seasonal, local ingredients, often sourced from her garden and nearby markets, to create recipes that are bursting with flavor yet easy to follow. When she’s not experimenting in the kitchen, Jenna loves exploring nature on hikes and discovering new treasures at local co-ops.